Scratch 2.0 Offline Editor v439.3
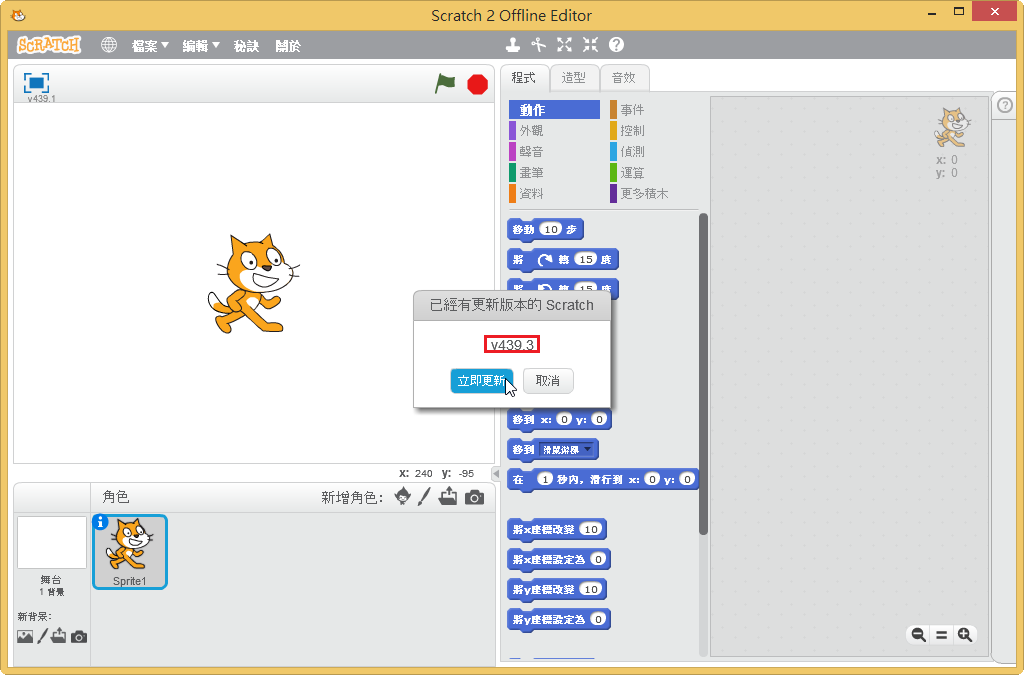
下載網址:https://scratch.mit.edu/scratch2download/
Windows 版本
Mac 版本
Linux 版本

全新的繁體中文 WordPress 網站《宜蘭部落格教育平台 網站》
Scratch 2.0 Offline Editor v439.3
下載網址:https://scratch.mit.edu/scratch2download/
Windows 版本
Mac 版本
Linux 版本
原本行政網路和班級網路都是在同一台 IBM Lenovo Server 的 NAT 下,一直想要把二個網段分開,覺得系統會比較好管理及安全,暑假期間,終於下定決心,找了一台同型號的 IBM Lenovo Server,安裝並設定好系統後,就一直放在機櫃裡,沒有把行政及班級網路分開,不過今天早上收到 Nagios 的警告信
遠端連進去 Server 後,發現好像有一顆硬碟故障了,還好平時都有做設定檔的備份,換了一顆硬碟,重新安裝系統,修改完設定檔後,就可以正常上線了,也順便把行政網路和班級網路做分家了,但二台 Server 也保持備援的狀態,如果有一台掛點,只要換一下網路線,就可以正常連線了。
心想,應該不會同時壞二台,不過這一個暑假,Server 的硬碟已經壞 6 顆了!
在設定 GRUB 時,vga 參數可以設定螢幕的解析度,不過不是用一般所習慣使用的,640*480/800*600…,而是使用 vga=7xx 來代表,比較沒有那麼直覺。
參考網站:VGA Resolution Codes for GRUB & Lilo – LinuxQuestions.org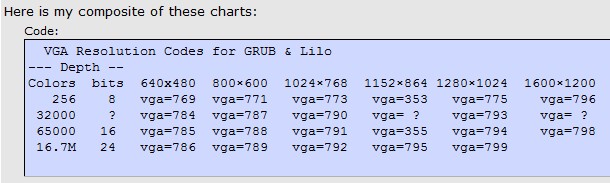
vga=788 800*600 / 65000 Colors / 16 bits
vga=791 1024*768 / 65000 Colors / 16 bits
NAS Server:192.168.1.5
Arch Linux Server:192.168.1.12
@ Arch Linux Server
1. 安裝 autofs 套件
# pacman -S autofs
2. 修改設定檔 /etc/autofs/auto.master
# vim /etc/autofs/auto.master
在最後一行加入
/mnt/nasnfs /etc/autofs/auto.nfs
3. 新增 /etc/autofs/auto.nfs 設定檔
# vim /etc/autofs/auto.nfs
nds -rw,soft,intr,rsize=8192,wsize=8192,nfsvers=4 192.168.1.5:/volume1/homes/t850008/Server/nds
[@more@]
4. 設定開機時啟動 autofs 服務
# systemctl enable autofs
Created symlink from /etc/systemd/system/multi-user.target.wants/autofs.service to /usr/lib/systemd/system/autofs.service.
5. 啟動 autofs 服務
# systemctl start autofs
6. 安裝 rpcbind nfs-utils 套件
# pacman -S rpcbind nfs-utils
7. 開機時啟動 rpcbind 服務
# systemctl enable rpcbind
Created symlink from /etc/systemd/system/sockets.target.wants/rpcbind.socket to /usr/lib/systemd/system/rpcbind.socket.
8. 啟動 rpcbind 服務
# systemctl start rpcbind
9. 開啟防火牆讓 Arch Linux Server 可以連線到 NAS 的 NFS Server,預設情況是有限制對外連線
# iptables -P OUTPUT DROP
# iptables -A OUTPUT -o eth0 -p tcp -d 192.168.1.5 -m multiport –dport 111,892,2049 –syn -m state –state NEW -j ACCEPT
# iptables -A OUTPUT -m state –state ESTABLISHED,RELATED -j ACCEPT
10. 切換到 /mnt/nasnfs/nds 目錄,如果可以正常切換到該目錄,代表上面的設定成功
# cd /mnt/nasnfs/nds
11. 將要備份的設定檔及資料寫入到 Script,並放入工作排程
例:
# cat /usr/local/bin/backuptonas
!/bin/bash
# 備份帳號密檔
cp /etc/passwd /mnt/nasnfs/nds/set/passwd_`date +%F`
cp /etc/shadow /mnt/nasnfs/nds/set/shadow_`date +%F`
cp /etc/group /mnt/nasnfs/nds/set/group_`date +%F`
cp /etc/gshadow /mnt/nasnfs/nds/set/gshadow_`date +%F`
# mirror 網頁資料
# /mnt/nasnfs/nds/html 目錄要先建好
/usr/bin/mirrordir /var/www/html /mnt/nasnfs/nds/html
12. 更改檔案屬性
# chmod +x /usr/local/bin/backuptonas
13. 加入工作排程,每天早上 3 時備份
# echo “0 3 * * * /usr/local/bin/backuptonas” >> /var/spool/cron/root
參考網頁:解決 smbd 錯誤訊息 Unable to connect to CUPS server localhost:631 – Connection refused | Mr. 沙先生
在看系統 log 檔時,發現 Samba Server 出現如下的錯誤訊息
Aug 31 12:42:54 localhost smbd[30235]: Unable to connect to CUPS server localhost:631 – 連線被拒絕
Aug 31 12:42:54 localhost smbd[30226]: [2015/08/31 12:42:54.544213, 0] printing/print_cups.c:528(cups_async_callback)
Aug 31 12:42:54 localhost smbd[30226]: failed to retrieve printer list: NT_STATUS_UNSUCCESSFUL
可能的原因是,Samba Server 安裝預設會啟用 Printer Server,但這一台 Samba Server 只負責檔案儲存及分享使用,並沒有擔任 Printer Server 的工作,所以要把 Samba Server 設定檔中關於 Printer Server 的設定關閉。[@more@]1. 修改 /etc/samba/smb.conf
# vim /etc/samba/smb.conf
原本
; load printers = yes
; printing = cups
改成
load printers = no
printing = bsd
2. 重新啟動 Samba Server
# service smb restart
在 Debian / Ubuntu 安裝套件時,突然出現下面的訊息
dpkg: unrecoverable fatal error, aborting:
files list file for package ‘libgpgme11:armhf’ is missing final newline
E: Sub-process /usr/bin/dpkg returned an error code (2)
在網路上搜尋了一下,發現好像是位於 /var/lib/dpkg/info 目錄下的檔案有問題
檔案內容變成是亂碼
# cat /var/lib/dpkg/info/libgpgme11:armhf.list
[@more@]解決方式:
1. 下載 deb 檔 libgpgme11
# apt-get –download-only install libgpgme11
2. 列出 deb 檔內容
# dpkg -c /var/cache/apt/archives/libgpgme11_1.4.3-0.1ubuntu5_armhf.deb | awk ‘{print $6}’
./
./usr/
./usr/lib/
./usr/lib/arm-linux-gnueabihf/
./usr/lib/arm-linux-gnueabihf/libgpgme-pthread.so.11.11.0
./usr/lib/arm-linux-gnueabihf/libgpgme.so.11.11.0
./usr/share/
./usr/share/doc/
./usr/share/doc/libgpgme11/
./usr/share/doc/libgpgme11/changelog.Debian.gz
./usr/share/doc/libgpgme11/copyright
./usr/lib/arm-linux-gnueabihf/libgpgme.so.11
./usr/lib/arm-linux-gnueabihf/libgpgme-pthread.so.11
3. 將列表輸出至 /var/lib/dpkg/info/ 目錄之下
# dpkg -c /var/cache/apt/archives/libgpgme11_1.4.3-0.1ubuntu5_armhf.deb | awk ‘{print $6}’ > /var/lib/dpkg/info/libgpgme11:armhf.list
4. 修改成所須要的格式
# sed -i ‘1s|/|/.|’ /var/lib/dpkg/info/libgpgme11:armhf.list
# sed -i ‘s/^.//’ /var/lib/dpkg/info/libgpgme11:armhf.list
5. 正常的格式
# cat /var/lib/dpkg/info/libgpgme11:armhf.list
/.
/usr/
/usr/lib/
/usr/lib/arm-linux-gnueabihf/
/usr/lib/arm-linux-gnueabihf/libgpgme-pthread.so.11.11.0
/usr/lib/arm-linux-gnueabihf/libgpgme.so.11.11.0
/usr/share/
/usr/share/doc/
/usr/share/doc/libgpgme11/
/usr/share/doc/libgpgme11/changelog.Debian.gz
/usr/share/doc/libgpgme11/copyright
/usr/lib/arm-linux-gnueabihf/libgpgme.so.11
/usr/lib/arm-linux-gnueabihf/libgpgme-pthread.so.11