因為在電腦教室常常會利用 Clonezilla / DRBL Live 來備份及還原電腦,雖然已經將 Clonezilla / DRBL Live 利用 grub4dos,製作成開機隨身碟,但隨身碟也不是都會放在身上,最好的方式就是直接放在本機上,所以利用 Linux 本身的 GRUB2 掛載 ISO 檔來啟動 Clonezilla / DRBL Live。
參考網站:
Grub2 設定以 Linux LiveCD 的 ISO 檔啟動系統 – 石頭閒語 – 樂多日誌
1. 首先下載 Clonezilla / DRBL Live(有時最新版本不一定能正確執行),這裡是放置在第一顆硬碟的第一個分割區的 /home/test 目錄
$ wget http://jaist.dl.sourceforge.net/project/clonezilla/clonezilla_live_alternative/20150217-utopic/clonezilla-live-20150217-utopic-i386.iso -P /home/test
$ wget http://downloads.sourceforge.net/project/drbl/drbl_live_stable/2.3.1-6/drbl-live-xfce-2.3.1-6-i686-pae.iso -P /home/test[@more@]2. 修改設定檔 /etc/grub.d/40_custom
$ sudo vim /etc/grub.d/40_custom
加入下面選項
insmod loopback
menuentry “CloneZilla live 20150217-utopic” {
set isofile=”/home/test/clonezilla-live-20150217-utopic-i386.iso”
loopback loop (hd0,1)$isofile
linux (loop)/live/vmlinuz boot=live config locales=”zh_TW.UTF-8″ keyboard-layouts=”NONE” noswap noprompt nosplash vga=788 ip=frommedia findiso=$isofile
initrd (loop)/live/initrd.img
}
menuentry “DRBL live XFCE 2.3.1-6-i686-pae” {
set isofile=”/home/test/drbl-live-xfce-2.3.1-6-i686-pae.iso”
loopback loop (hd0,1)$isofile
linux (loop)/live/vmlinuz boot=live username=user config quiet nomdoeset locales=”zh_TW.UTF-8″ keyboard-layouts=”NONE” noswap noprompt nosplash vga=791 ip=frommedia findiso=$isofile
initrd (loop)/live/initrd.img
}
3. 修改 /etc/default/grub
把 GRUB_HIDDEN_TIMEOUT 和 GRUB_HIDDEN_TIMEOUT_QUIET 這二行前面加上 # 註解
$ cp /etc/default/grub ~/grub.default
$ sudo sed -i ‘s/^GRUB_HIDDEN_TIMEOUT/#GRUB_HIDDEN_TIMEOUT/’ /etc/default/grub
$ sudo sed -i ‘s/^GRUB_HIDDEN_TIMEOUT_QUIET/#GRUB_HIDDEN_TIMEOUT_QUIET/’ /etc/default/grub
4. 更新 GRUB2
$ sudo update-grub
正在產生 grub 設定檔 …
找到 linux 映像檔:/boot/vmlinuz-3.13.0-32-generic
找到 initrd 映像檔:/boot/initrd.img-3.13.0-32-generic
找到 linux 映像檔:/boot/vmlinuz-3.13.0-24-generic
找到 initrd 映像檔:/boot/initrd.img-3.13.0-24-generic
Found memtest86+ image: /boot/memtest86+.elf
Found memtest86+ image: /boot/memtest86+.bin
完成
$ sudo update-grub2
正在產生 grub 設定檔 …
找到 linux 映像檔:/boot/vmlinuz-3.13.0-32-generic
找到 initrd 映像檔:/boot/initrd.img-3.13.0-32-generic
找到 linux 映像檔:/boot/vmlinuz-3.13.0-24-generic
找到 initrd 映像檔:/boot/initrd.img-3.13.0-24-generic
Found memtest86+ image: /boot/memtest86+.elf
Found memtest86+ image: /boot/memtest86+.bin
完成
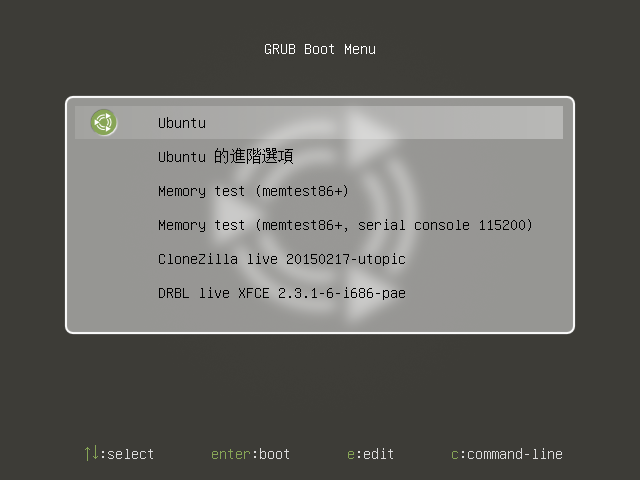
5. Ubuntu 開機出現的功能表
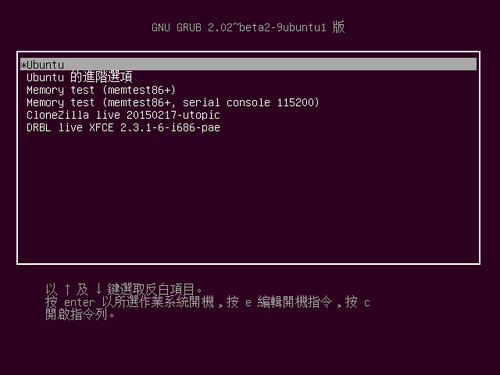
Ubuntu MATE 開機出現的功能表

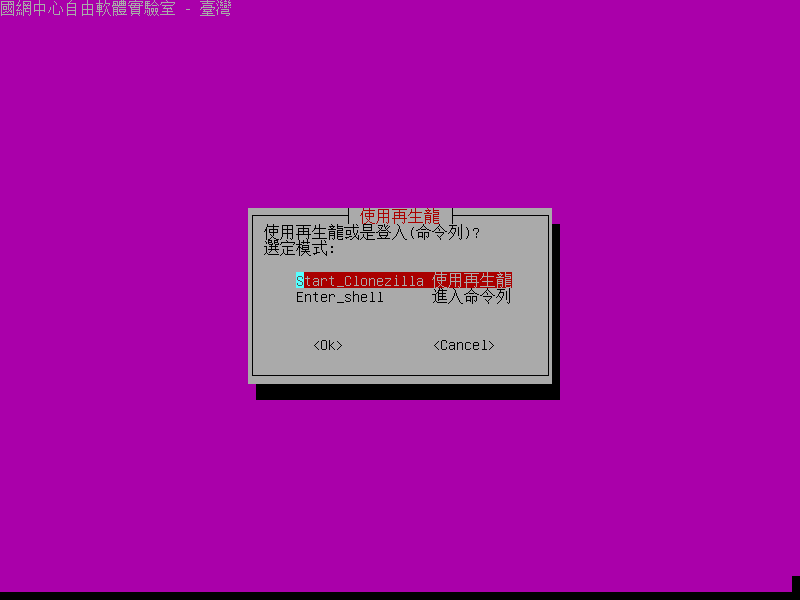
6. Clonezilla 開機

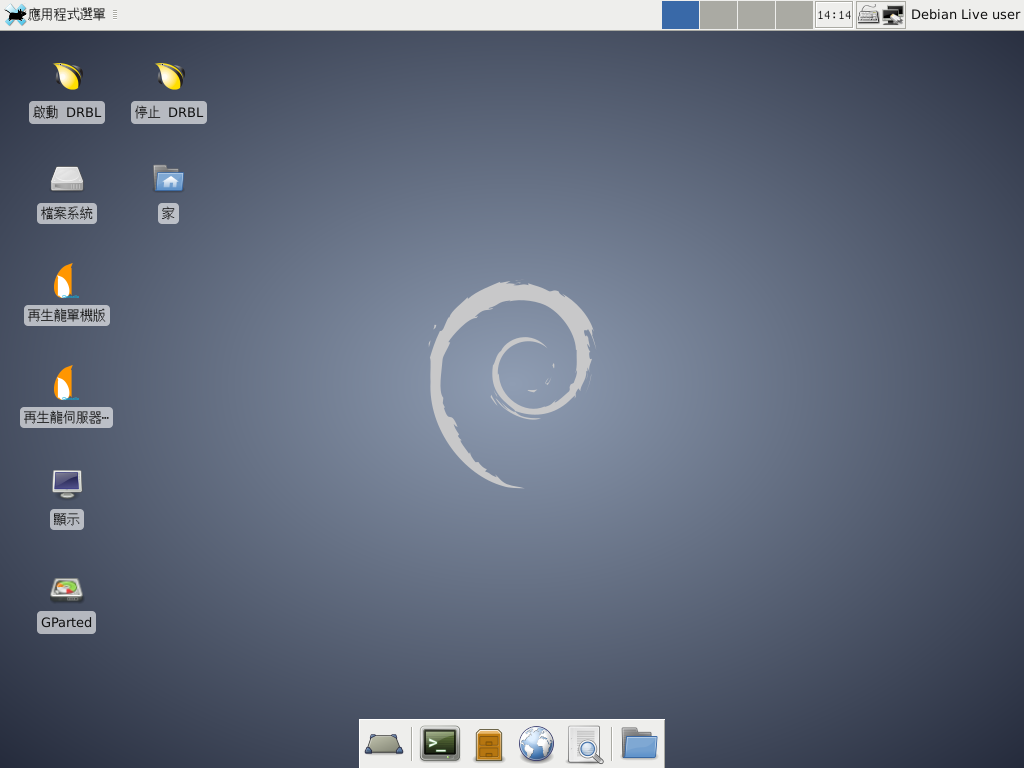
7. DRBL Live 開機


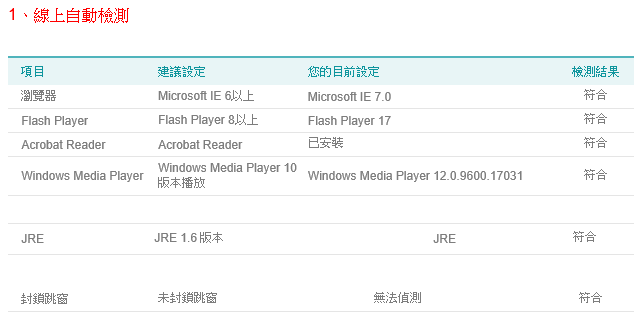
 [@more@]但線上檢測環境是沒有問題的