Wake-on-LAN Client on Linux

關於 Wake-on-LAN 網路喚醒的介紹,可以參考:網路喚醒 – 維基百科,自由的百科全書

在 Ubuntu 14.04 LTS Server 上安裝
$ sudo apt-get install wakeonlan

在 CentOS 6.x 上安裝
# yum install wol –enablerepo=epel

# yum install net-tools[@more@]使用方式:
在 Ubuntu 14.04 LTS Server
$ sudo wakeonlan 00:11:22:33:44:55

在 CentOS 6.x
# wol 00:11:22:33:44:55

# ether-wake -i eth1 00:11:22:33:44:55

試用 VMware photon Linux 1.0TP1

VMware 釋出 photon Linux 1.0TP1,TP1 就是 Technical Preview 技術預覽版,更詳細的訊息可以參考:
Container太夯了!VMware也推出Linux作業系統 | iThome

光碟開機畫面,
[@more@]2. 軟體授權,選擇 Accept

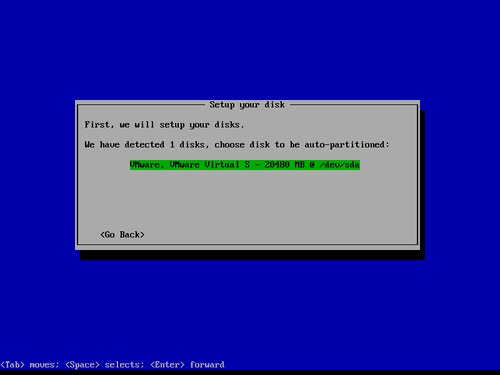
3. 安裝硬碟

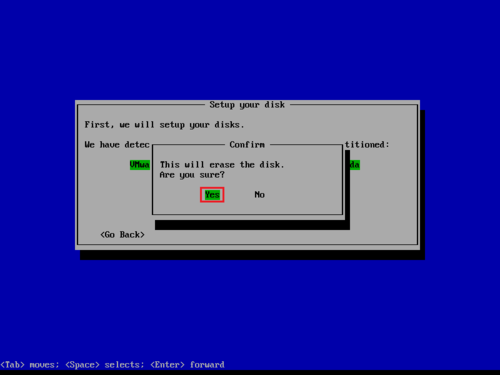
4. 選擇 Yes 確認

5. 安裝類型,這裡選擇 Photon Full OS (All)

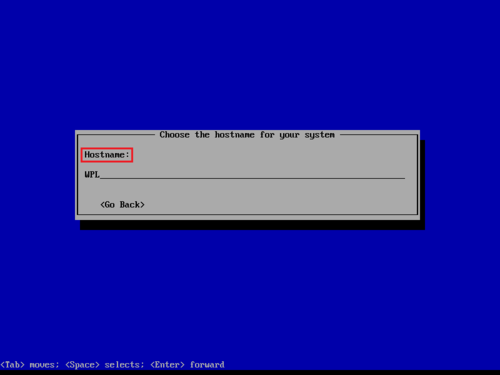
6. 主機名稱設定

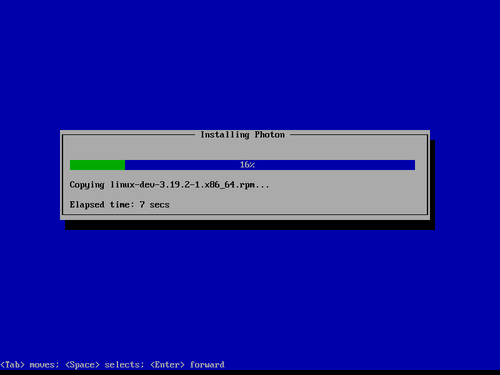
7. 安裝過程

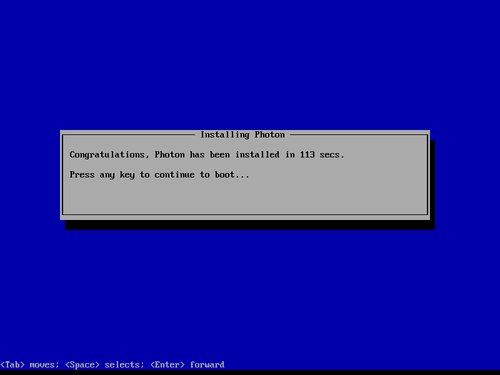
8. 安裝完成

9. 登入

# cat /etc/lsb-release
DISTRIB_ID=VMware Photon
DISTRIB_RELEASE=1.0 TP1
DISTRIB_CODENAME=Photon
DISTRIB_DESCRIPTION=VMware Photon 1.0 TP1

使用的感覺:
1. base on RedHat / CentOS,使用 yum / rpm
2. 似乎用來和 VMware 的產品配合的,缺少常用的套件
# yum search vsftp
Warning: No matches found for: vsftp
No Matches found
3. 執行 yum update 會出現錯誤訊息
# yum update
file:///media/cdrom/usr/src/photon/RPMS/repodata/repomd.xml: [Errno 14] curl#37 – “Couldn’t open file /media/cdrom/usr/src/photon/RPMS/repodata/repomd.xml”
Trying other mirror.
Setting up Update Process
No Packages marked for Update

解決方式:
# mkdir /mnt/photon
# mount -o loop photon-1.0TP1.iso /mnt/photon
mount: /dev/loop0 is write-protected, mounting read-only
# sed -i ‘s/media/cdrom/mnt/photon/’ /etc/yum.repos.d/photon-iso.repo
# yum update

# sed -i ‘s/enabled=1/enabled=0/’ /etc/yum.repos.d/photon-iso.repo
# yum update

MaraDNS 輕量級 DNS Server 設定 – authoritative DNS server

參考網頁:How to install the fast and lightweight DNS Server MaraDNS on CentOS 7
                  MaraDNS tutorial
                  http://maradns.samiam.org/tutorial/man.csv2.html
建置 authoritative DNS server
1. 修改 /etc/mararc 設定檔
# egrep -v ‘^#|^$’ /etc/mararc
# 設定 MaraDNS 為 authoritative DNS server
csv2 = {}
# 管理的網域
csv2[“example.net.”] = “db.example.net”
# MaraDNS Server IP
ipv4_bind_addresses = “127.0.0.1”
# 設定檔的位置
chroot_dir = “/etc/maradns”[@more@]2. 建立網域設定檔 /etc/maradns/db.example.net
# cat /etc/maradns/db.example.net
example.net.      +14400    soa    ns1.example.net. dns@example.net. 2012010117 14400 3600 604800 14400 ~
example.net.      +14400    ns     ns1.example.net. ~
example.net.      +14400    ns     ns2.example.net. ~
ns1.example.net.  +14400    a      127.0.0.1 ~
ns2.example.net.  +14400    a      127.0.0.1 ~
example.net.      +14400    a      127.0.0.1 ~
www.example.net.  +14400    a      127.0.0.1 ~
example.net.      +14400    mx     10 mail.example.net. ~
mail.example.net. +14400    a      127.0.0.1 ~
ftp.% +14400    a      192.168.1.2 ~
2.1.168.192.in-addr.arpa. ptr ftp.% ~
ftp.%   AAAA    fd4d:6172:6144:4e53:ffe::f ~
disk.% +14400    a      192.168.1.3 ~
nas.% +14400    cname      disk.% ~
3.1.168.192.in-addr.arpa. ptr disk.example.net. ~

3. 重新啟動 MaraDNS Server
# systemctl restart maradns

4. 進行測試
# host ftp.example.net 127.0.0.1
Using domain server:
Name: 127.0.0.1
Address: 127.0.0.1#53
Aliases:

ftp.example.net has address 192.168.1.2
ftp.example.net has IPv6 address fd4d:6172:6144:4e53:ffe::f

# host nas.example.net 127.0.0.1
Using domain server:
Name: 127.0.0.1
Address: 127.0.0.1#53
Aliases:

nas.example.net is an alias for disk.example.net.
disk.example.net has address 192.168.1.3

# host 192.168.1.3 127.0.0.1
Using domain server:
Name: 127.0.0.1
Address: 127.0.0.1#53
Aliases:

3.1.168.192.in-addr.arpa domain name pointer disk.example.net.

# host 192.168.1.2 127.0.0.1
Using domain server:
Name: 127.0.0.1
Address: 127.0.0.1#53
Aliases:

2.1.168.192.in-addr.arpa domain name pointer ftp.example.net.

MaraDNS 輕量級 DNS Server 安裝

MaraDNS 是一套 OpenSource 開放源碼、輕量級、容易設定且跨平台的 DNS Server,由 Sam Trenholme 所開發。
MaraDNS 官方網站:http://maradns.samiam.org/index.html
目前最新的版本是 2.0.11 版,2015.1.19 釋出。

底下是安裝的方式:
1. 使用 rpm 安裝
官方網站上有提供 for CentOS 6.x 版的 rpm 可以下載
CentOS 6.x 下載:http://maradns.samiam.org/download/2.0/2.0.11/rpmlist.html
下載:
# wget http://maradns.samiam.org/download/2.0/2.0.11/maradns-2.0.11-1.i686.rpm
進行安裝
# rpm -ivh maradns-2.0.11-1.i686.rpm[@more@]CentOS 7.x 的部份,因為官方網站上的 rpm 是 for CentOS 6.x,所以要重新編譯後才能使用
這裡是我重新編譯過的程式:從 此處 下載
# wget https://2blog.ilc.edu.tw/wp-content/uploads/sites/985/25793/25793-3010188.rpm -O /root/maradns-2.0.11-1.x86_64.rpm
安裝:
# rpm -ivh /root/maradns-2.0.11-1.x86_64.rpm

2. 使用 tar.gz 原始碼安裝
安裝 gcc 編譯程式
# yum install gcc
下載 MaraDNS 原始碼
# wget http://maradns.samiam.org/download/2.0/2.0.11/maradns-2.0.11.tar.bz2
解壓縮
# tar xvjf maradns-2.0.11.tar.bz2
進行編譯及安裝
# cd maradns-2.0.1
# make;make install

3. 啟動 maradns
CentOS 6.x
# chkconfig –level 35 maradns on
# service maradns start
CentOS 7.x
# chkconfig –level 35 maradns on
# systemctl start maradns

IP 和 Mac address 排序

手上有一份 IP 和 Mac address 的對照表
# cat ipmac.txt
192.168.1.112 00:0c:29:ac:47:64
192.168.1.254 50:67:f0:19:cf:a4
192.168.1.2 ac:22:0b:50:49:ea
192.168.1.5 00:1d:7d:d5:2f:d3
192.168.1.100 00:11:32:0c:da:e2
192.168.1.101 28:cf:e9:80:0c:76

想要以 IP 排序由小到大,但一直都無法試驗成功
# sort -n ipmac.txt
192.168.1.100 00:11:32:0c:da:e2
192.168.1.101 28:cf:e9:80:0c:76
192.168.1.112 00:0c:29:ac:47:64
192.168.1.254 50:67:f0:19:cf:a4
192.168.1.2 ac:22:0b:50:49:ea
192.168.1.5 00:1d:7d:d5:2f:d3[@more@]後來利用 sed 來處理就 OK 了!
想法:
1. 先去除 IP 前面的 192.168.1.
    以下三種方式都可以
# cat ipmac.txt | sed -n ‘/192.168.1./s/192.168.1.//p’
# cat ipmac.txt | sed ‘s/^……….//’
# cat ipmac.txt | sed ‘s/^.{10}//’
112 00:0c:29:ac:47:64
254 50:67:f0:19:cf:a4
2 ac:22:0b:50:49:ea
5 00:1d:7d:d5:2f:d3
100 00:11:32:0c:da:e2
101 28:cf:e9:80:0c:76

2. 以 sort 排序
# cat ipmac.txt | sed ‘s/^.{10}//’ | sort -n
2 ac:22:0b:50:49:ea
5 00:1d:7d:d5:2f:d3
100 00:11:32:0c:da:e2
101 28:cf:e9:80:0c:76
112 00:0c:29:ac:47:64
254 50:67:f0:19:cf:a4

3. 排序完成之後,再將 192.168.1. 加回
# cat ipmac.txt | sed ‘s/^.{10}//’ | sort -n | sed ‘s/^/192.168.1./’
192.168.1.2 ac:22:0b:50:49:ea
192.168.1.5 00:1d:7d:d5:2f:d3
192.168.1.100 00:11:32:0c:da:e2
192.168.1.101 28:cf:e9:80:0c:76
192.168.1.112 00:0c:29:ac:47:64
192.168.1.254 50:67:f0:19:cf:a4

終於可以了,自己胡亂試了一下,如果大家有更好的方式,歡迎告知!

利用 arp-scan 來查詢區域網路的 IP 和 Mac address

在 Ubuntu 14.04 LTS Server 上安裝 arp-scan 工具
# apt-get install arp-scan

在 CentOS 6.x 上安裝
# yum install arp-scan –enablerepo=epel

利用 arp-scan 進行偵測
# arp-scan –localnet
Interface: eth0, datalink type: EN10MB (Ethernet)
Starting arp-scan 1.8.1 with 256 hosts (http://www.nta-monitor.com/tools/arp-scan/)
192.168.1.2     ac:22:0b:50:49:ea       (Unknown)
192.168.1.5     00:1d:7d:c5:2f:d3       GIGA-BYTE TECHNOLOGY CO.,LTD.
192.168.1.100   00:11:23:0c:da:e2       Synology Incorporated
192.168.1.101   28:cf:e9:80:0c:76       (Unknown)
192.168.1.112   00:0c:29:ac:47:64       VMware, Inc.
192.168.1.254   50:67:fa:19:cf:a4       ZyXEL Communications Corporation

9 packets received by filter, 0 packets dropped by kernel
Ending arp-scan 1.8.1: 256 hosts scanned in 2.316 seconds (110.54 hosts/sec). 7 responded[@more@]利用 sed / egrep 來過濾一些不要的資料,和使用 awk 來取得所要的資料
# arp-scan –localnet | sed -n ‘/Starting/,/^$/p’ | egrep -v ‘(Starting|^$)’ | awk ‘{print $1,$2}’
192.168.1.2 ac:22:0b:50:49:ea
192.168.1.5 00:1d:7d:c5:2f:d3
192.168.1.100 00:11:23:0c:da:e2
192.168.1.101 28:cf:e9:80:0c:76
192.168.1.112 00:0c:29:ac:47:64
192.168.1.254 50:67:fa:19:cf:a4

Windows 版本的 putty 工具程式

如果不習慣在 Linux 下操作 putty-tools 工具,也可以使用 Windows 的版本。

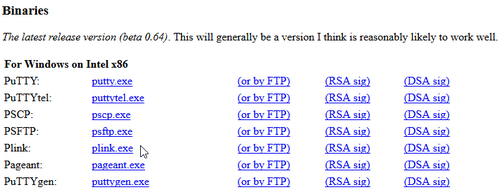
下載網頁:http://www.chiark.greenend.org.uk/~sgtatham/putty/download.html[@more@]這裡我只下載 PSCP 和 Plink 這二個程式
使用的參數應該與 Linux 版本相同

1. 連線到遠端的 Windows 主機
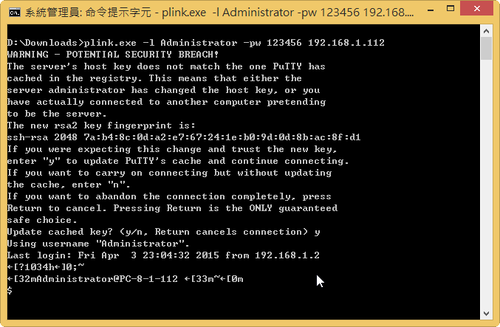
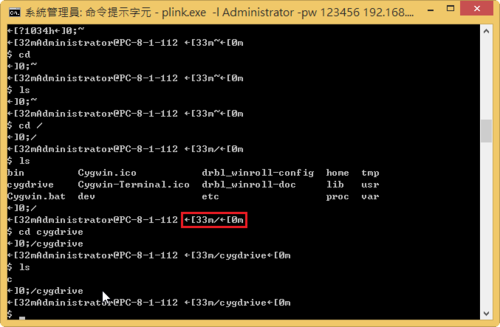
d:>plink.exe -l Administrator -pw 123456 192.168.1.112

2. 關閉遠端 Windows 主機
d:>echo y | plink.exe -l Administrator -pw 123456 192.168.1.112 “shutdown -s -t 0”

3. 遠端 Windows 主機重新啟動
d:>echo y | plink.exe -l Administrator -pw 123456 192.168.1.112 “shutdown -r -t 0”

4. 自動安裝遠端 Windows 主機 Administrator 使用者桌面上的 PotPlayer
d:>echo y | plink -pw 123456 Administrator@192.168.1.112 “/cygdrive/c/Users/Administrator/Desktop/PotPlayerSetup64.exe /S”

5. 複製檔案到遠端 Windows 主機 Administrator 使用者桌面上
d:>echo -y | pscp -pw 123456  PotPlayerSetup64.exe Administrator@192.168.1.112:/cygdrive/c/Users/Administrator/Desktop

不過使用 plink 連線到遠端 Windows 主機時,會有一些奇怪的控制碼顯示在上面,雖然不影響連線,但看起來總是有些礙眼