
因為不須要使用到這一項功能,所以把它取消
修改方式:
1. 備份原檔
$ sudo cp /etc/lightdm/lightdm.conf /etc/lightdm/lightdm.conf.$(date +%F)
2. 修改設定檔 /etc/lightdm/lightdm.conf
$ sudo sed -i ‘$aallow-guest=false’ /etc/lightdm/lightdm.conf
3. 重新啟動 lightdm
$ sudo restart lightdm
ChomeOS – elementary OS Linux 安裝 Scratch 1.4
elementary OS Linux 中已經一個叫做 Scratch 的應用程式
不過是一個文字編輯器,套件庫中沒有 Scrarch 的套件
$ sudo dpkg -l | grep scratch
ii scratch-text-editor 2.0.2.1~r1234-0+pkg53~ubuntu12.04.1 text editor written in Vala[@more@]
下載 Scratch 1.4 for Debian / Ubuntu 版本
下載網頁:http://scratch.mit.edu/scratch_1.4/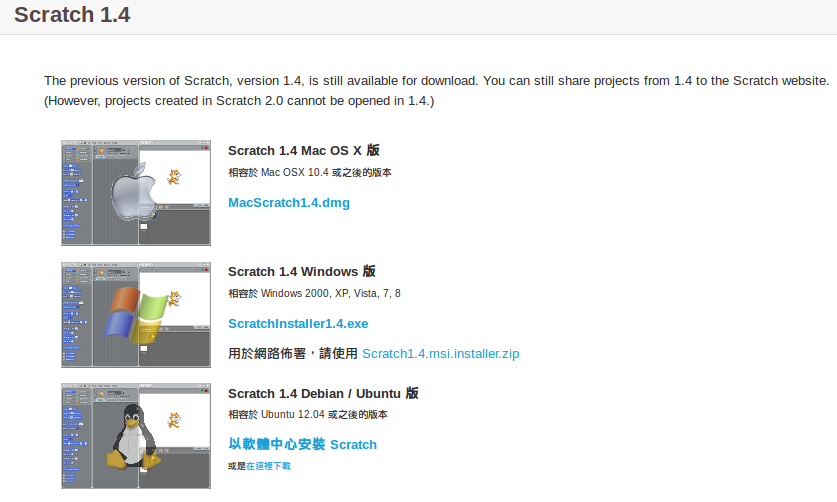
不過網頁中的連結無法下載,出現 404 錯誤
改採手動下載
$ wget http://mirrors.kernel.org/ubuntu/pool/universe/s/scratch/scratch_1.4.0.6~dfsg1-5~ubuntu12.04.1_all.deb -P ~/Downloads
先安裝須要的套件
$ sudo apt-get install squeak-plugins-scratch squeak-vm
進行安裝
$ sudo dpkg -i ~/Downloads/scratch_1.4.0.6~dfsg1-5~ubuntu12.04.1_all.deb
畫面中會有二個 Scratch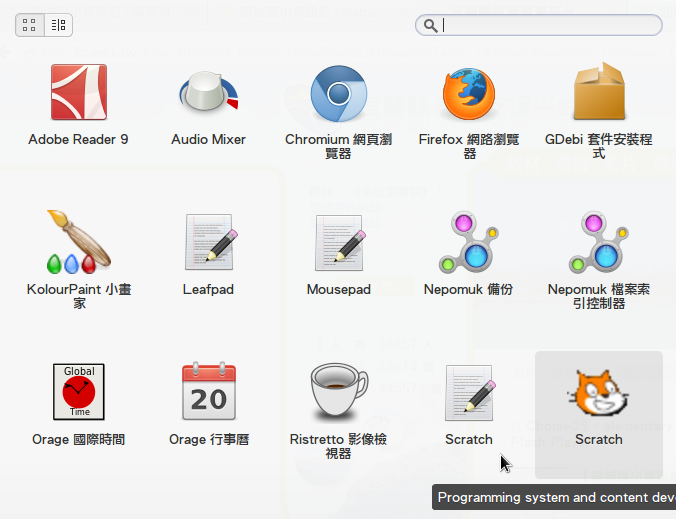
執行 Scratch 1.4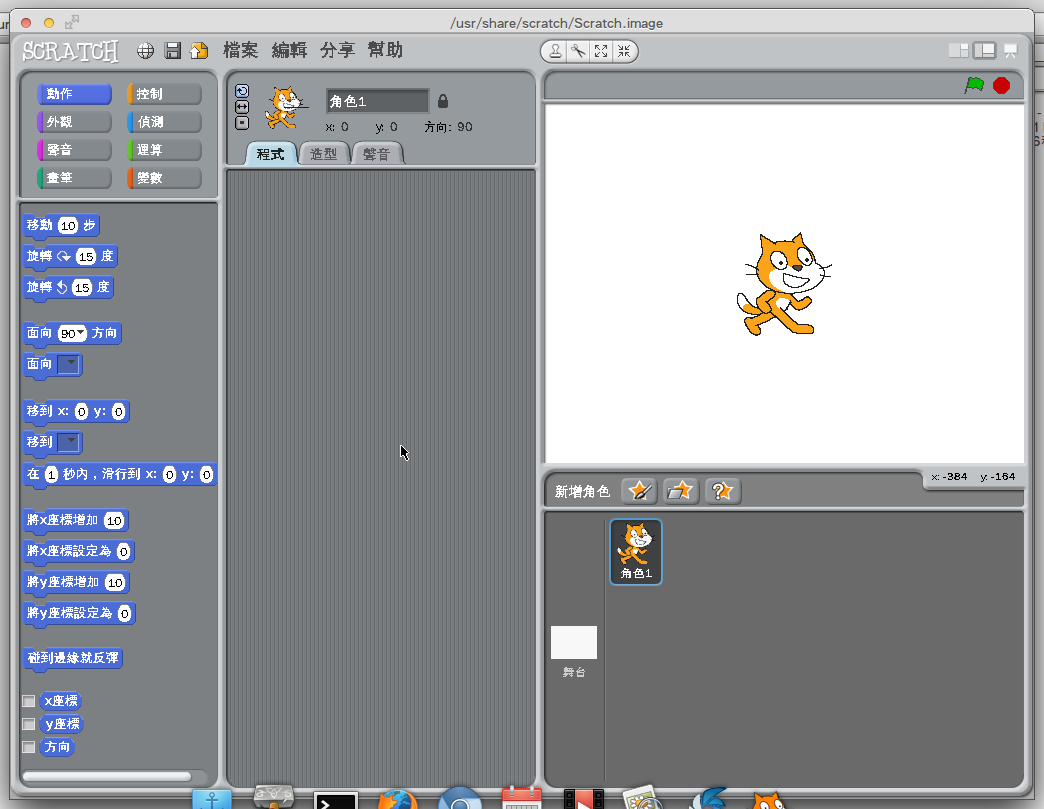
ChomeOS – elementary OS Linux Chromium 安裝 Flash Player
1. 首先到 Google Chrome 的官方網站下載相對應的版本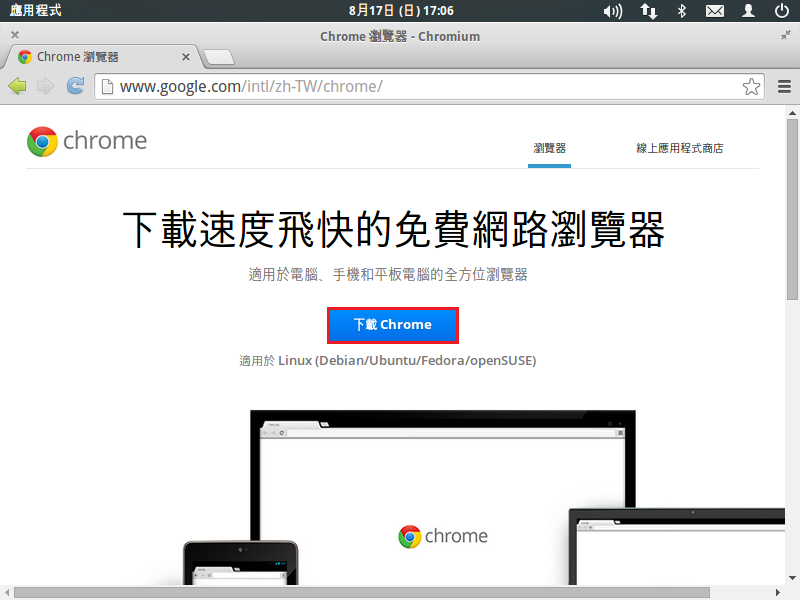
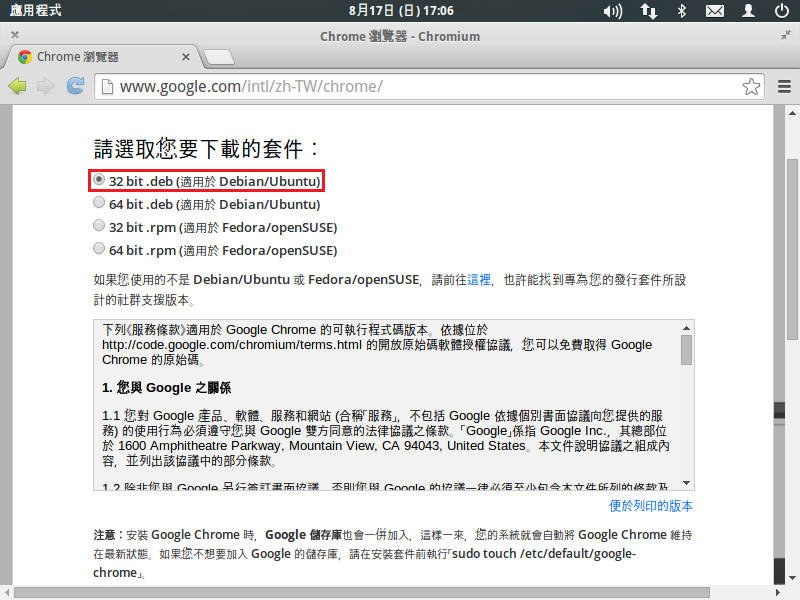 [@more@]
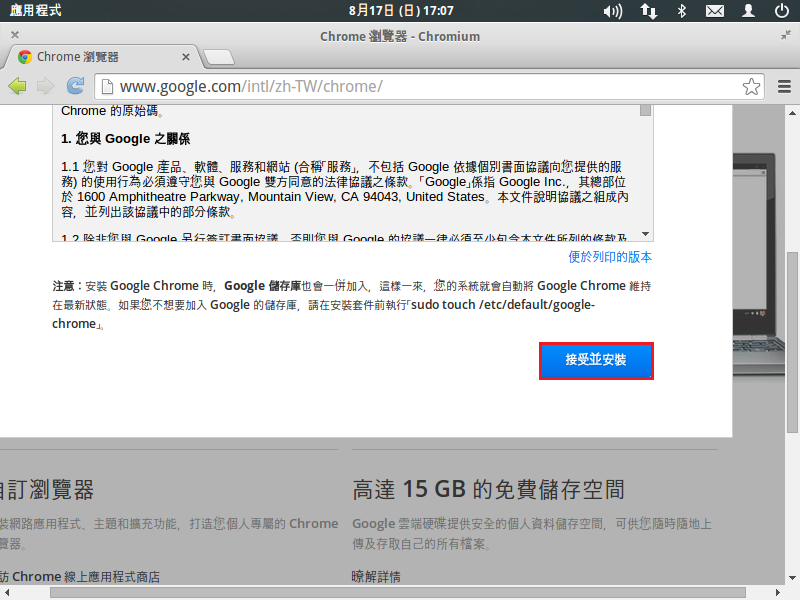
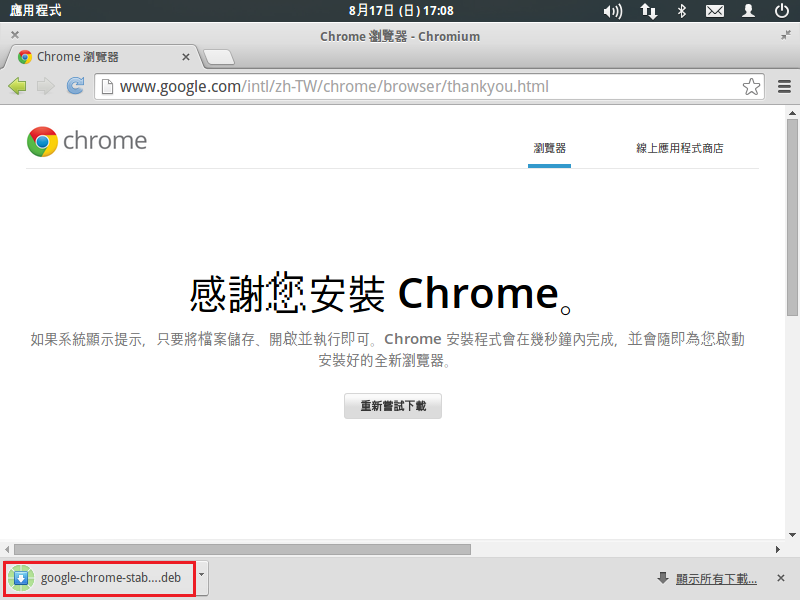
或直接下載
$ wget https://dl.google.com/linux/direct/google-chrome-stable_current_i386.deb -P ~/Downloads
2. 建立目錄並切換目錄
$ mkdir ~/Download/chrome
$ cd ~/Downloads/chrome
3. 搬移檔案至 chrome
$ cp ~/Downloads/google-chrome-stable_current_i386.deb .
4. 解開檔案
$ ar -x google-chrome-stable_current_i386.deb
$ tar xvJf data.tar.lzm
5. 複製檔案到 /usr/lib/chromium-browser/plugins
$ sudo cp opt/google/chrome/PepperFlash/libpepflashplayer.so /usr/lib/chromium-browser/plugins
6. 修改設定檔 /etc/chromium-browser/default
把
CHROMIUM_FLAGS=””
改成
CHROMIUM_FLAGS=” –ppapi-flash-path=/usr/lib/chromium-browser/plugins/libpepflashplayer.so”
$ sudo sed -i ‘s/CHROMIUM_FLAGS=””/CHROMIUM_FLAGS=” –ppapi-flash-path=/usr/lib/chromium-browser/plugins/libpepflashplayer.so”/’ /etc/chromium-browser/default
Acer Chromebox – 安裝 Elementary OS 後調校
1. 建立中文化環境的設定
備份原檔
$ sudo cp /var/lib/locales/supported.d/local /var/lib/locales/supported.d/local.$(date +%F)
加入 zh_TW.UTF-8
$ sudo sed -i ‘$azh_TW.UTF-8 UTF-8’ /var/lib/locales/supported.d/local
產生中文化環境設定
$ sudo locale-gen zh_TW.UTF-8
Generating locales…
zh_TW.UTF-8… done
Generation complete.
$ sudo update-locale LANG=zh_TW.UTF-8
$ sudo update-locale LANGUAGE=zh_TW.UTF-8
安裝中文字形及語系
$ sudo apt-get install ttf-wqy-microhei ttf-wqy-zenhei xfonts-wqy fonts-droid poppler-data cmap-adobe-cns1 fonts-arphic-uming ttf-arphic-ukai
$ sudo apt-get install language-pack-zh-hant language-pack-gnome-zh-hant language-pack-zh-hant-base language-pack-gnome-zh-hant-base
安裝中文輸入法
$ sudo apt-get remove –purge ibus ibus-chewing ibus-gtk ibus-gtk3 ibus-pinyin ibus-pinyin-db-android ibus-pinyin-db-open-phrase ibus-table ibus-table-cangjie ibus-table-cangjie-big ibus-table-cangjie3 ibus-table-cangjie5 libibus-1.0-0 python-ibus pinyin-database libchewing3 libchewing3-data
$ sudo apt-get autoremove
$ sudo apt-get install gcin[@more@]2. 安裝常用程式
安裝 gnome-termainal 終端機程式
$ sudo apt-get install gnome-terminal
安裝 gnome-screenshot 擷圖程式
$ sudo apt-get install gnome-screenshot
安裝 eog 看圖程式
$ sudo apt-get install eog
安裝文字編輯器 vim/nano/leafpad
$ sudo apt-get install vim nano leafpad
安裝所須的套件
$ sudo apt-get install mlocate dnsutils zip unzip rar unrar p7zip p7zip-full p7zip-rar xarchiver openssh-client
安裝 Firefox
$ sudo apt-get install firefox firefox-locale-zh-hant
安裝 Firefox Flash Player Plugin
$ sudo apt-get install flashplugin-installer
安裝 Chromium Browser
$ sudo apt-get install chromium-browser chromium-browser-l10n chromium-codecs-ffmpeg-extra
加入 add-apt-repository 指令
$ sudo apt-get install software-properties-common python-software-properties
安裝 LibreOffice
$ sudo apt-get install libreoffice libreoffice-help-zh-tw libreoffice-l10n-zh-tw openclipart-libreoffice openclipart-png
3. 加入新的套件庫
$ sudo add-apt-repository -y ppa:elementary-os/stable
更新套件庫
$ sudo apt-get update
安裝套件
$ sudo apt-get install elementary-desktop
$ sudo apt-get install gtk2-engines-pixbuf
4. 修改 /usr/bin/startelementary
$ sudo cp /usr/bin/startxfce4 /usr/bin/startelementary
$ sudo vim /usr/bin/startelementary
把倒數第二行由
exec $prog /etc/xdg/xfce4/xinitrc $CLIENTRC $SERVERRC
改成
exec $prog /usr/bin/xinit_pantheon
建立 /usr/bin/xinit_pantheon
$ sudo vim /usr/bin/xinit_pantheon
#!/bin/sh
/usr/sbin/lightdm-session “gnome-session –session=pantheon”
更改執行權限及擁有者
$ sudo chmod +x /usr/bin/xinit_pantheon
$ sudo chown root:root /usr/bin/xinit_pantheon
5. 登出後進入 ChromeOS Shell
把 /media/removable/sdcard/bin/startxfce4 複製成 /media/removable/sdcard/bin/startelementary
$ sudo cp /media/removable/sdcard/bin/startxfce4 /media/removable/sdcard/bin/startelementary
修改 /media/removable/sdcard/bin/startelementary
把最後一行的
exec startxfce4
改成
exec startxelementary
$ sudo sed -i ‘s/startxfce4/startelementary/’ /media/removable/sdcard/bin/startelementary
產生新的啟動檔
$ cp ~/startxfce4 ~/startelementary
修改 ~/startelementary
把最後一行的
/media/removable/sdcard/bin/startxfce4
改成
/media/removable/sdcard/bin/startelementary
$ sed -i ‘s/startxfce4/startelementary/’ ~/startelementary
6. 執行
$ sudo sh ~/startelementary
Elementary OS 桌面環境
安裝 xserver-xorg-lts-raring 提升效能
$ sudo apt-get install xserver-xorg-lts-raring
選擇 OK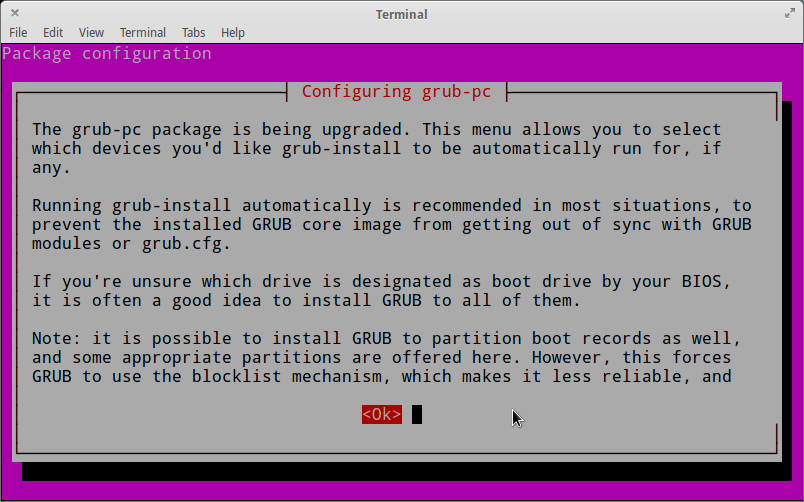
安裝 elementary-tweaks
$ sudo add-apt-repository ppa:versable/elementary-update
$ sudo apt-get update
$ sudo apt-get install elementary-tweaks
網站上建議可以移除的套件
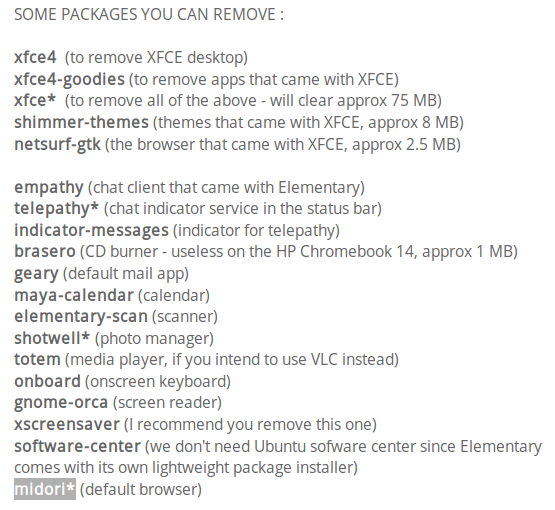
我移除的套件,保留 xfce
$ sudo apt-get remove –purge shimmer-themes netsurf-gtk empathy telepathy* indicator-messages brasero geary elementary-scan onboard gnome-orca software-center midori*
清除更徹底一些
$ sudo apt-get autoremove
安裝一些美化的套件
Elementary Interface Themes
$ sudo apt-get install elementary-blue-theme elementary-colors-theme elementary-champagne-theme elementary-lion-theme elementary-milk-theme elementary-dark-theme elementary-harvey-theme elementary-whit-e-theme elementary-plastico-theme
Elementary PLANK (taskbar)
$ sudo apt-get install elementary-plank-themes elementary-plank-extra
Elementary WING PANEL (to customize the top bar)
$ sudo apt-get install super-wingpanel
Elementary Icon Packs
$ sudo apt-get install elementary-elfaenza-icons elementary-emod-icons elementary-enumix-utouch-icons elementary-nitrux-icons elementary-taprevival-icons elementary-thirdparty-icons
Acer Chromebox 安裝 Elementary OS(chrubuntu) 後的一些調整
參考網站:
How to Install Elementary OS Luna (linux) on an HP Chromebook 14 – Reality Equation
1. 升級系統核心,因為目前系統的核心比較舊,所以進行升級
$ uname -r
3.2.0-75-generic-pae
到網站上下載新的核心 Index of /~kernel-ppa/mainline
因為我是使用 x86 的版本,所以下載 i386 的版本
$ wget http://kernel.ubuntu.com/~kernel-ppa/mainline/v3.14.1-trusty/linux-image-3.14.1-031401-generic_3.14.1-031401.201404141220_i386.deb -P ~/Downloads
$ wget http://kernel.ubuntu.com/~kernel-ppa/mainline/v3.14.1-trusty/linux-headers-3.14.1-031401_3.14.1-031401.201404141220_all.deb -P ~/Downloads
$ wget http://kernel.ubuntu.com/~kernel-ppa/mainline/v3.14.1-trusty/linux-headers-3.14.1-031401-generic_3.14.1-031401.201404141220_i386.deb -P ~/Downloads
2. 進行升級
$ sudo dpkg -i ~/Downloads/linux*
3. 系統重新開機
$ sync;sync;sync;sync;shutdown -r now
升級後核心版本
$ uname -r
3.14.1-031401-generic
[@more@]4. 進行 xserver-xorg 升級
$ sudo apt-get install xserver-xorg-lts-raring
5. 修正一些問題
在 /etc/pm/sleep.d/ 下建立 05_Sound
# sudo vim /etc/pm/sleep.d/05_Sound
#!/bin/sh
# File: “/etc/pm/sleep.d/05_Sound”.
case “${1}” in
hibernate|suspend)
# Unbind ehci for preventing error
echo -n “0000:00:1d.0” | tee /sys/bus/pci/drivers/ehci-pci/unbind
# Unbind snd_hda_intel for sound
echo -n “0000:00:1b.0” | tee /sys/bus/pci/drivers/snd_hda_intel/unbind
echo -n “0000:00:03.0” | tee /sys/bus/pci/drivers/snd_hda_intel/unbind
;;
resume|thaw)
# Bind ehci for preventing error
echo -n “0000:00:1d.0” | tee /sys/bus/pci/drivers/ehci-pci/bind
# Bind snd_hda_intel for sound
echo -n “0000:00:1b.0” | tee /sys/bus/pci/drivers/snd_hda_intel/bind
echo -n “0000:00:03.0” | tee /sys/bus/pci/drivers/snd_hda_intel/bind
;;
esac
6. 更改檔案權限
$ sudo chmod +x /etc/pm/sleep.d/05_Sound
7. 在 /etc/rc.local 增加下列幾行
$ sudo vim /etc/rc.localecho EHCI > /proc/acpi/wakeup
echo HDEF > /proc/acpi/wakeup
echo XHCI > /proc/acpi/wakeup
echo LID0 > /proc/acpi/wakeup
echo TPAD > /proc/acpi/wakeup
echo TSCR > /proc/acpi/wakeup
echo 300 > /sys/class/backlight/intel_backlight/brightness
rfkill block bluetooth
/etc/init.d/bluetooth stop
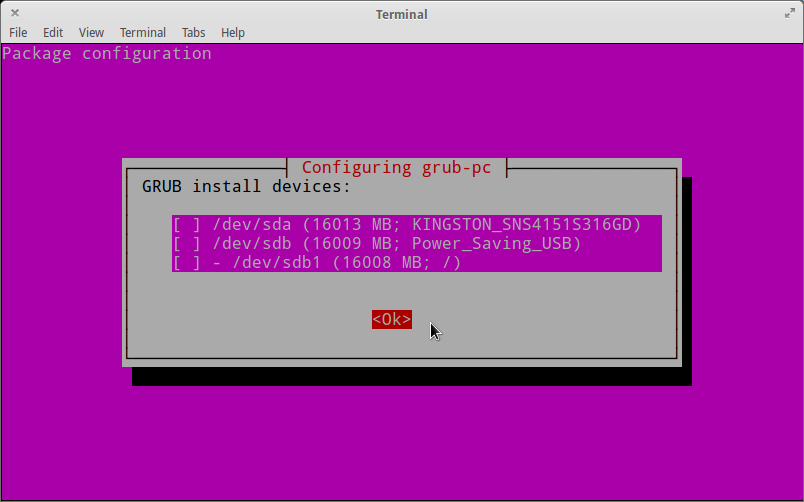
8. 修改 /etc/default/grub$ sudo vim /etc/default/grub
把
GRUB_CMDLINE_LINUX_DEFAULT="quiet splash"改成GRUB_CMDLINE_LINUX_DEFAULT="quiet splash add_efi_memmap boot=local noresume noswap i915.modeset=1 tpm_tis.force=1 tpm_tis.interrupts=0 nmi_watchdog=panic,lapic"
9. 在終端機下執行
$ sudo update-grub
Generating grub.cfg ...
Found linux image: /boot/vmlinuz-3.14.1-031401-generic
Found initrd image: /boot/initrd.img-3.14.1-031401-generic
Found linux image: /boot/vmlinuz-3.8.0-44-generic
Found initrd image: /boot/initrd.img-3.8.0-44-generic
Found linux image: /boot/vmlinuz-3.2.0-75-generic-pae
Found initrd image: /boot/initrd.img-3.2.0-75-generic-pae
Found linux image: /boot/vmlinuz-3.2.0-51-generic-pae
Found initrd image: /boot/initrd.img-3.2.0-51-generic-pae
Found unknown Linux distribution on /dev/sda3
Found unknown Linux distribution on /dev/sda5
done
$ sudo update-grub2
Generating grub.cfg ...
Found linux image: /boot/vmlinuz-3.14.1-031401-generic
Found initrd image: /boot/initrd.img-3.14.1-031401-generic
Found linux image: /boot/vmlinuz-3.8.0-44-generic
Found initrd image: /boot/initrd.img-3.8.0-44-generic
Found linux image: /boot/vmlinuz-3.2.0-75-generic-pae
Found initrd image: /boot/initrd.img-3.2.0-75-generic-pae
Found linux image: /boot/vmlinuz-3.2.0-51-generic-pae
Found initrd image: /boot/initrd.img-3.2.0-51-generic-pae
Found unknown Linux distribution on /dev/sda3
Found unknown Linux distribution on /dev/sda5
done
10. 修正 TouchPad,因為我使用的是 Chromebox,所以這部分沒有測試
下載 cros-haswell-modules.sh$ sudo wget https://googledrive.com/host/0B0YvUuHHn3MndlNDbXhPRlB2eFE/cros-haswell-modules.sh
11. 修改 cros-haswell-modules.sh
$ vim ~/Downloads/cros-haswell-modules.sh
# Grab Ubuntu kernel source
apt-get source linux-image-$mykern
cd $mykernver
改成
# Grab Ubuntu kernel source
wget https://www.kernel.org/pub/linux/kernel/v3.x/linux-3.12.5.tar.xz
tar -xJf linux-3.12.5.tar.xz
cd linux-3.12.5
12. 執行 cros-haswell-modules.sh
13. 建立 /usr/share/X11/xorg.conf.d 目錄$ sudo mkdir /usr/share/X11/xorg.conf.d
14. 在 /usr/share/X11/xorg.conf.d 目錄下建立 50-synaptics.conf
$ sudo vim /usr/share/X11/xorg.conf.d/50-synaptics.conf
加入下面的內容
Section "InputClass"
Identifier "touchpad catchall"
Driver "synaptics"
MatchIsTouchpad "on"
MatchDevicePath "/dev/input/event*"
Option "FingerLow" "10"
Option "FingerHigh" "16"
EndSection
15. 完成收工,重新啟動電腦
Chromebox 安裝 Elementary OS(crouton)
參考網頁:
[Guide] How To Install Elementary OS on an HP Chromebook 14 Using Crouton
[Guide] How To Install Elementary OS on an HP Chromebook 14 Using Crouton
前面的步驟和 頭城國小資訊組 | Chromebox 安裝 Ubuntu(crouton) 相同,不再複述
1. 建立 Chroot 環境(Ubuntu 12.04 xfce 桌面)
$ sudo sh -e ~/Downloads/crouton -a i386 -t xfce,keyboard,extension -n elementary -p /media/removable/sdcard
Downloading latest crouton installer…
######################################################################## 100.0%
Installing precise-i386 chroot to /media/removable/sdcard/chroots/elementary
Downloading latest debootstrap…
2015-01-19 19:15:20 URL:http://anonscm.debian.org/gitweb/?p=d-
/debootstrap.git;a=snapshot;h=HEAD;sf=tgz [61095] -> “-” [1]
Patching debootstrap…
Downloading bootstrap files…
W: Cannot check Release signature; keyring file not available /usr/share/keyrings/ubuntu-archive-keyring.gpg
I: Retrieving Release
I: Retrieving Packages
I: Validating Packages
I: Resolving dependencies of required packages…
I: Resolving dependencies of base packages…
I: Checking component main on http://archive.ubuntu.com/ubuntu…
I: Retrieving adduser 3.113ubuntu2
I: Validating adduser 3.113ubuntu2
2. 設定帳號及密碼
Please specify a username for the primary user:
Enter new UNIX password:
Retype new UNIX password:
看到下面這一段時,代表終於完成了
Here’s some tips:
Audio from the chroot will now be forwarded to CRAS (Chromium OS audio server),
through an ALSA plugin.
Future Chromium OS upgrades may break compatibility with the installed version
of CRAS. Should this happen, simply update your chroot.
You can flip through your running chroot desktops and Chromium OS by hitting
Ctrl+Alt+Shift+Back and Ctrl+Alt+Shift+Forward.
You can start Unity via the startunity host command: sudo startunity
Unmounting /media/removable/sdcard/chroots/trusty…
Done! You can enter the chroot using enter-chroot.[@more@]3. 建立啟動 Elementary OS 的 Script 檔
$ vim ~/startunity
#!/bin/bash
if [ -z “$(mount | grep sdb1 | grep sdcard)” ]; then
umount /dev/sdb1
if [ ! -d /media/removable/sdcard ]; then
mkdir /media/removable/sdcard
fi
mount -o rw,noatime /dev/sdb1 /media/removable/sdcard
fi
/media/removable/sdcard/bin/startxfce4
4. 進入 Chrome OS
按 Ctrl+Alt+T,輸入 shell 進入完整 shell 模式
執行
$ sudo sh ~/startxfce4
5. Ubuntu 12.04 xfce 桌面環境
Acer Chromebox 安裝 Elementary OS(chrubuntu)
參考網頁:
How to Install Elementary OS Luna (linux) on an HP Chromebook 14 – Reality Equation
請注意:進行以下的操作,原本使用者的資料會被清除,務必做好備份工作!
安裝時選錯分割區,會造成 Chromebook/Chromebox 無法開機!
1. 開啟 legacy BIOS and USB boot
$ sudo crossystem dev_boot_usb=1 dev_boot_legacy=1
2. 下載 Elementary Luna 0.2 i386 版
$ wget http://downloads.sourceforge.net/project/elementaryosstable/elementaryos-stable-i386.20130810.iso -P ~/Downloads
3. 插入要用來安裝的 USB 隨身碟或是 SD 卡
$ cd ~/Downloads
$ sudo dd if=elementaryos-stable-i386.20130810.iso of=/dev/sdb bs=1M[@more@]
4. 重新啟動電腦
Chrome 作業系統驗證程序已關閉,按 Ctrl+D 繼續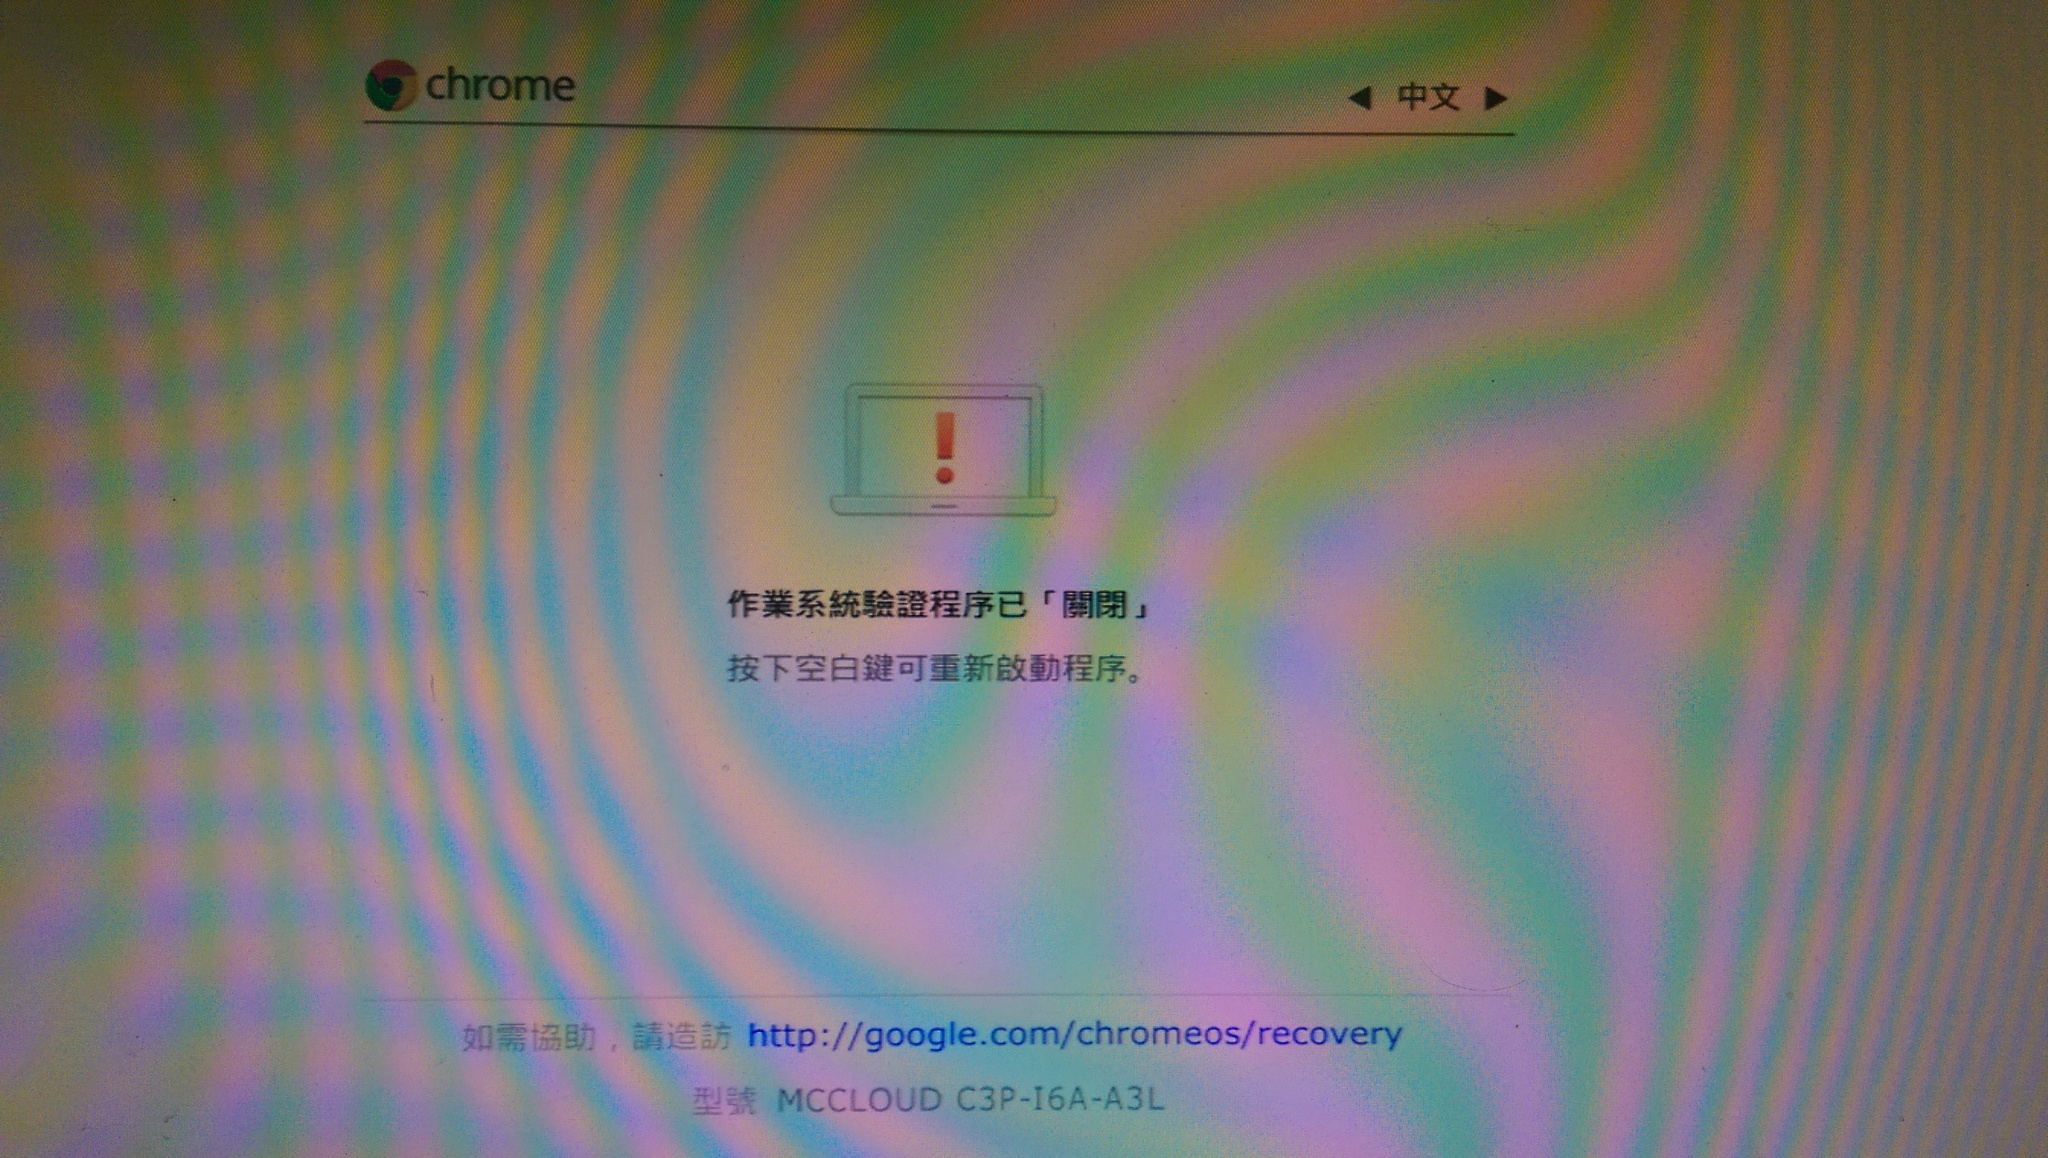
5. 在登入畫面的時候,按 Ctrl+Alt+F2 鍵,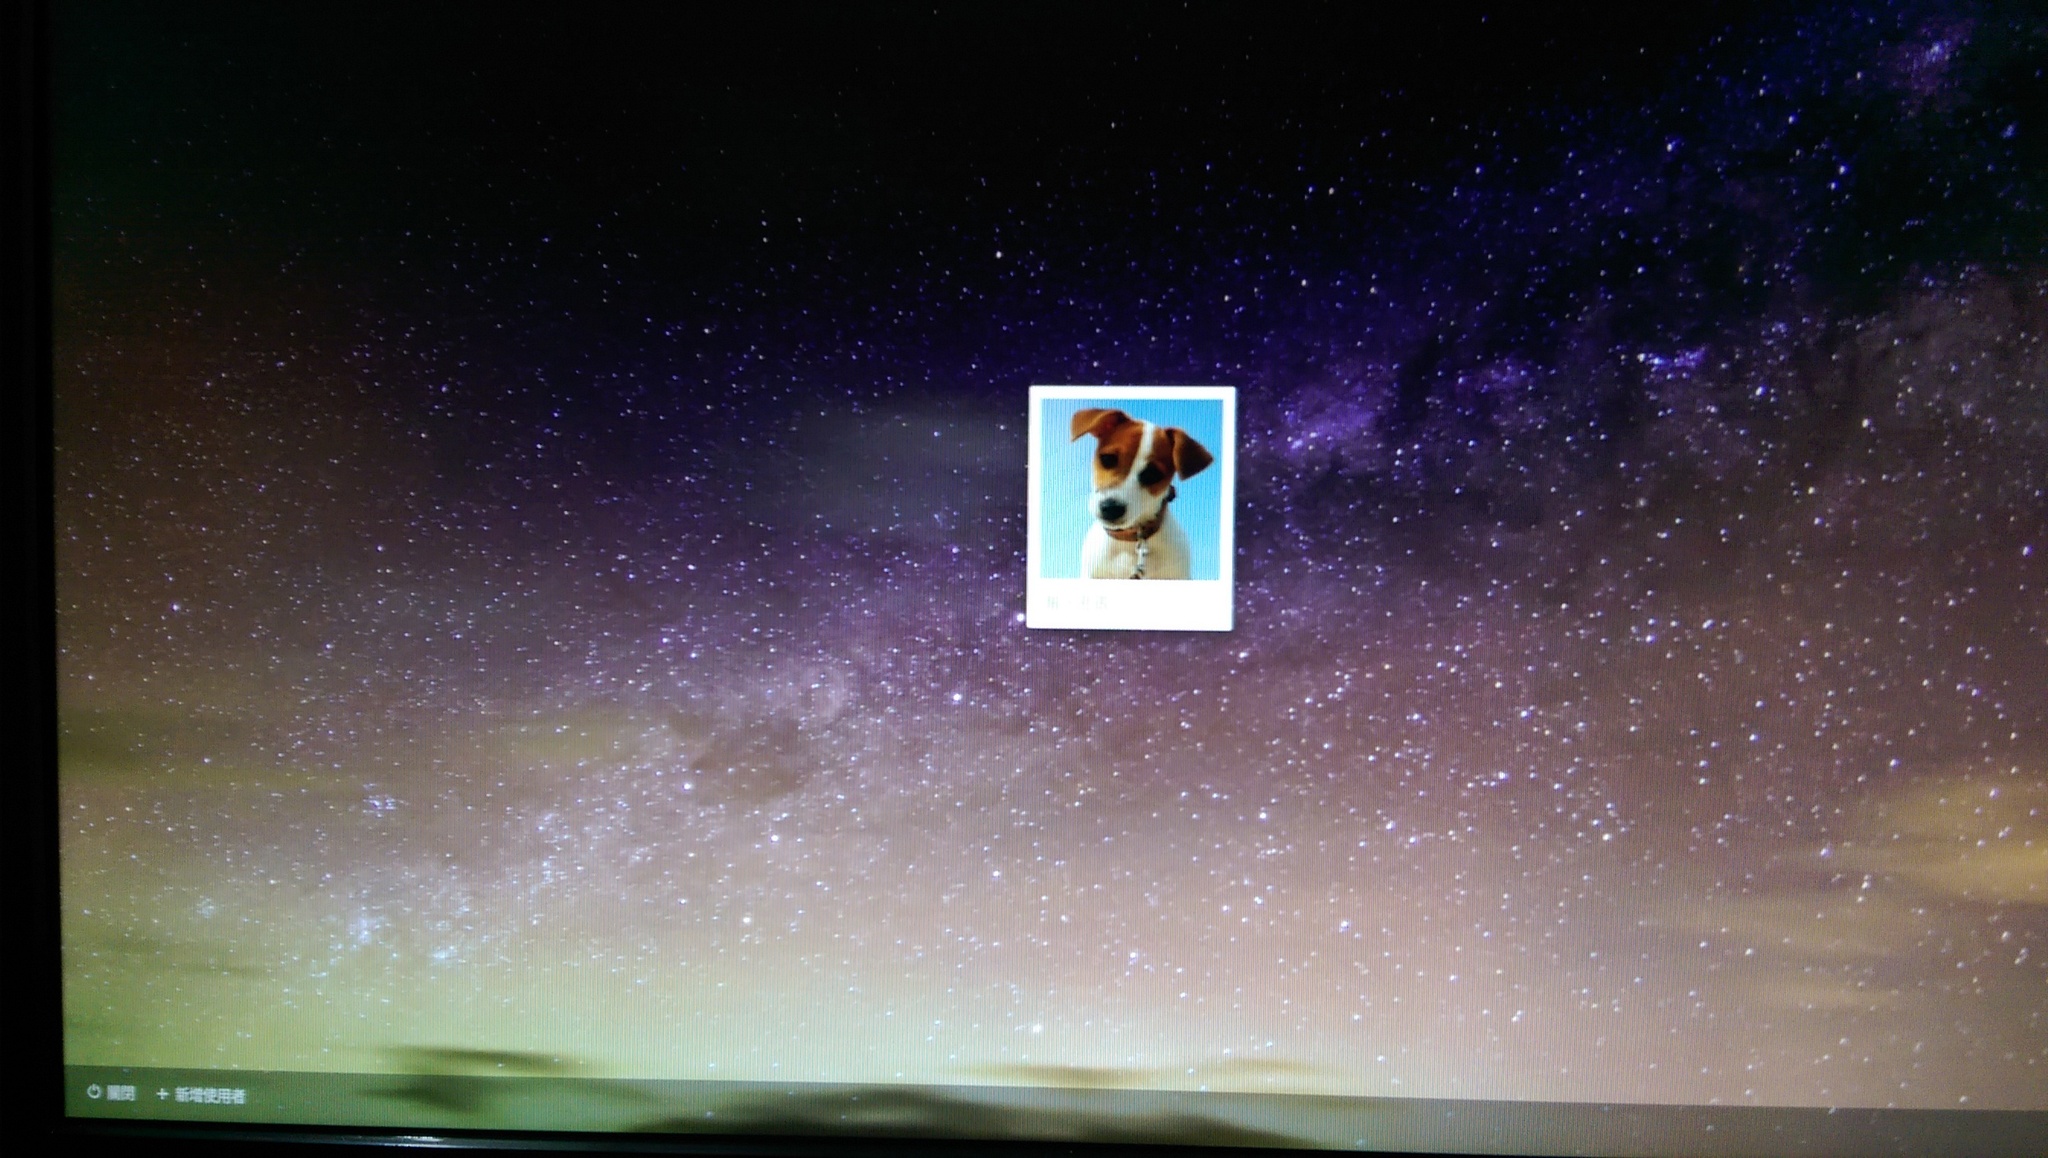
6. 進入 Developer Console 模式,帳號是 chronos,沒有密碼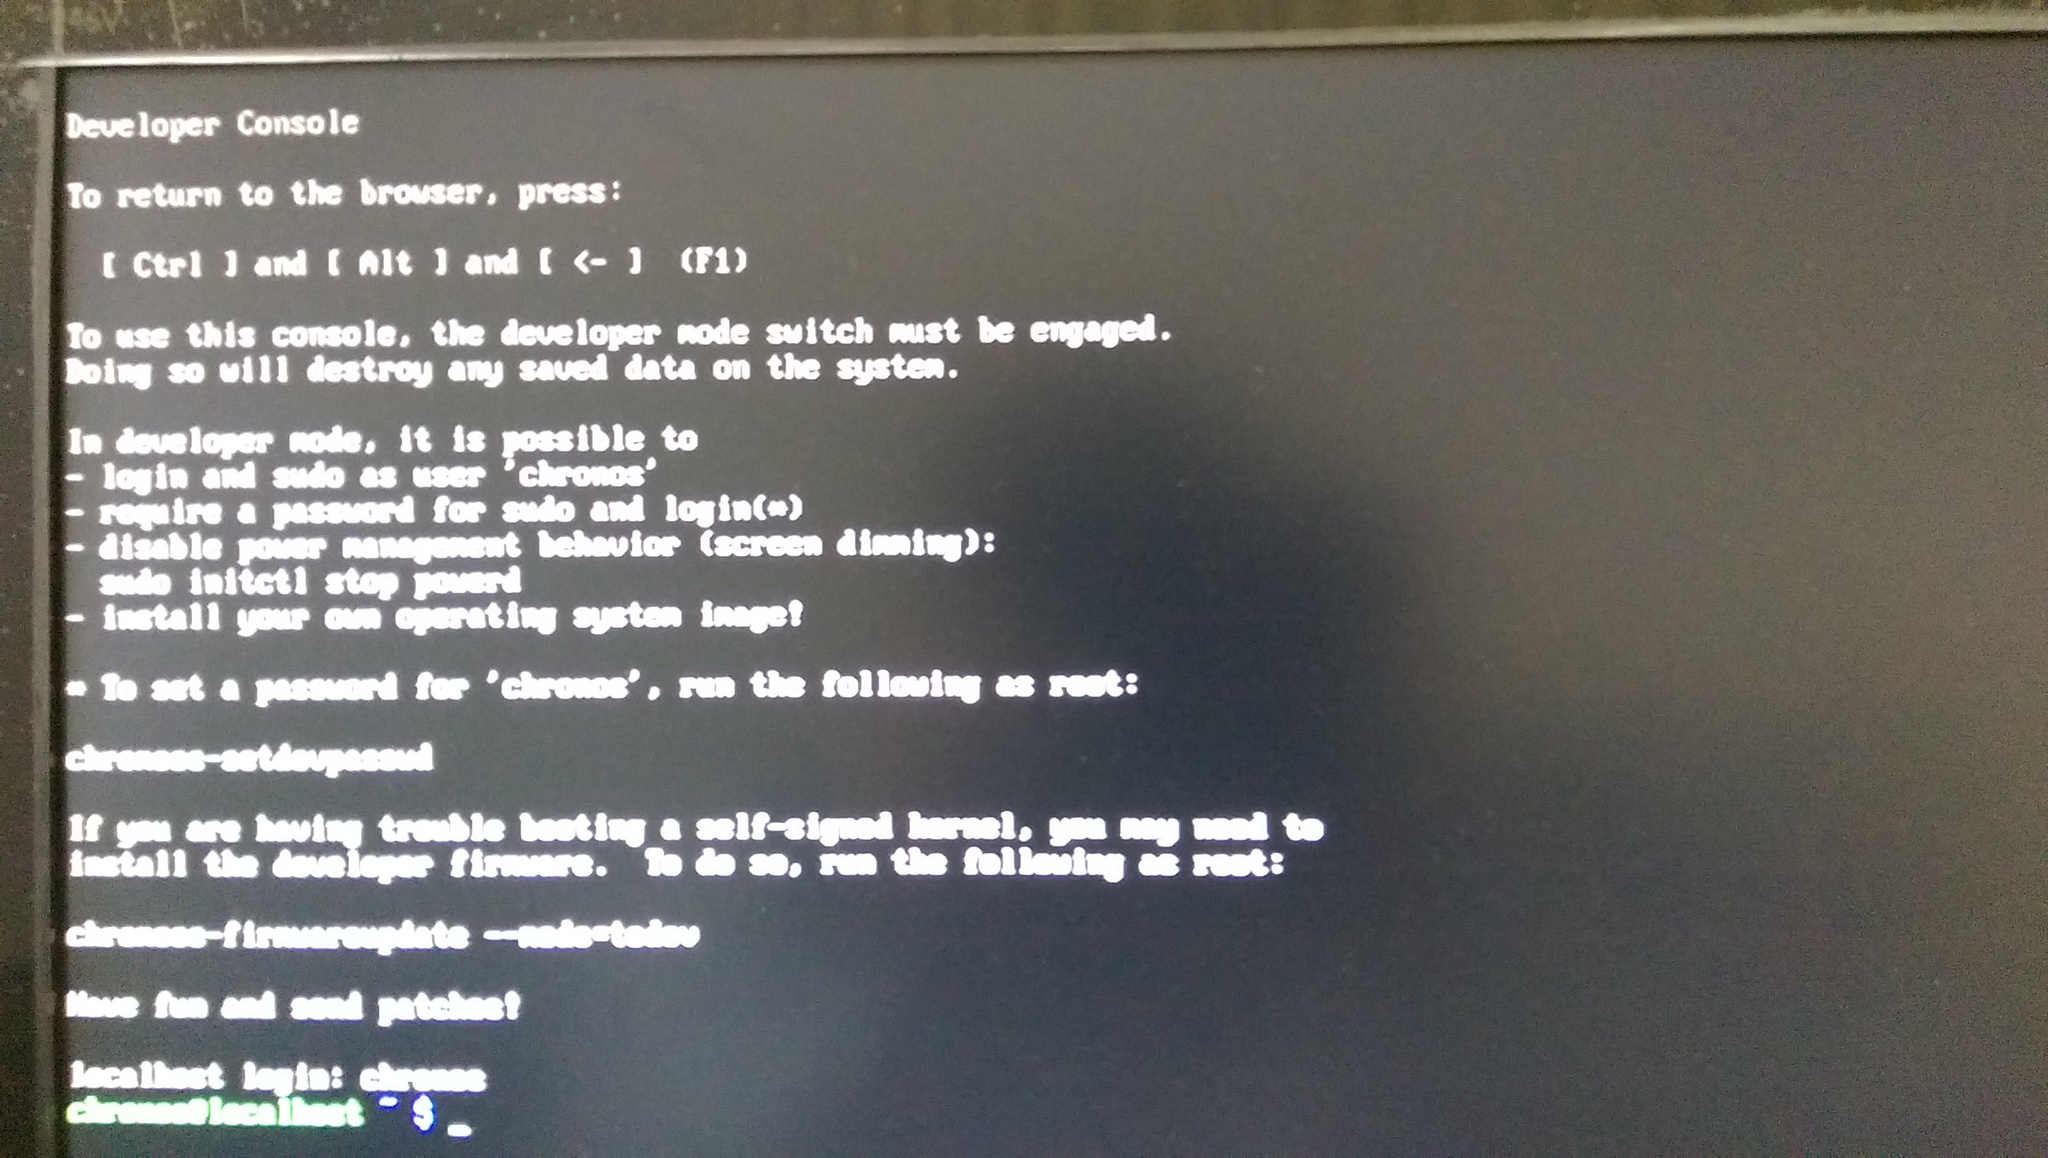
7. 下載 chrubuntu 並執行
$ curl -L -O http://goo.gl/9sgchs; sudo bash 9sgchs
8. 出現
powerd stop/waiting
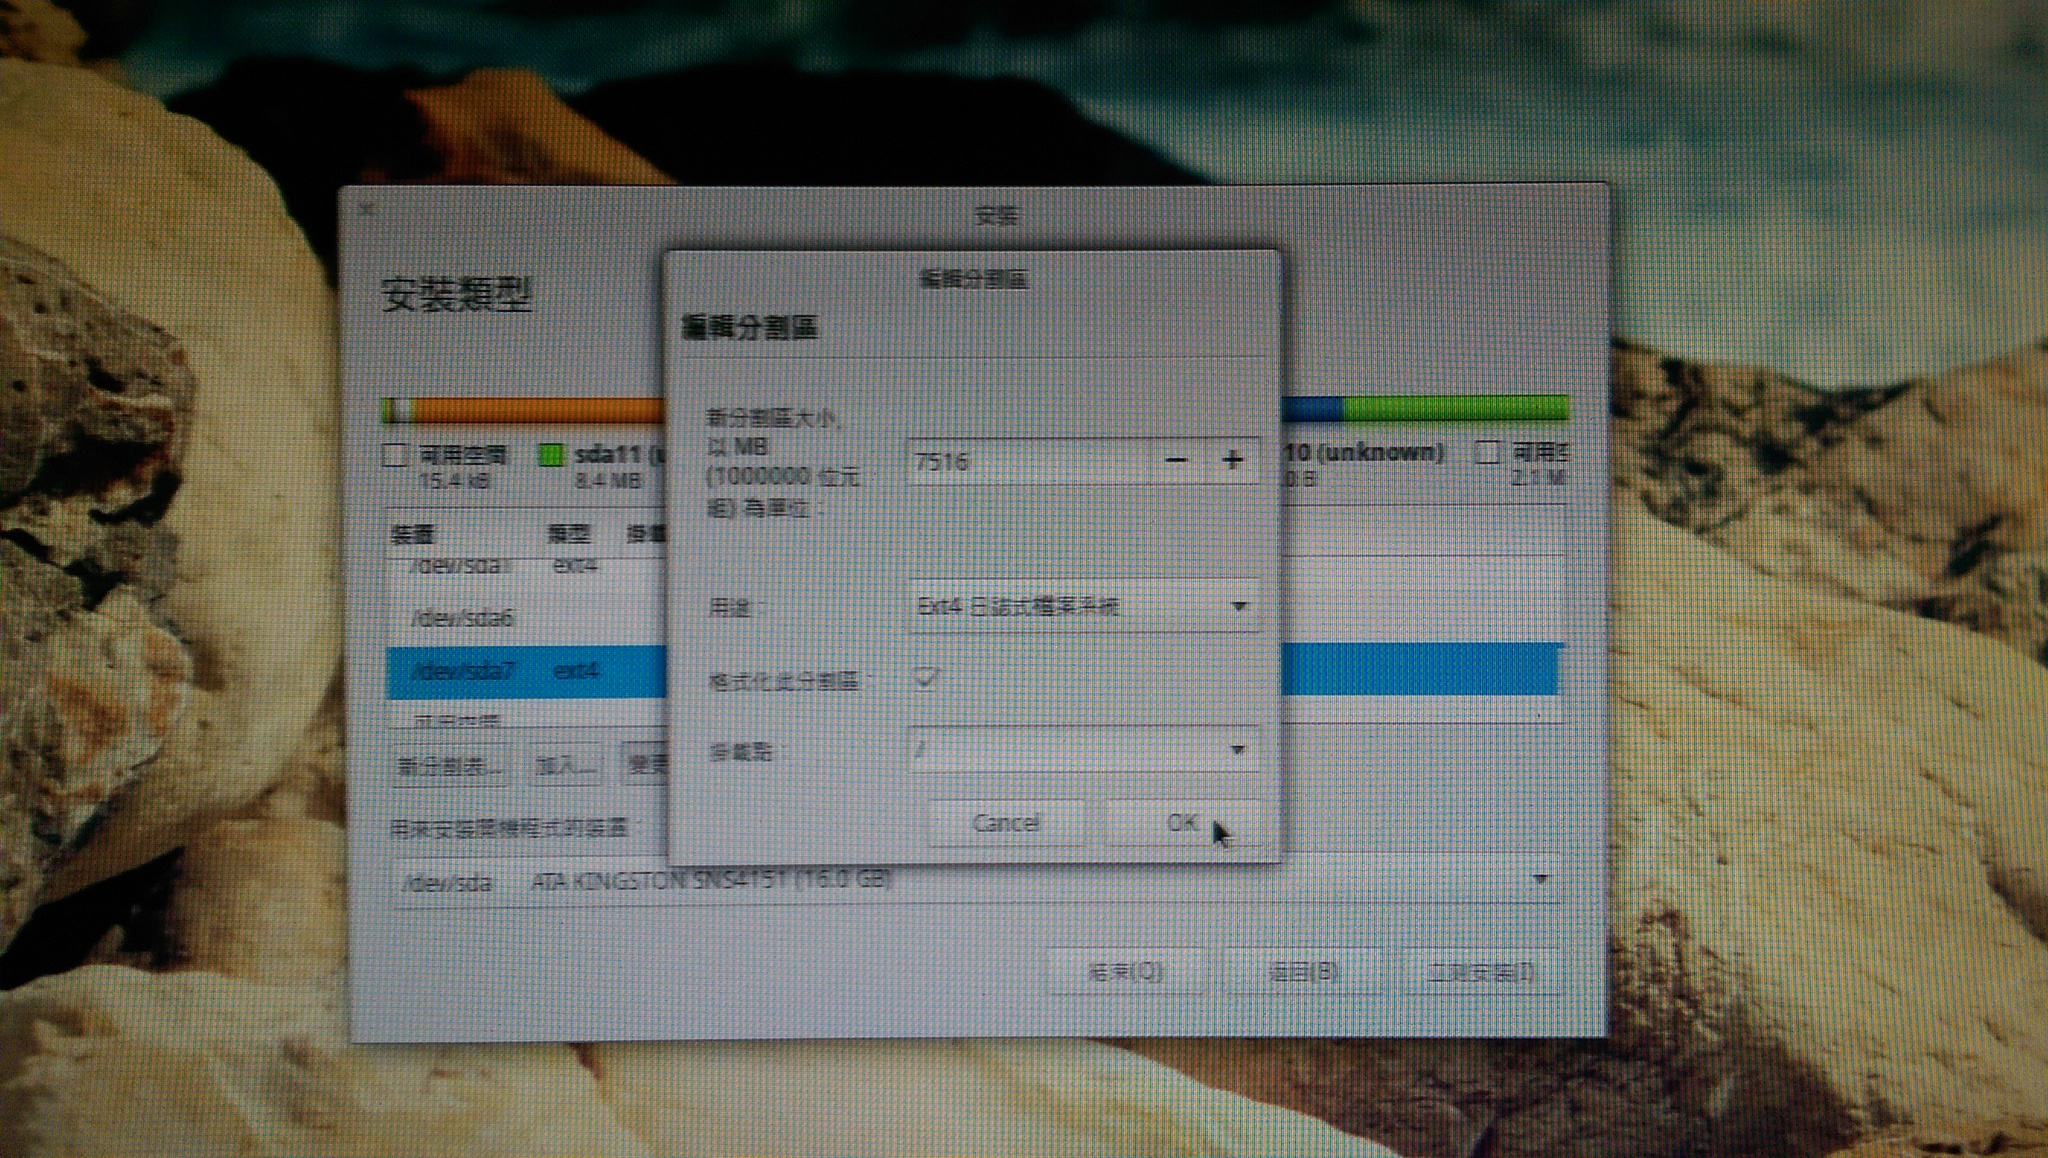
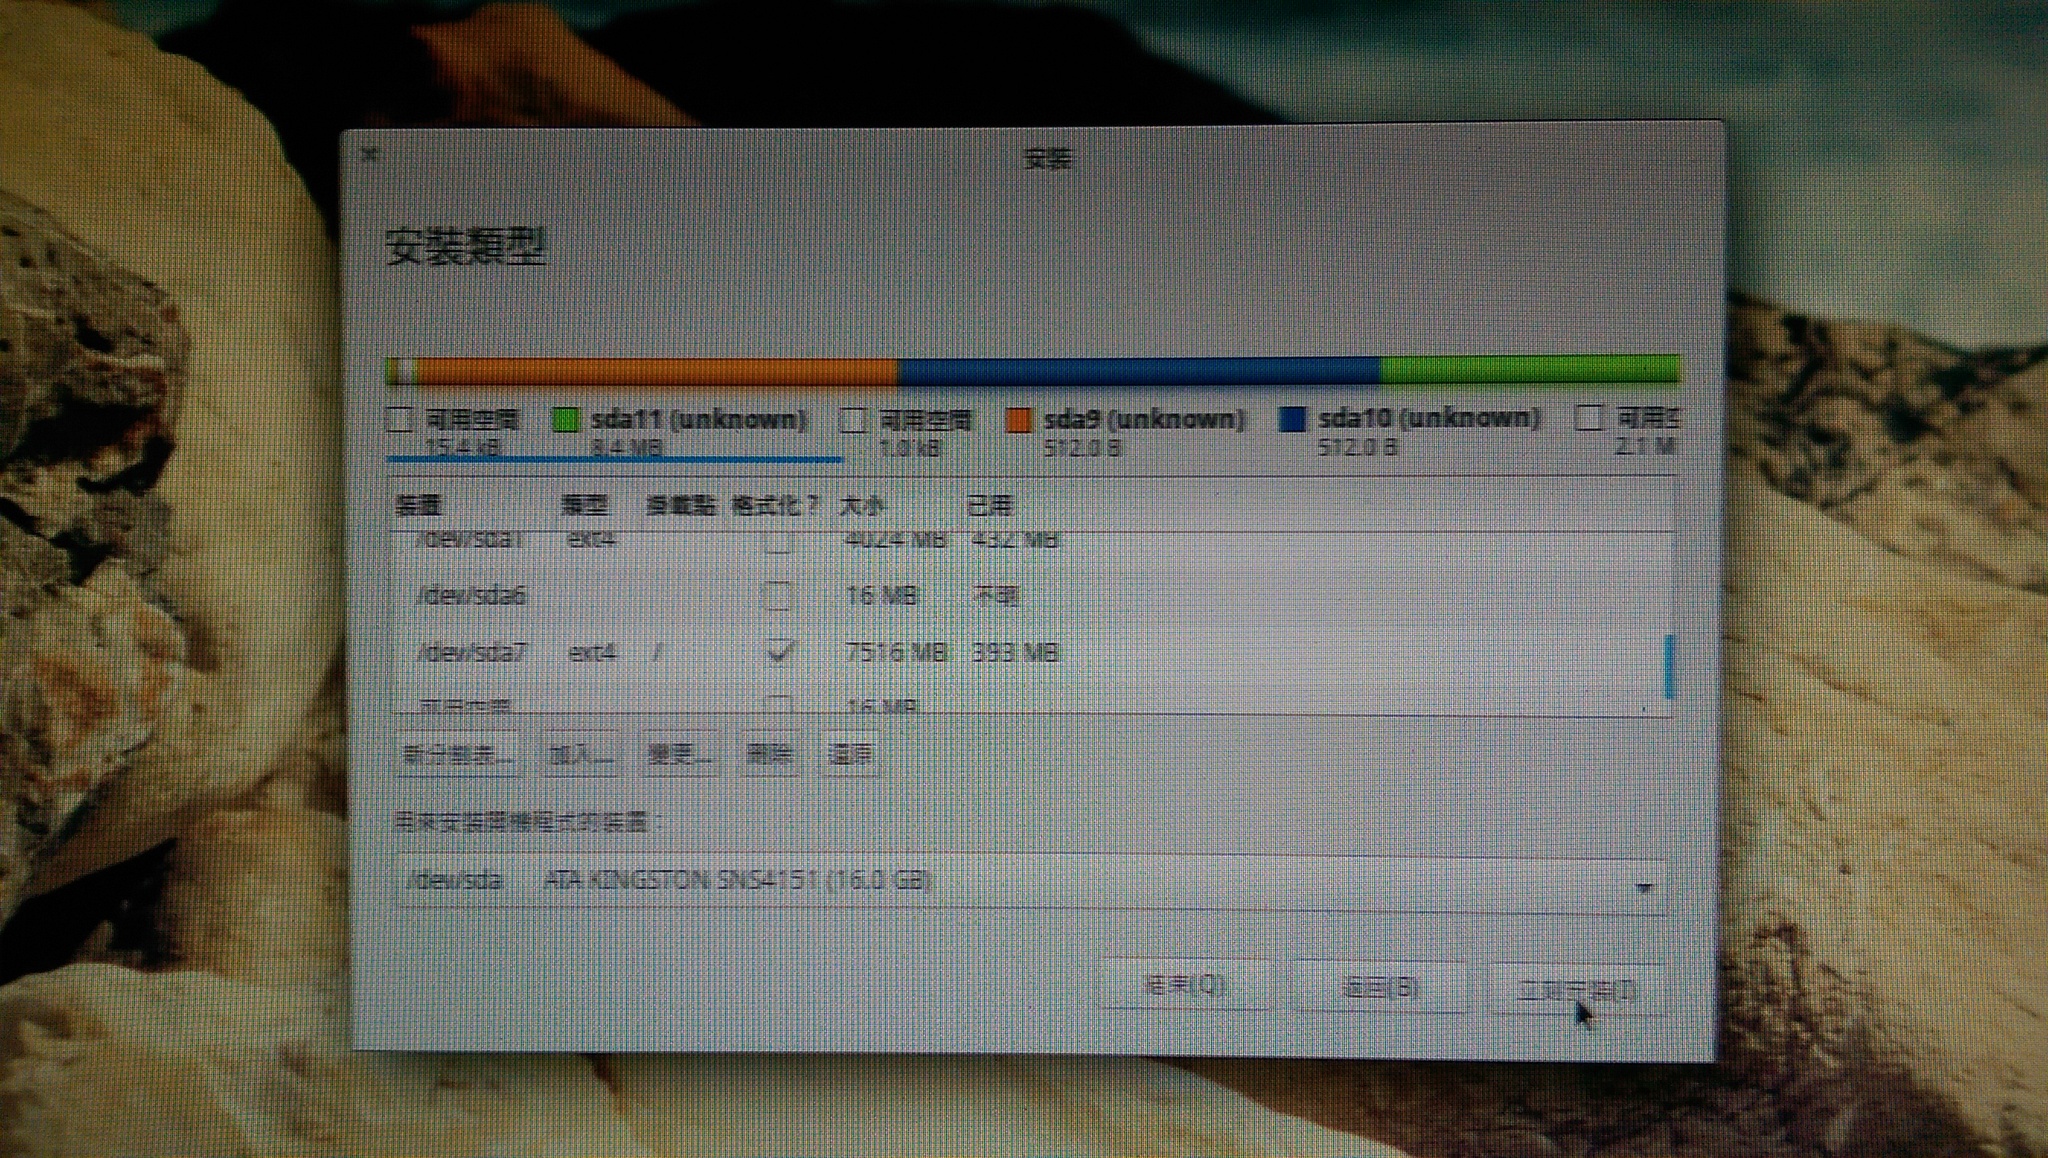
Enter the size in gigabytes you want to reserve for Ubuntu. Acceptable range 5 to 10 but 9 is the recommended maximum:7
代表要從原本的 16G/32G 中切出多少空間用來安裝新的作業系統,可接受的範圍是 5~10G,我取中間值 7G
完畢後,電腦會自動重新開機
這一台 Chromebox 內建是 16G,底下是切割前
$ sudo fdisk -l /dev/sda
Disk /dev/sda: 14.9 GiB, 16013942784 bytes, 31277232 sectors
Units: sectors of 1 * 512 = 512 bytes
Sector size (logical/physical): 512 bytes / 512 bytes
I/O size (minimum/optimal): 512 bytes / 512 bytes
Disklabel type: gpt
Disk identifier: 4924648B-4648-F140-A28D-966C97073BFE
Device Start End Size Type
/dev/sda1 8671232 31244287 10.8G Microsoft basic data
/dev/sda2 20480 53247 16M ChromeOS kernel
/dev/sda3 4476928 8671231 2G ChromeOS root fs
/dev/sda4 53248 86015 16M ChromeOS kernel
/dev/sda5 282624 4476927 2G ChromeOS root fs
/dev/sda6 16448 16448 512B ChromeOS kernel
/dev/sda7 16449 16449 512B ChromeOS root fs
/dev/sda8 86016 118783 16M Microsoft basic data
/dev/sda9 16450 16450 512B ChromeOS reserved
/dev/sda10 16451 16451 512B ChromeOS reserved
/dev/sda11 64 16447 8M unknown
/dev/sda12 249856 282623 16M EFI System
這是切割後
$ sudo fdisk -l /dev/sda
We trust you have received the usual lecture from the local System
Administrator. It usually boils down to these three things:
#1) Respect the privacy of others.
#2) Think before you type.
#3) With great power comes great responsibility.
Disk /dev/sda: 14.9 GiB, 16013942784 bytes, 31277232 sectors
Units: sectors of 1 * 512 = 512 bytes
Sector size (logical/physical): 512 bytes / 512 bytes
I/O size (minimum/optimal): 512 bytes / 512 bytes
Disklabel type: gpt
Disk identifier: 4924648B-4648-F140-A28D-966C97073BFE
Device Start End Size Type
/dev/sda1 8671232 16531455 3.8G Microsoft basic data
/dev/sda2 20480 53247 16M ChromeOS kernel
/dev/sda3 4476928 8671231 2G ChromeOS root fs
/dev/sda4 53248 86015 16M ChromeOS kernel
/dev/sda5 282624 4476927 2G ChromeOS root fs
/dev/sda6 16531456 16564223 16M ChromeOS kernel
/dev/sda7 16564224 31244287 7G ChromeOS root fs
/dev/sda8 86016 118783 16M Microsoft basic data
/dev/sda9 16450 16450 512B ChromeOS reserved
/dev/sda10 16451 16451 512B ChromeOS reserved
/dev/sda11 64 16447 8M unknown
/dev/sda12 249856 282623 16M EFI System
9. Chrome 作業系統驗證程序已關閉,按 Ctrl+L 繼續
如果沒有按 Ctrl+L 時,可能會出現 系統正在進行自我修復程序,請稍候。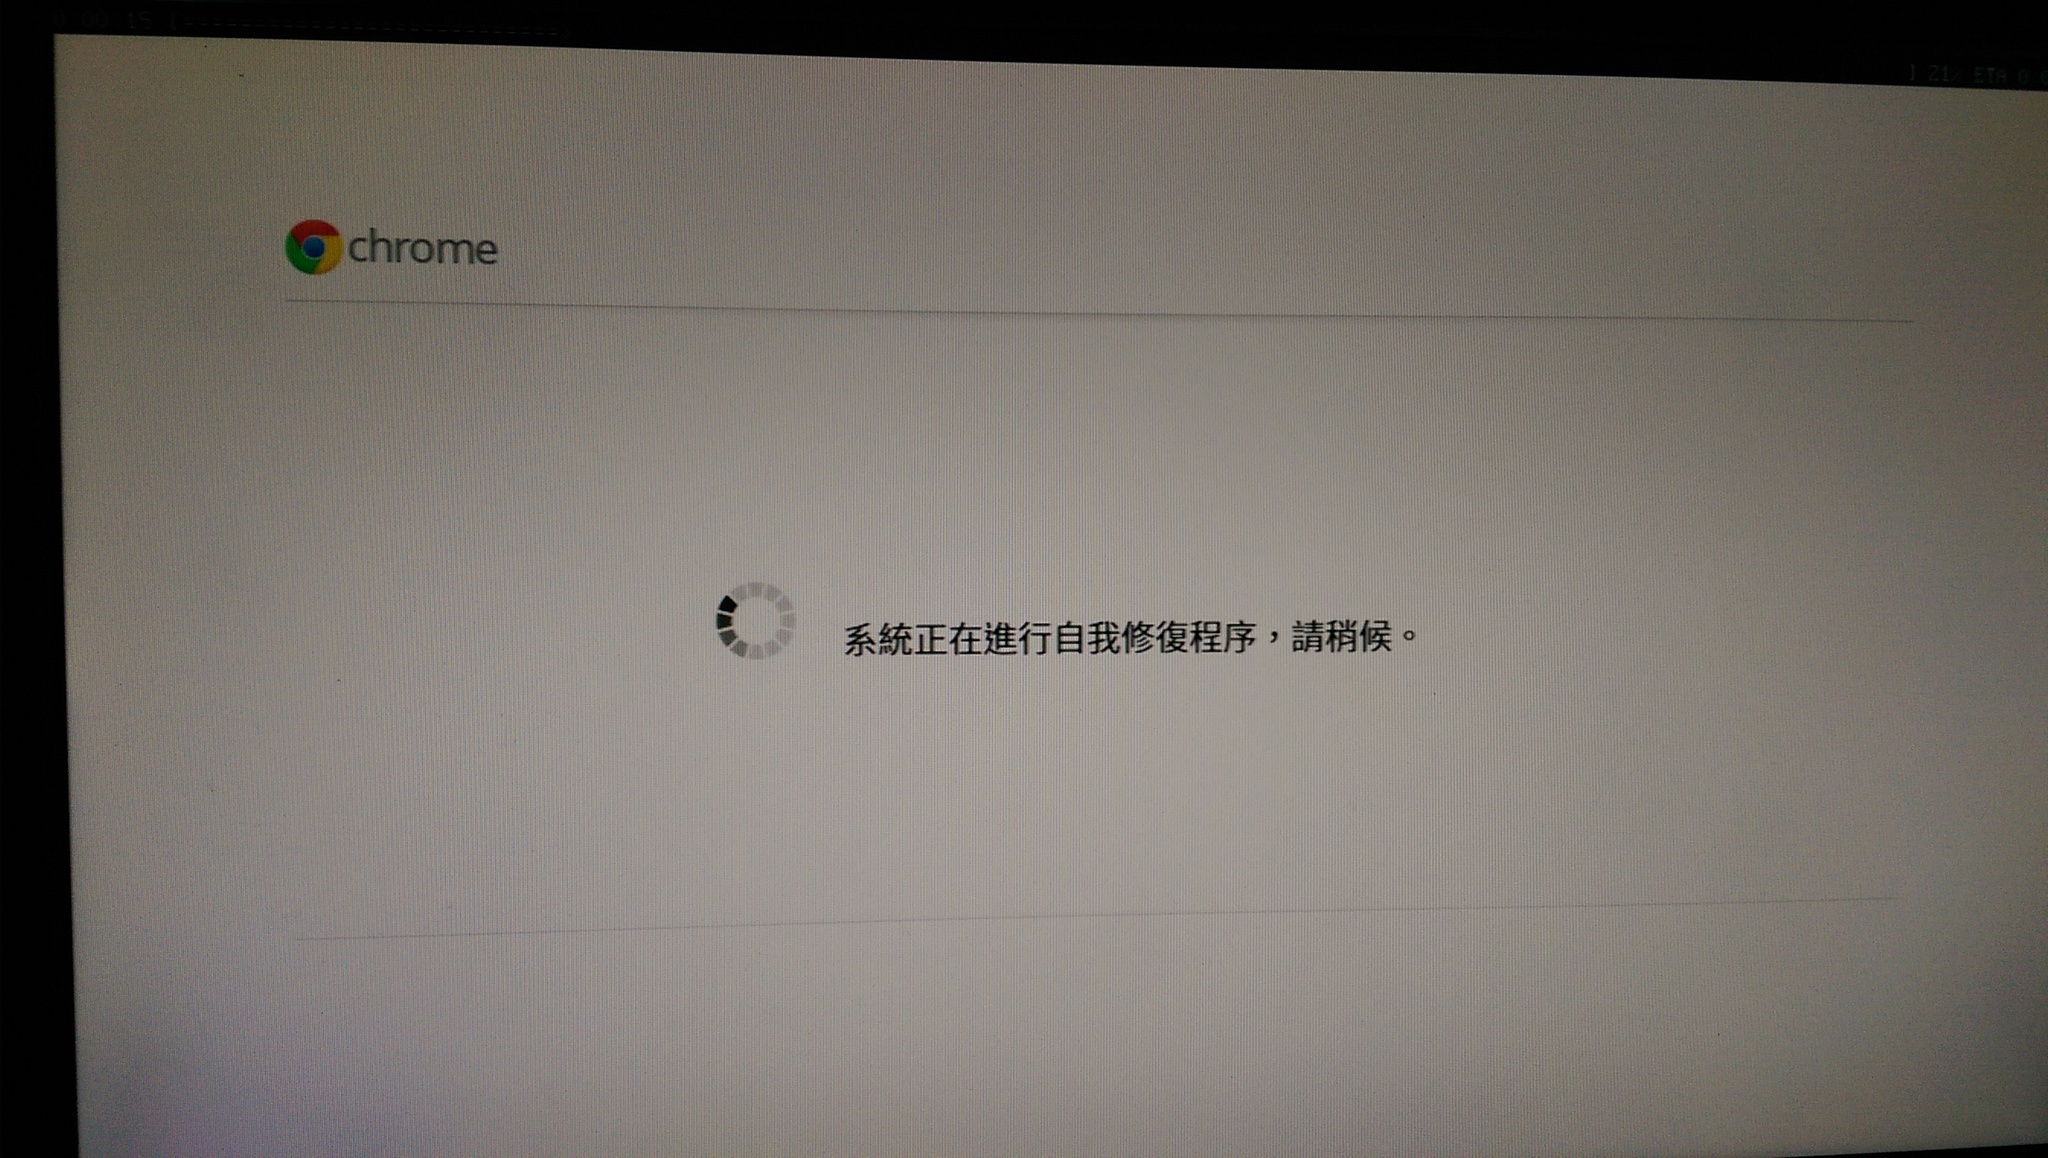
10. 出現 SeaBIOS 畫面,按 ESC 鍵出現開機選單,請選擇製作好要用來安裝的 USB 隨身碟或 SD 卡,在畫面中應該是 1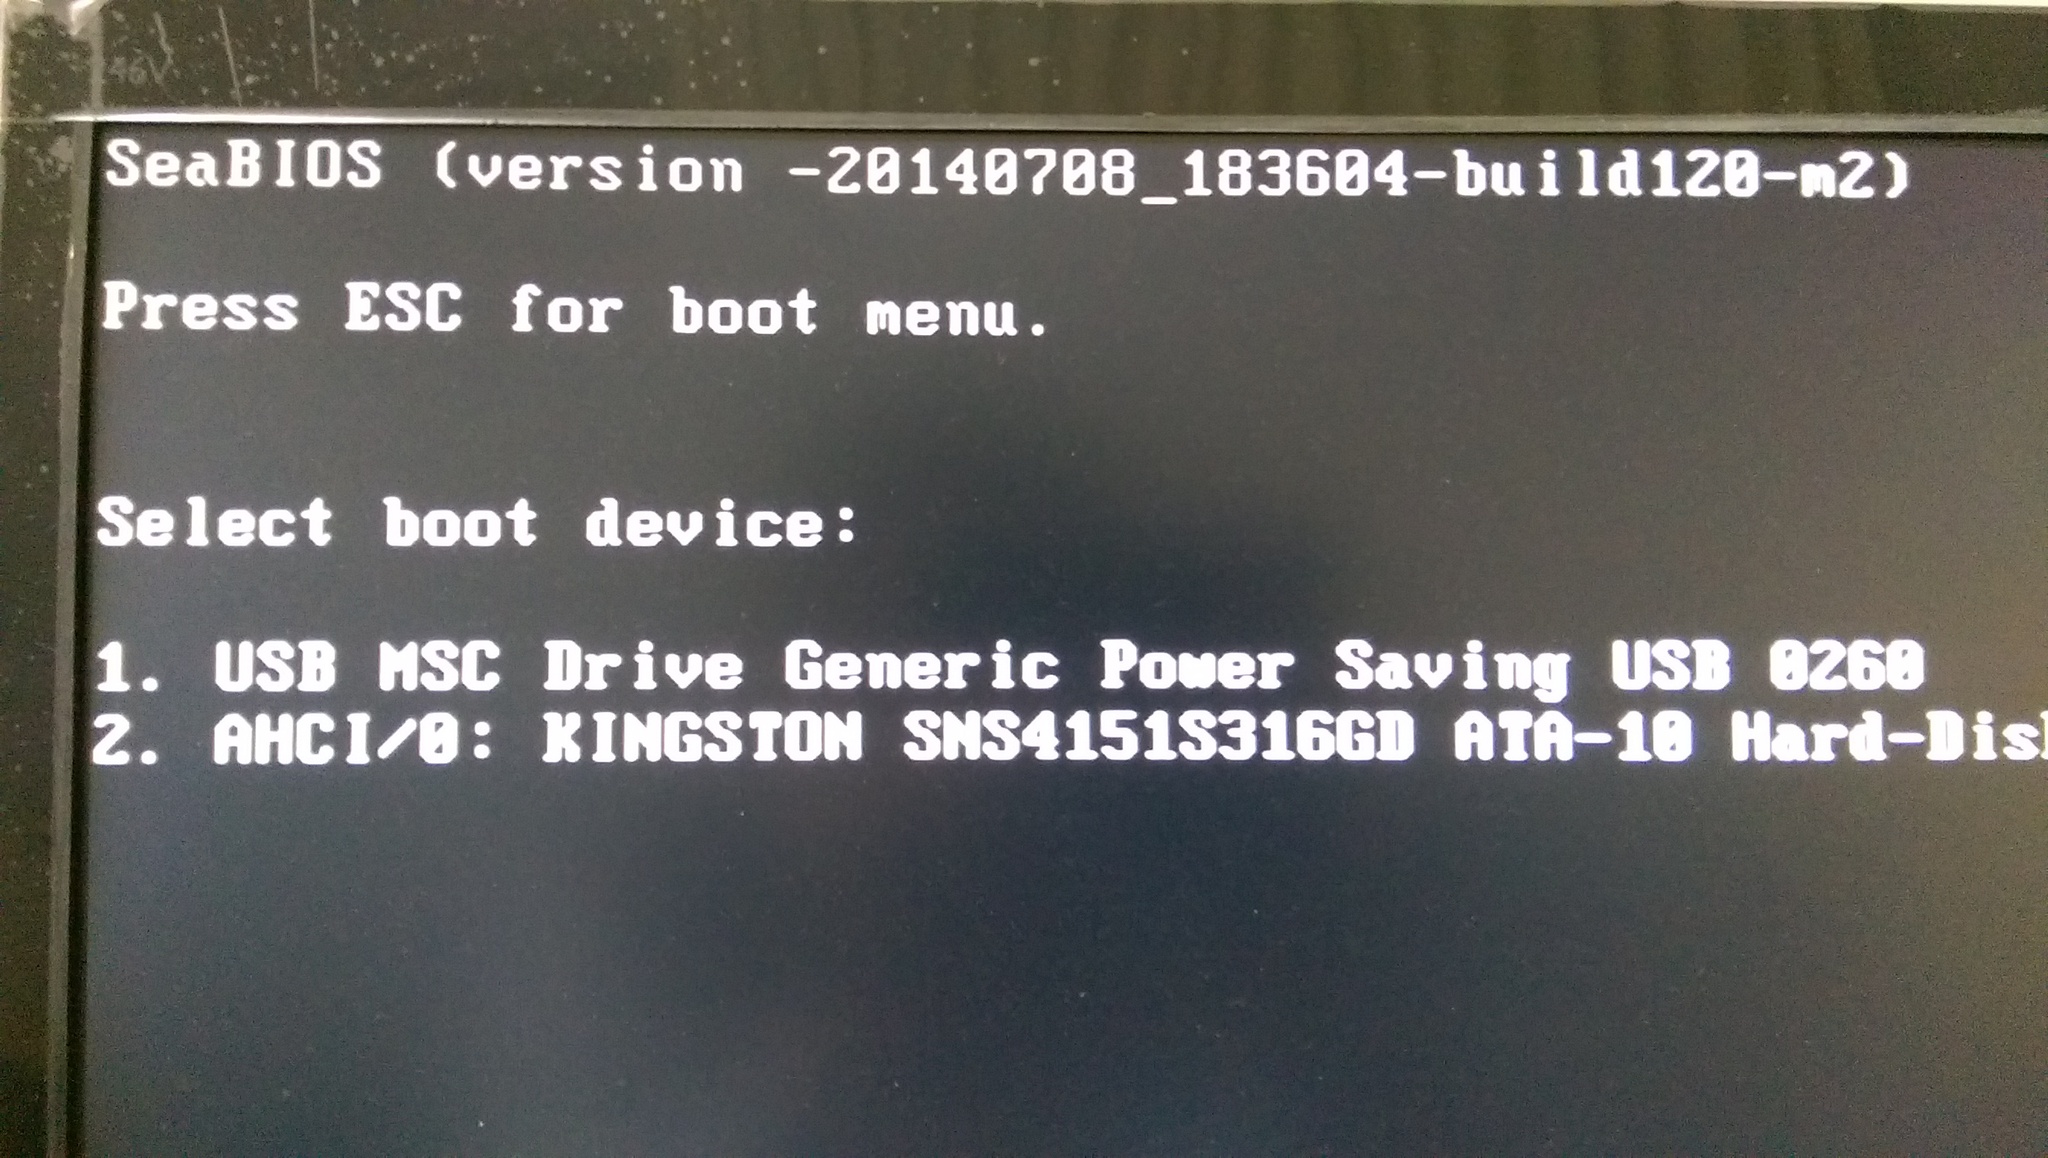
11. USB 隨身碟或 SD 卡開機畫面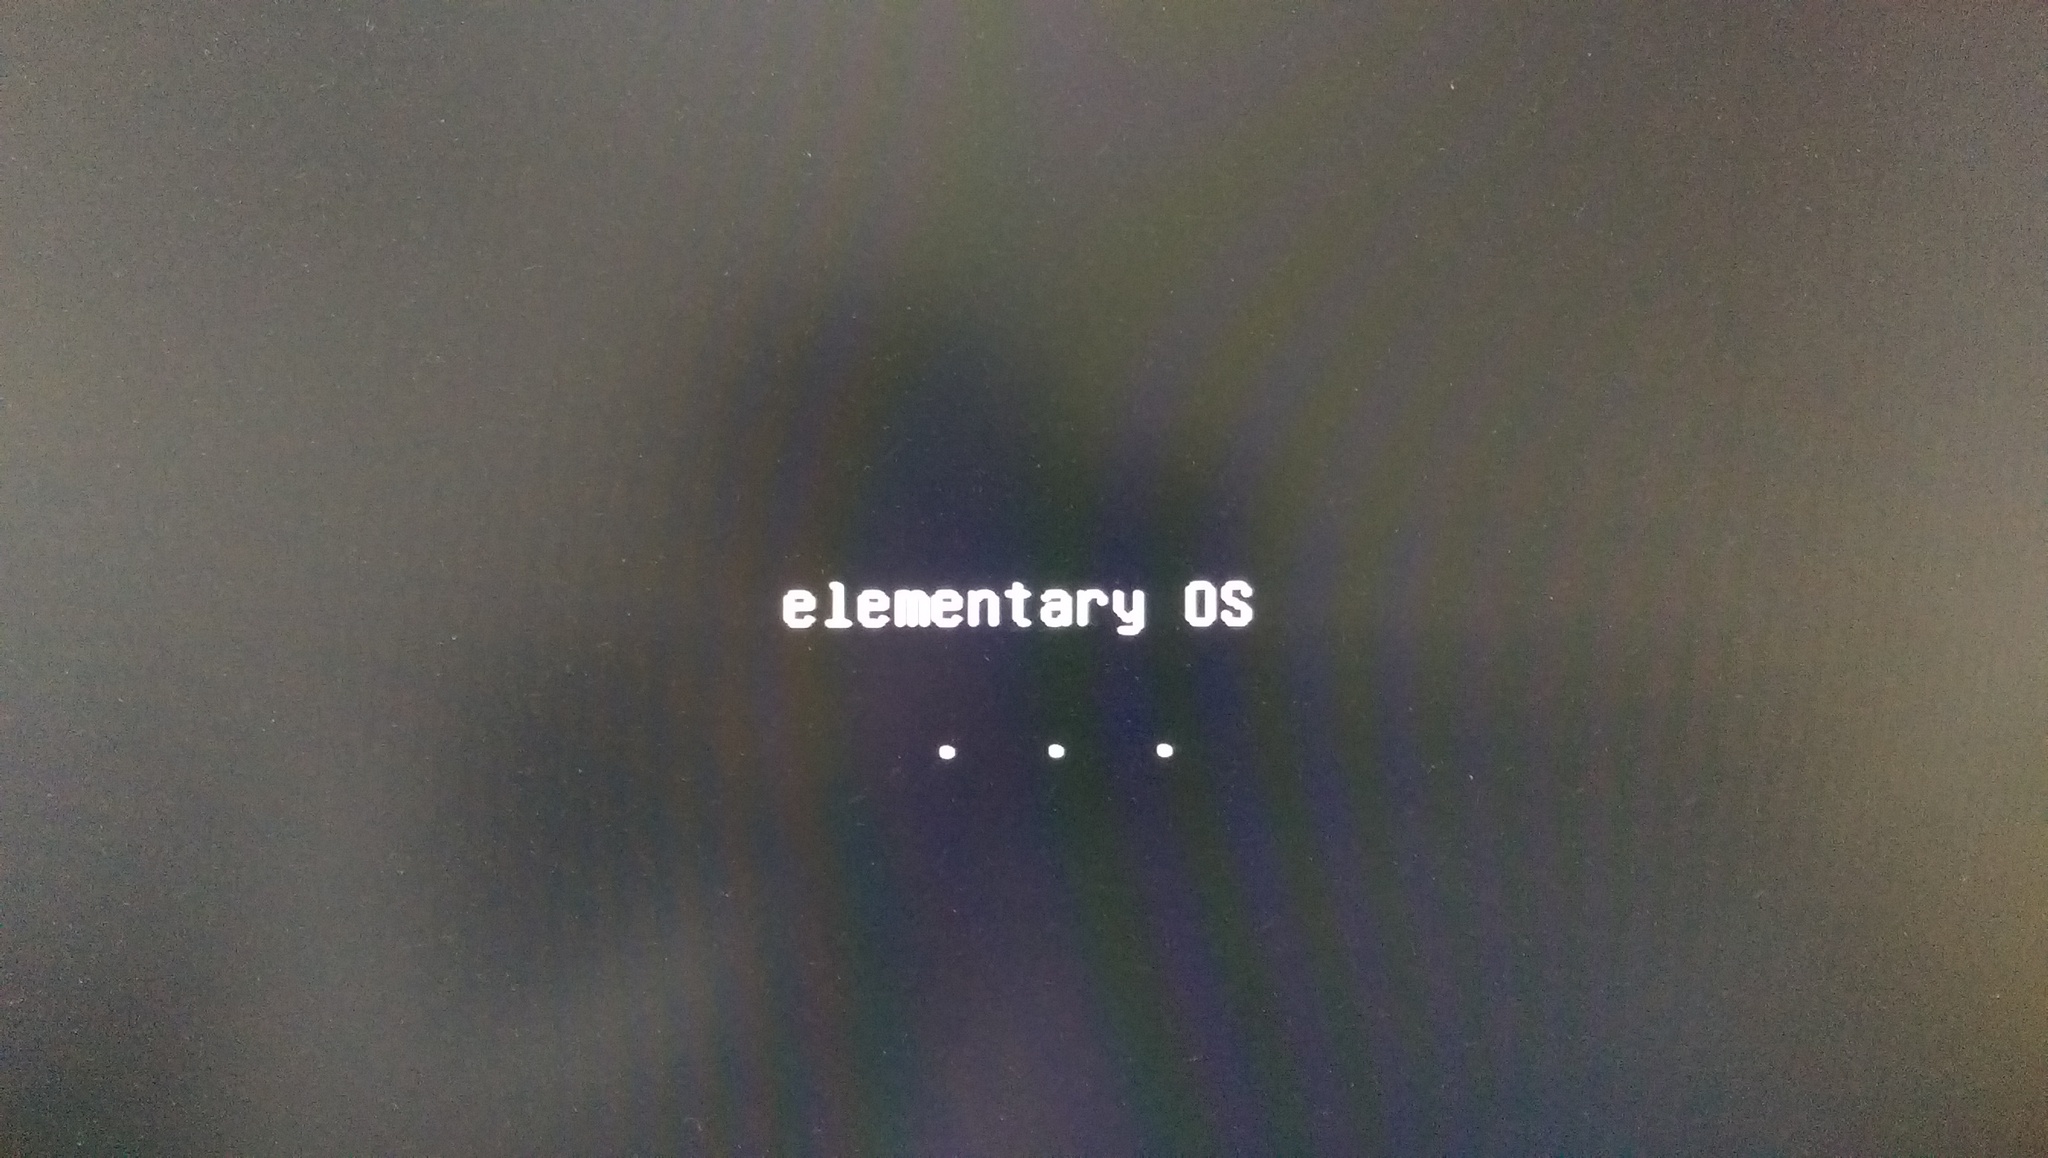
12. 選擇 左邊的繁體中文,然後選右邊的 安裝 elementary OS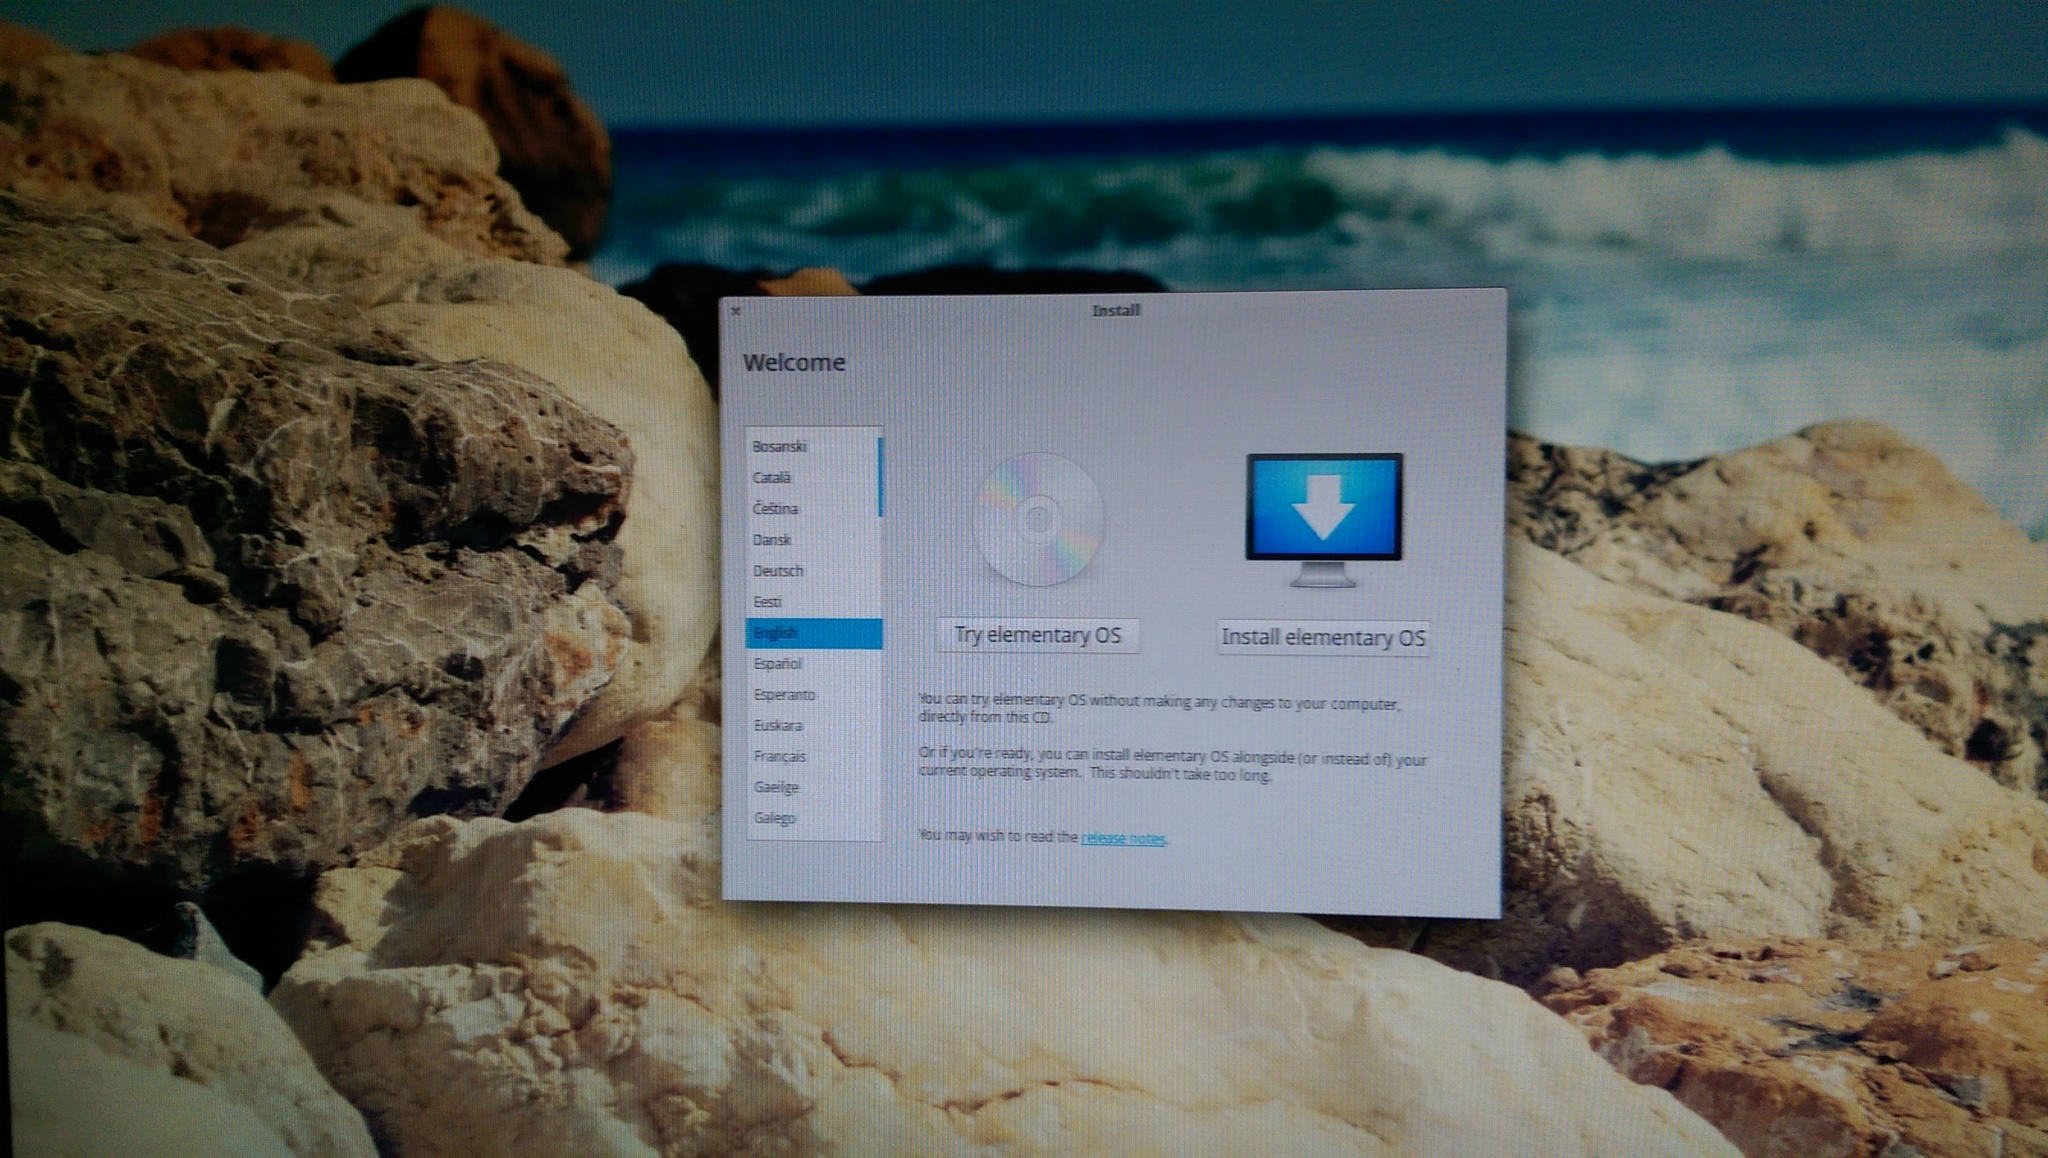
13. 勾選 當安裝時下載更新 及 安裝這個第三方軟體 ,然後選擇 繼續
14. 選擇 其它,並選擇 繼續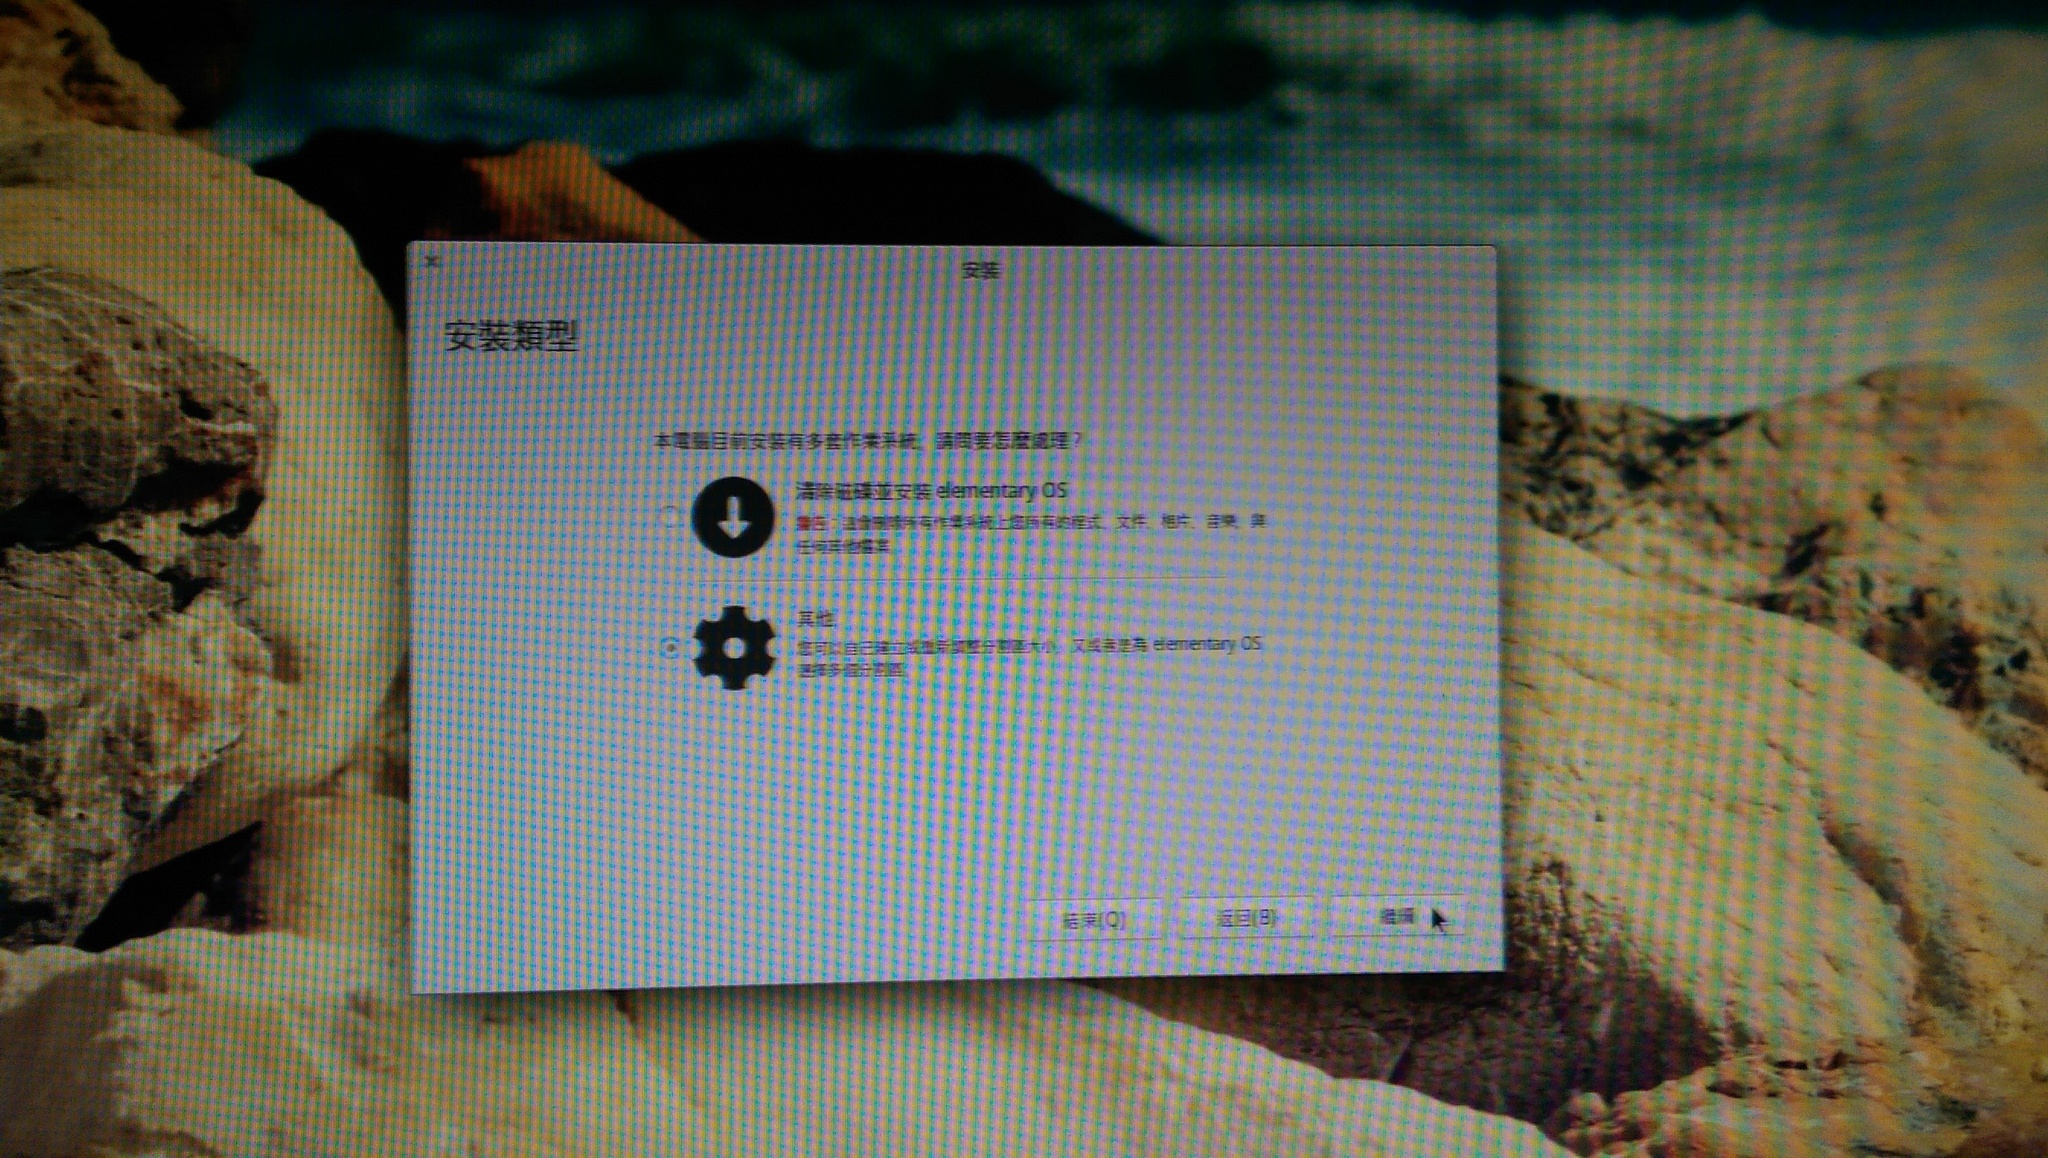
15. 進行硬碟分割,這裡要特別注意,因為選錯分割區,可能會造成您的 Chromebook/Chromebox 無法開機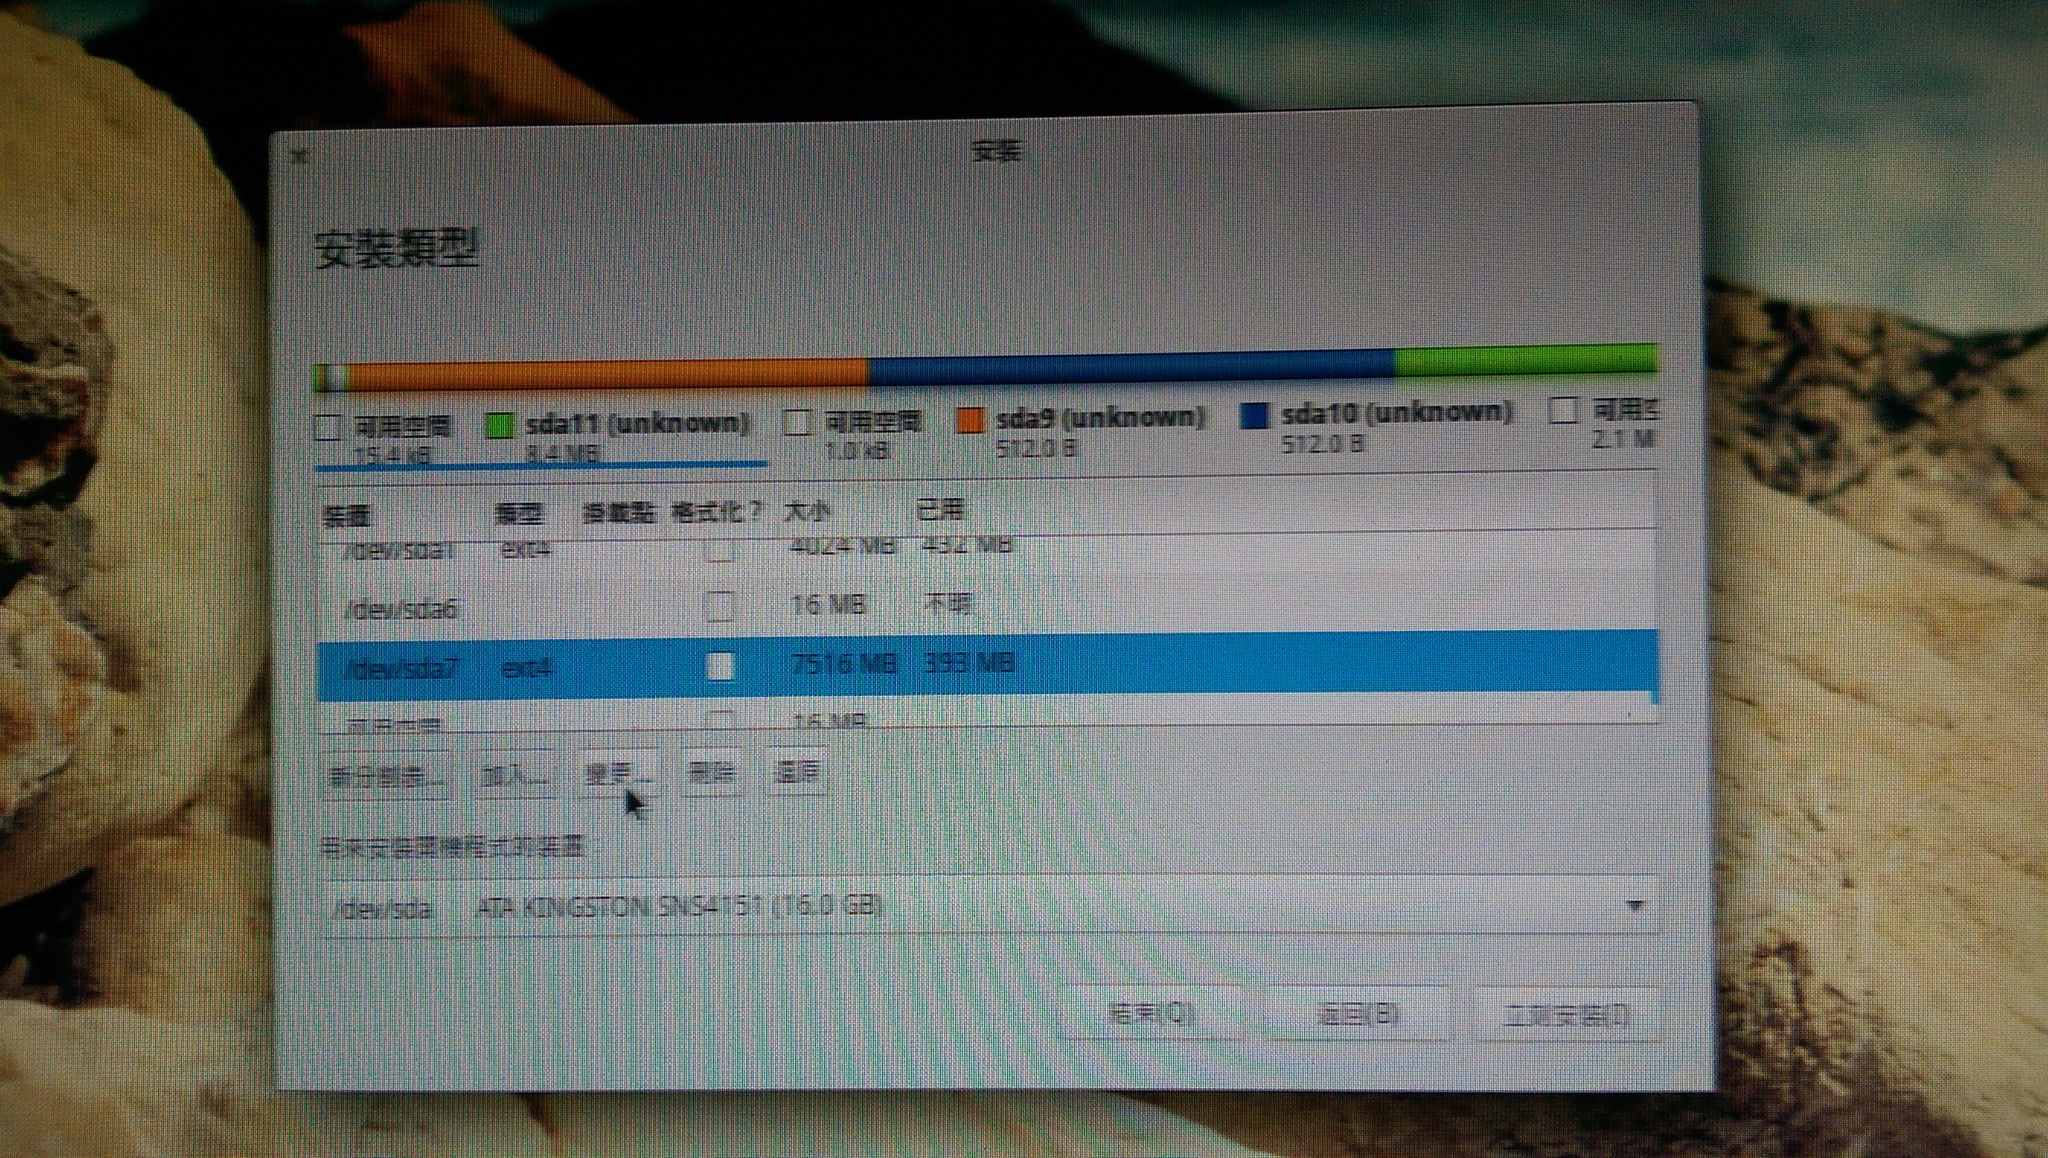
後面就不抓圖了,因為就是一般的安裝 Linux
16. 安裝完畢後,請重新開機
17. Chrome 作業系統驗證程序已關閉,按 Ctrl+L 繼續
18. 出現 SeaBIOS 畫面,就能選擇安裝好的 elementary OS 了!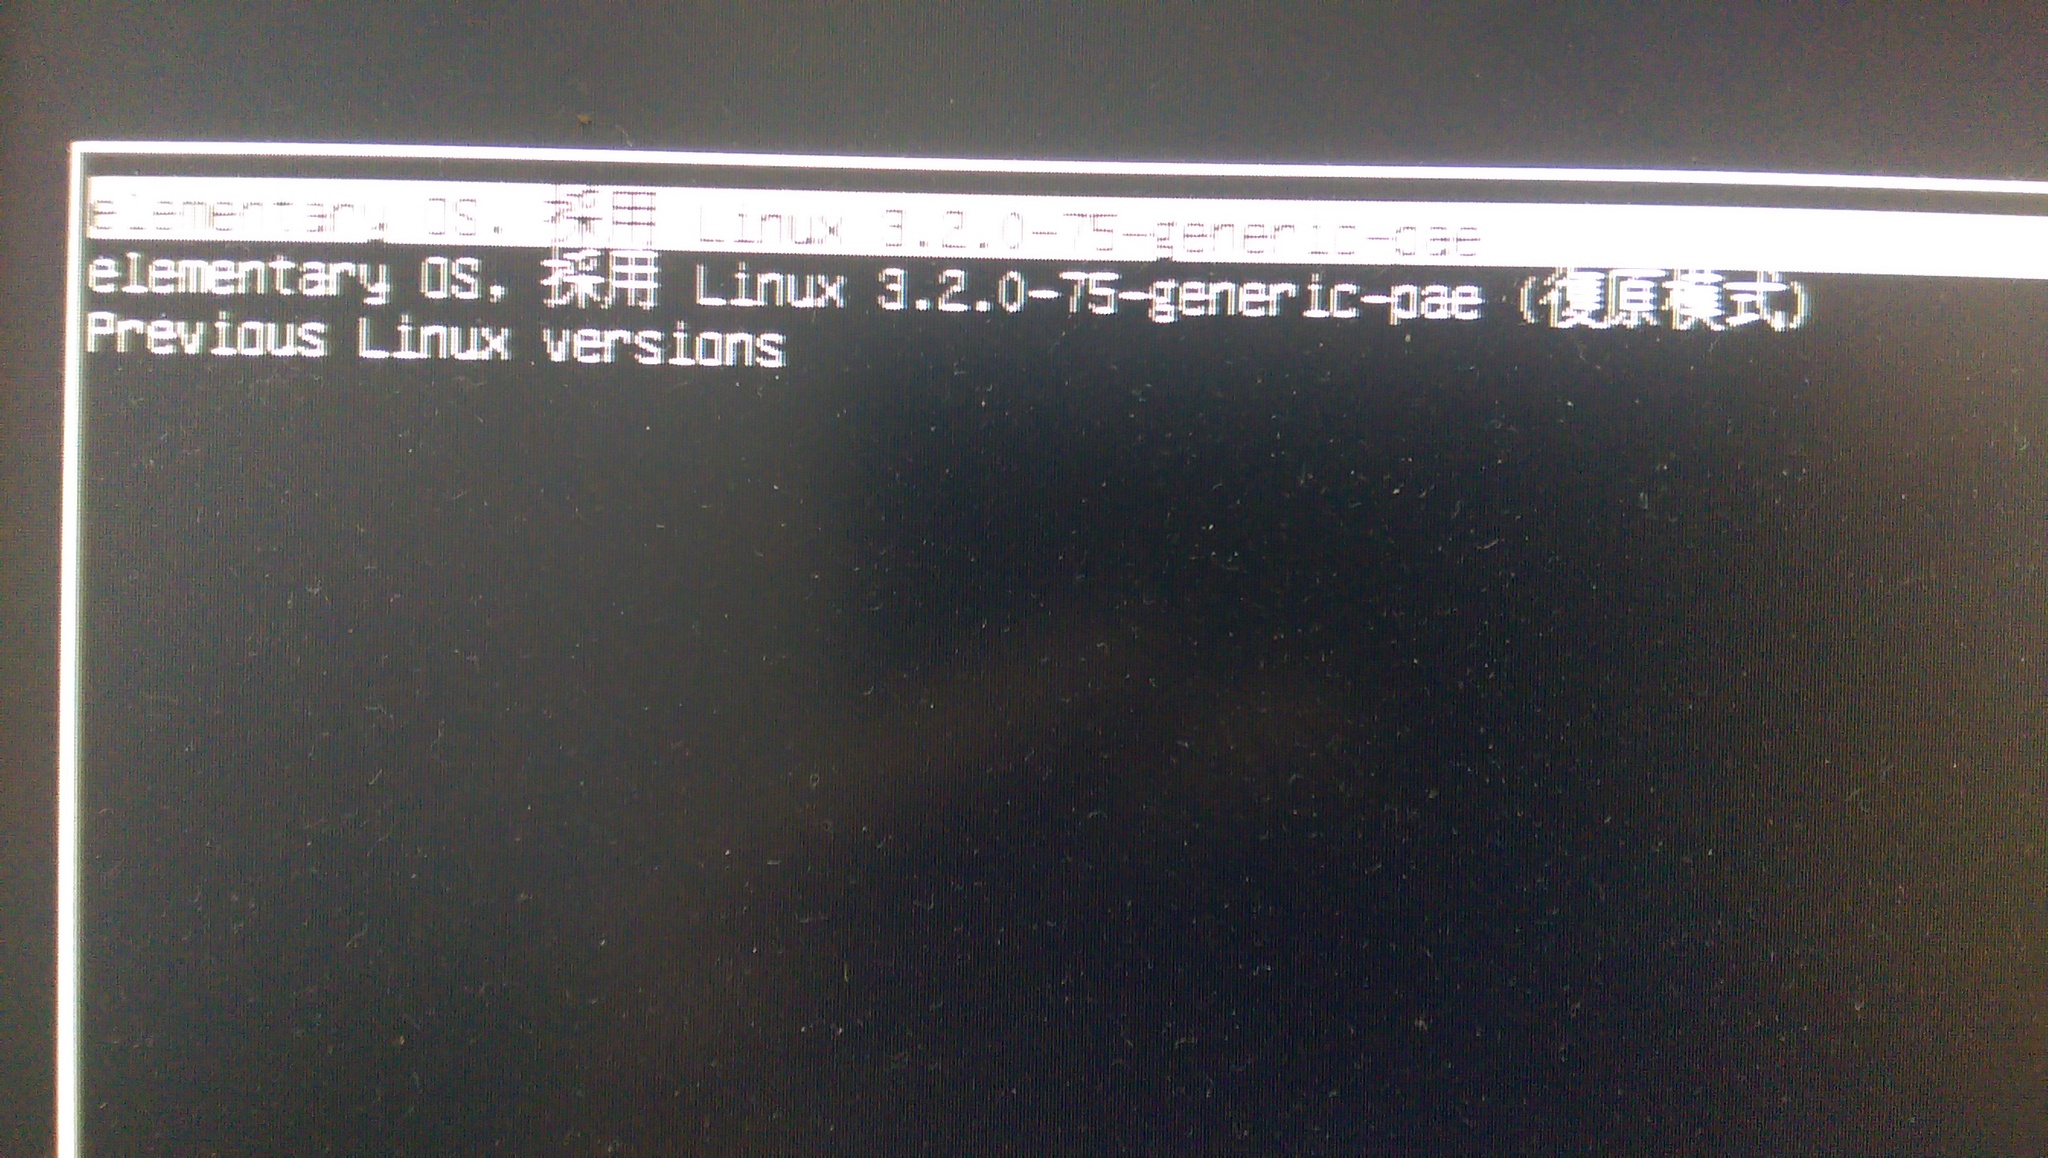
ChromeOS – crouton vs chrubuntu
crouton 和 chrubuntu 二個都是可以用來協助使用者,在 Chromebook/Chrombox 安裝 Ubuntu Linux 或是其它 Linux Distribution 的工具,但操作的步驟不太相同,但都要先把 ChromeOS 切換到開發人員模式。
不熟悉 ChromeOS 或是 Linux 的使用者,常常會分不清楚這二者的差別,或是該使用哪一種方式來安裝其它的作業系統,
底下試著將二者做一下簡單的區分:[@more@]
| crouton | chrubuntu | |
| 安裝位置 | USB 隨身碟或 SD 卡 | Chromebook/Chromebox 上的 eMMC |
| 執行方式 | 先執行 ChromeOS,再以 chroot 方式來執行,二者可以切換 | 可以在開機時切換要使用的作業系統 |
| 執行效能 | 效能會比較差一些 | 效能很不錯 |
| 製作風險度 | 相對安全一些,動到 ChromeOS系統的地方不大 | 風險性大,有可能操作錯誤,造成 ChromeOS 無法開機 |
| 新系統調校 | 較煩瑣,要修改的地方很多 | 較簡單,須要修改的地方相對很少 |
建議一開始先使用 crouton 的方式來試做,等到比較熟悉之後,再改用 chrubuntu 的方式,比較能發揮出 Chromebook/Chromebox 的效能。
把 Chromebox 給玩掛了!
今天在試玩 chrubuntu 時,終於發生最擔心發生的事,就是把 ChromeOS 給玩掛了,開機到這個畫面就不動了!
出現 Chrome 作業系統已毀損或遺失,請插入系統修復 USB 隨身碟或 SD 卡。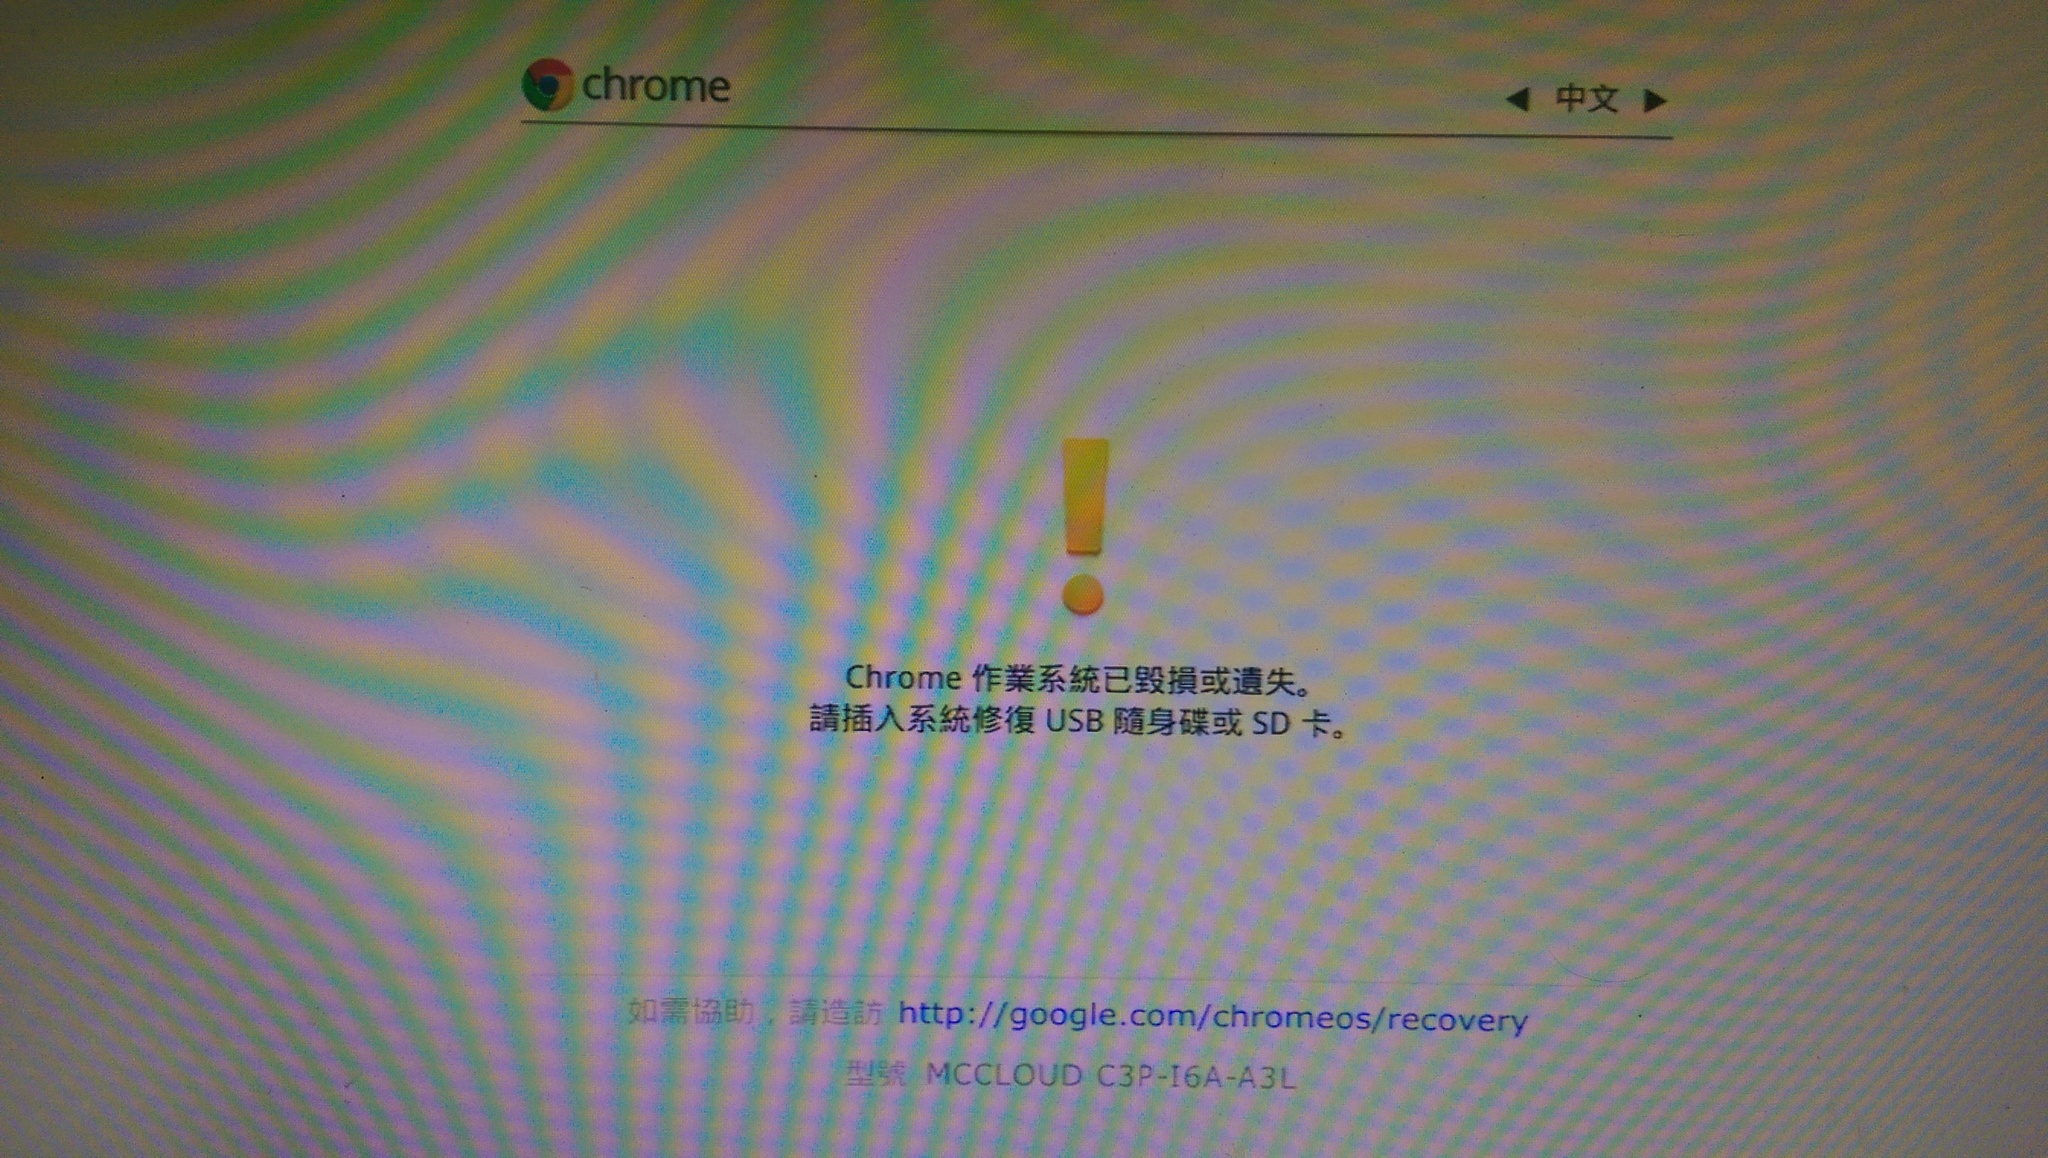 [@more@]解決的方式:
底下在 Windows 7 處理
1. 打開 Google Chrome 瀏覽器,連線到 http://google.com/chromeos/recovery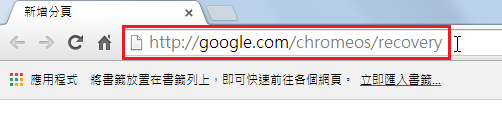
2. 選擇 使用 Chromebook 還原公用程式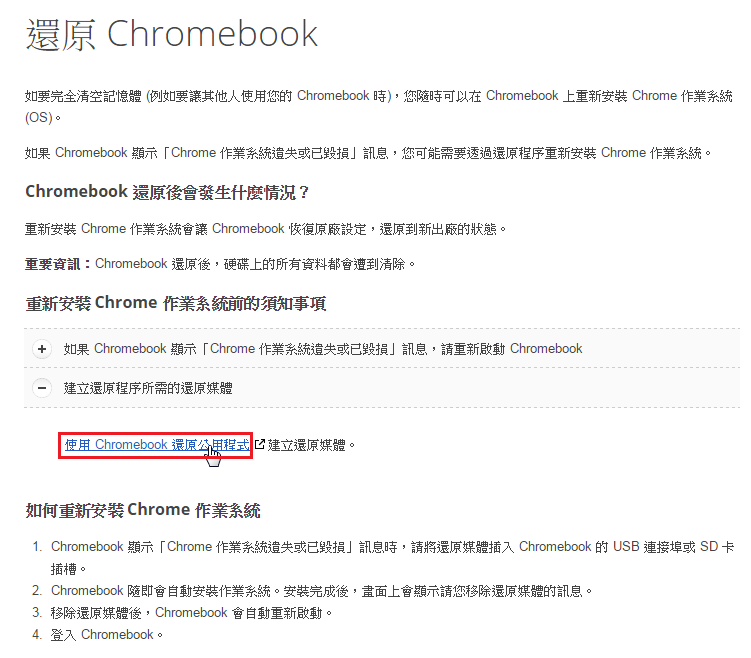
3. 選擇 Chromebook 還原公用程式
4. 開啟 Chromebook Recovery Utility 擴充功能畫面,請選擇 +免費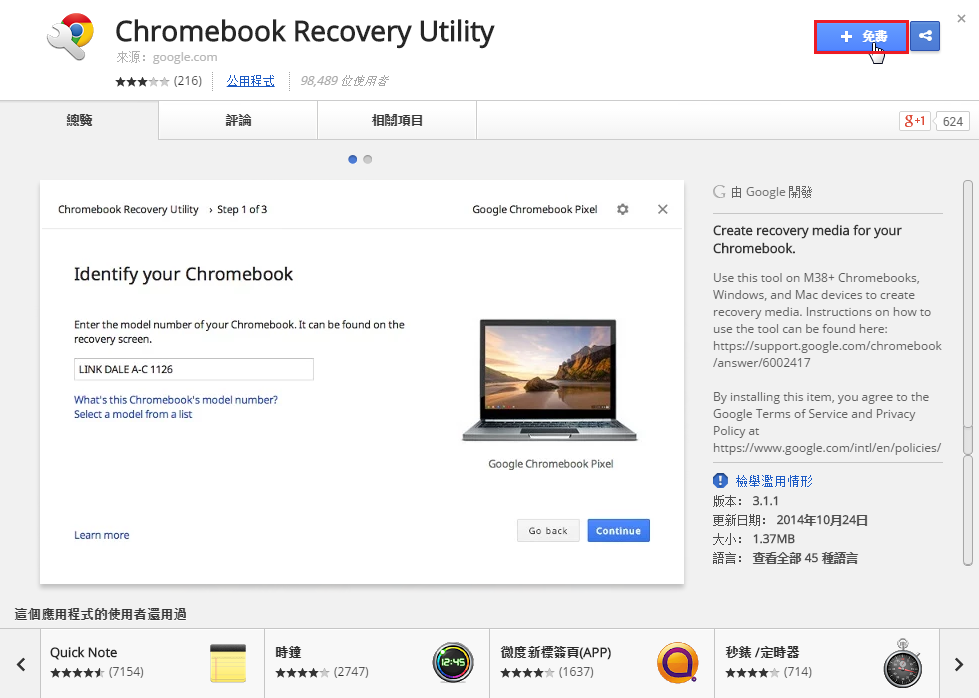
5. 選擇 新增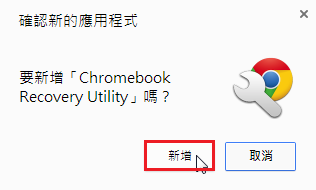
6. 安裝完成
7. 執行 Chromebook Recovery Utility,選擇 Get started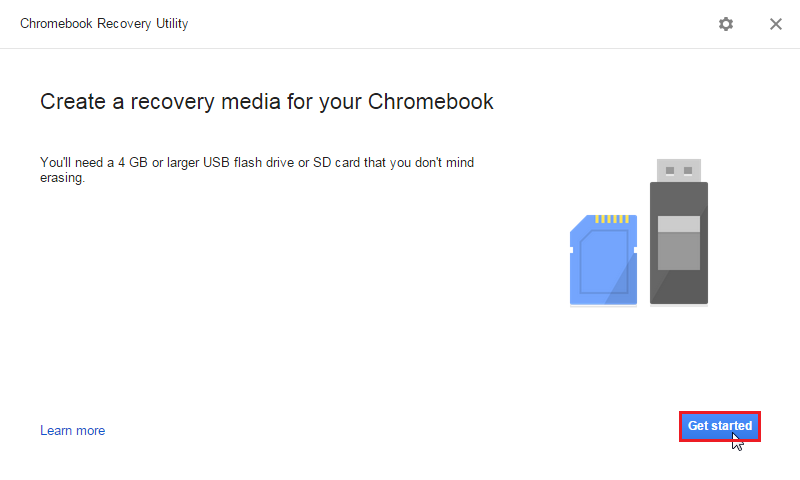
8. 輸入的 Chromebook/Chromebox 的型別,如果不知道的話,可以選擇 Select a model from a list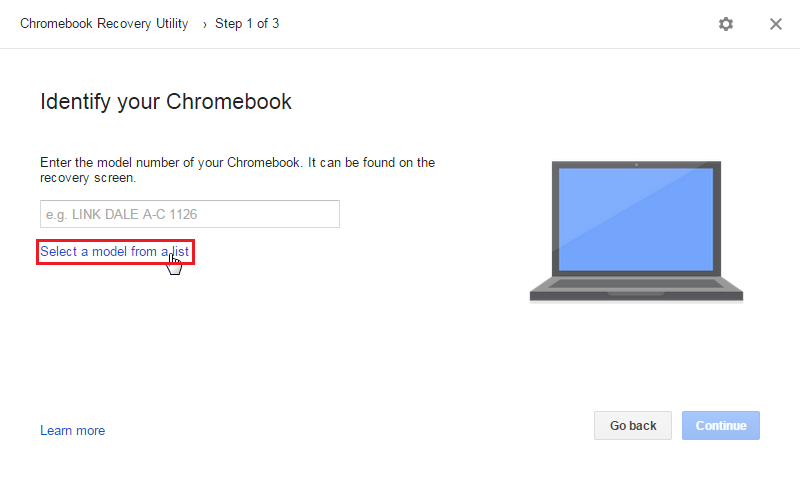
9. 確認之後,請按 Continue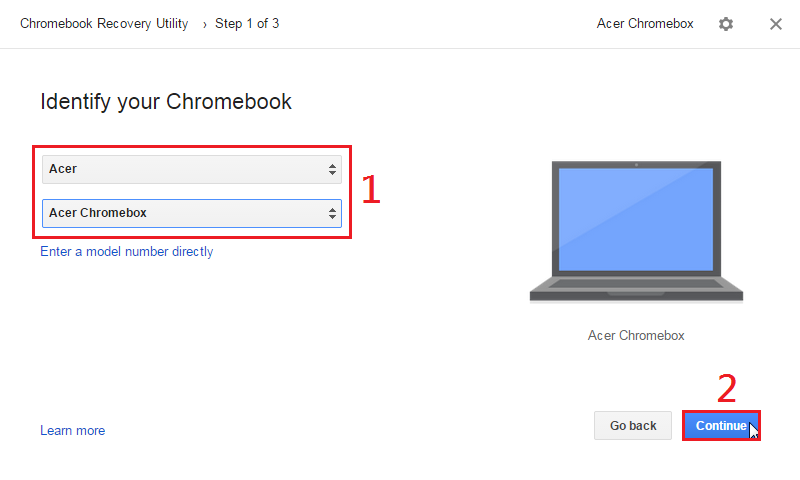
10. 插入您要用來做為緊急復原的 USB 隨身碟或 SD 卡,最後按 Continue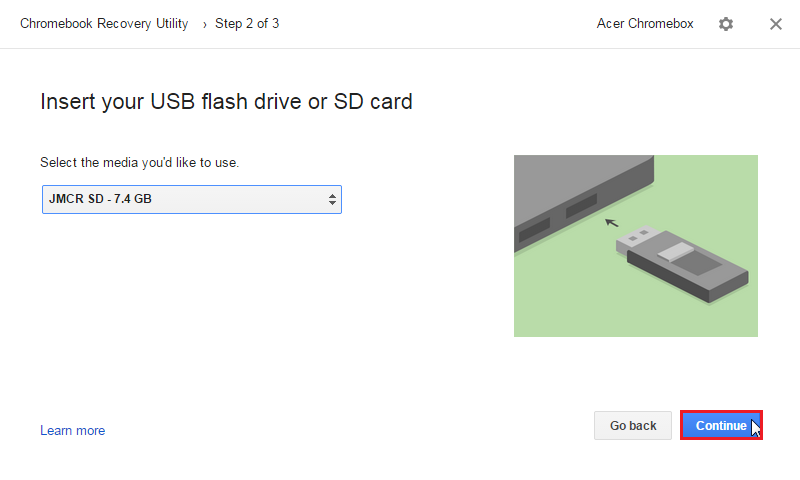
11. 警告資料將會被清除,請按 Create now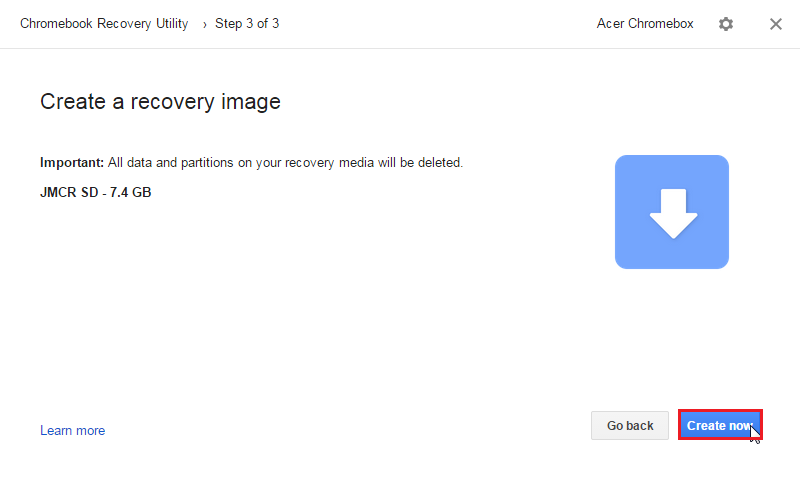
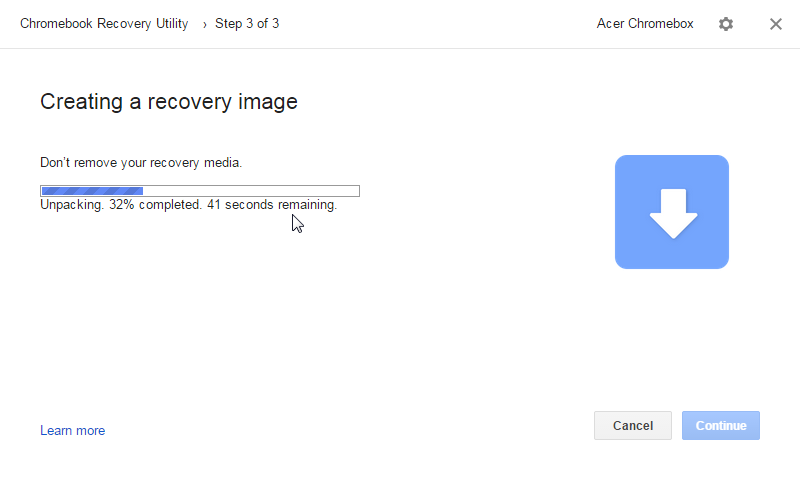
12. 製作中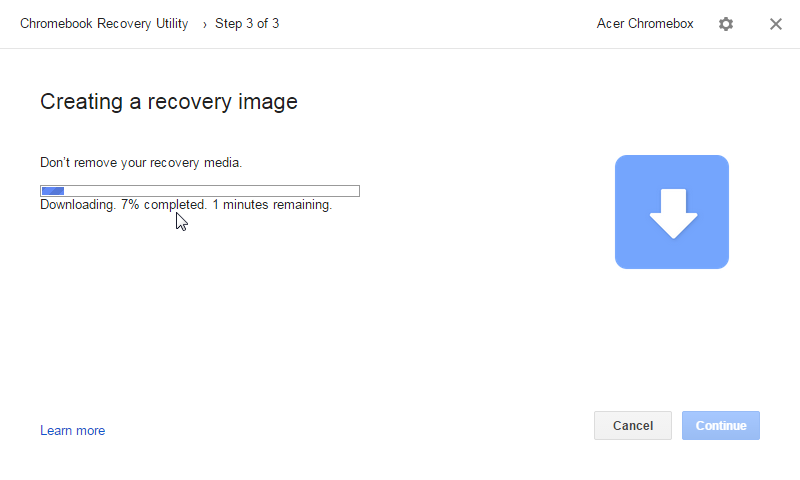


13. 製作完成,請按 Done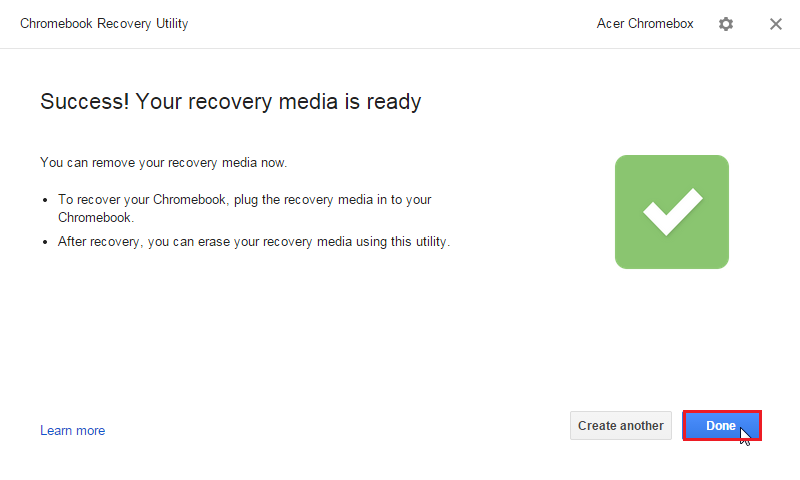
14. 進行復原,將製好的 USB 隨身碟或是 SD 卡,插入 Chromebook/Chromebox,系統會進行還原
15. 看到這個畫面,代表系統已還原成功,請按 Ctrl+Alt+Delete 重新啟動電腦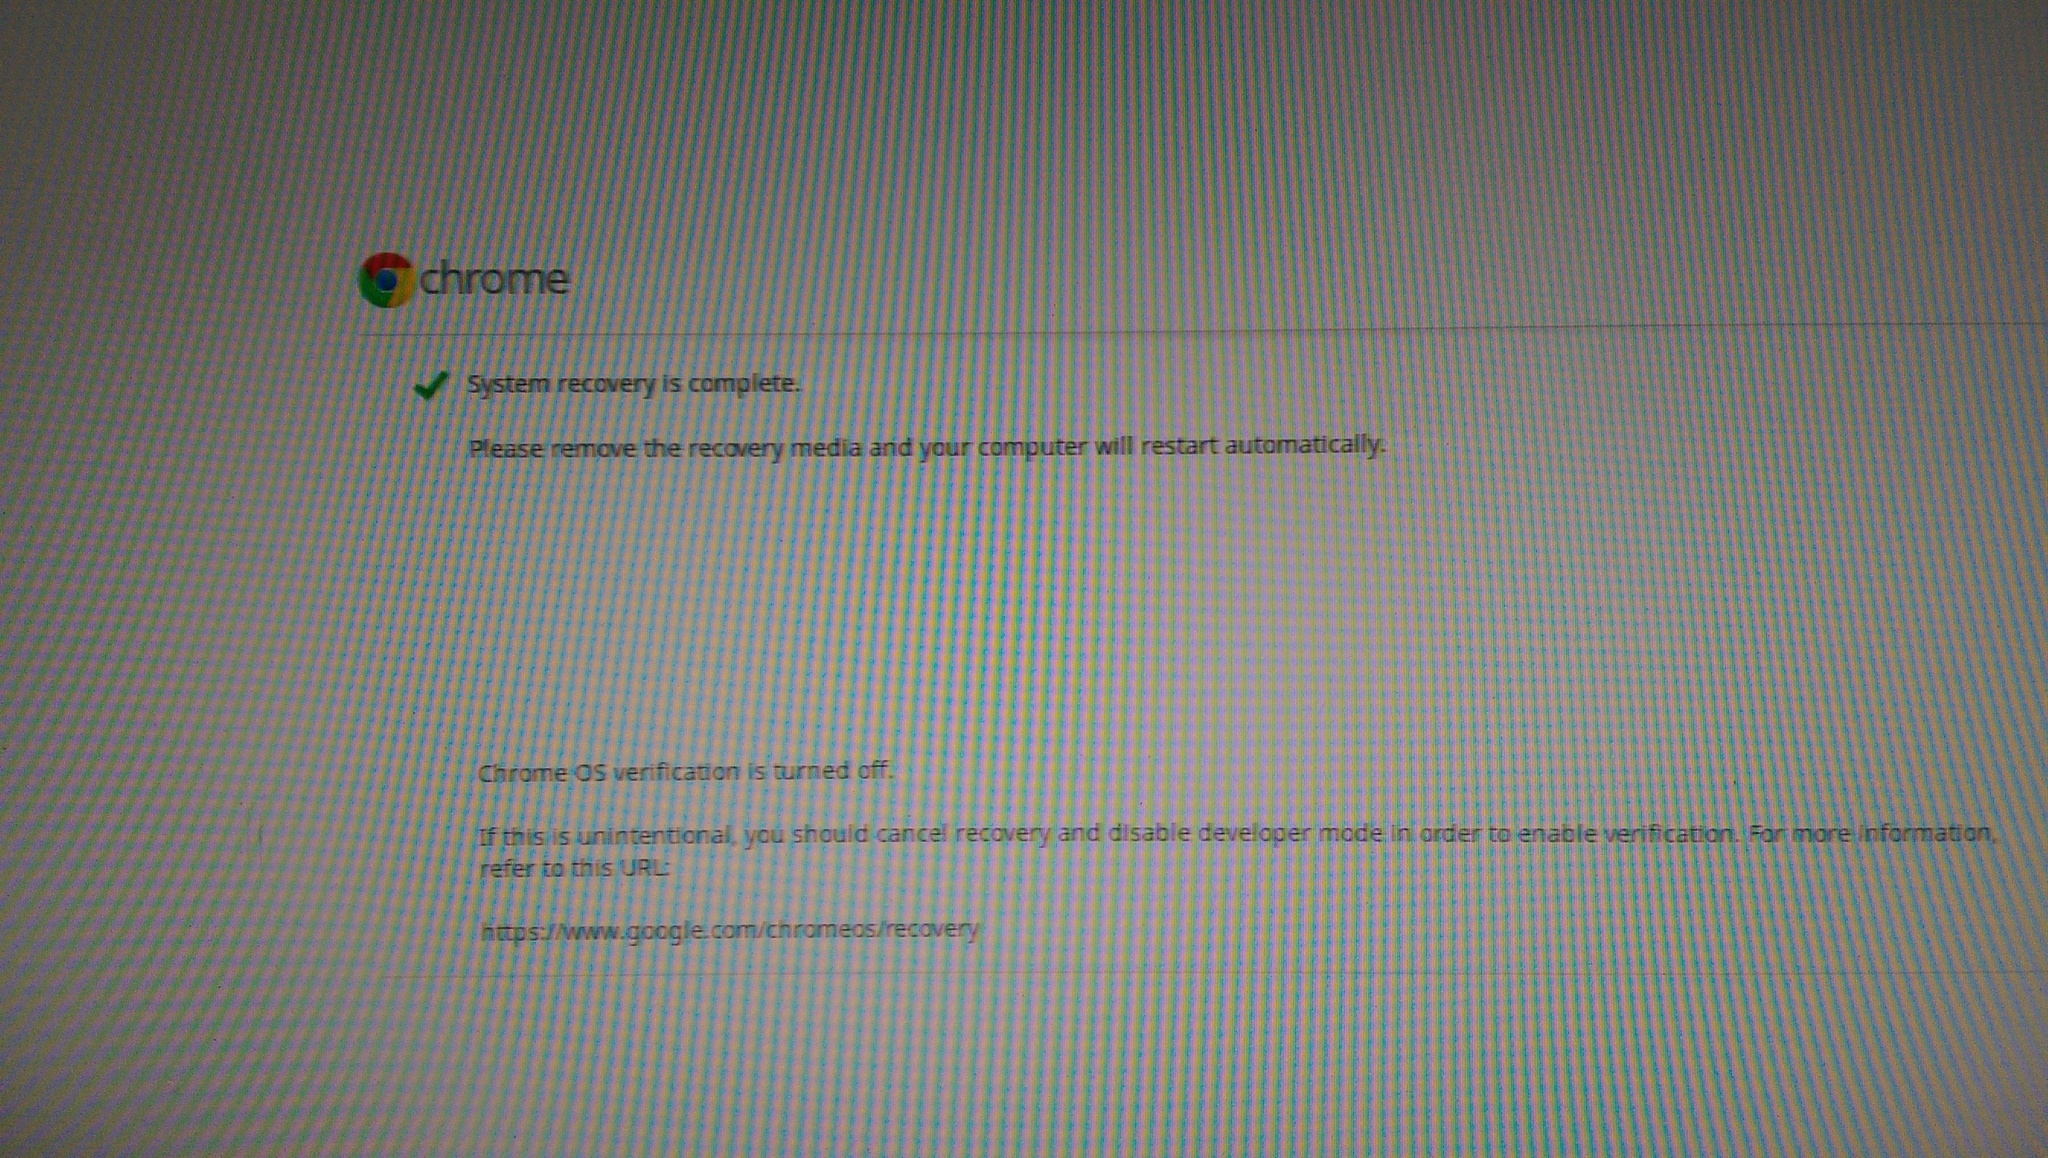
16. 重新進行帳號登入及設定,如果登入的是之前的帳號,系統會把之前的設定值帶回
Acer Chromebox – Ubuntu 14.04 桌面打扮成 Mac OS X
參考網頁:
MBuntu (MacBuntu) 14.10/14.04 Transformation Pack Is Ready For Ubuntu 14.10/14.04 – NoobsLab
將 Ubuntu 14.10 Unity 桌面打扮成 Mac OS X Yosemite « Jamyy’s Weblog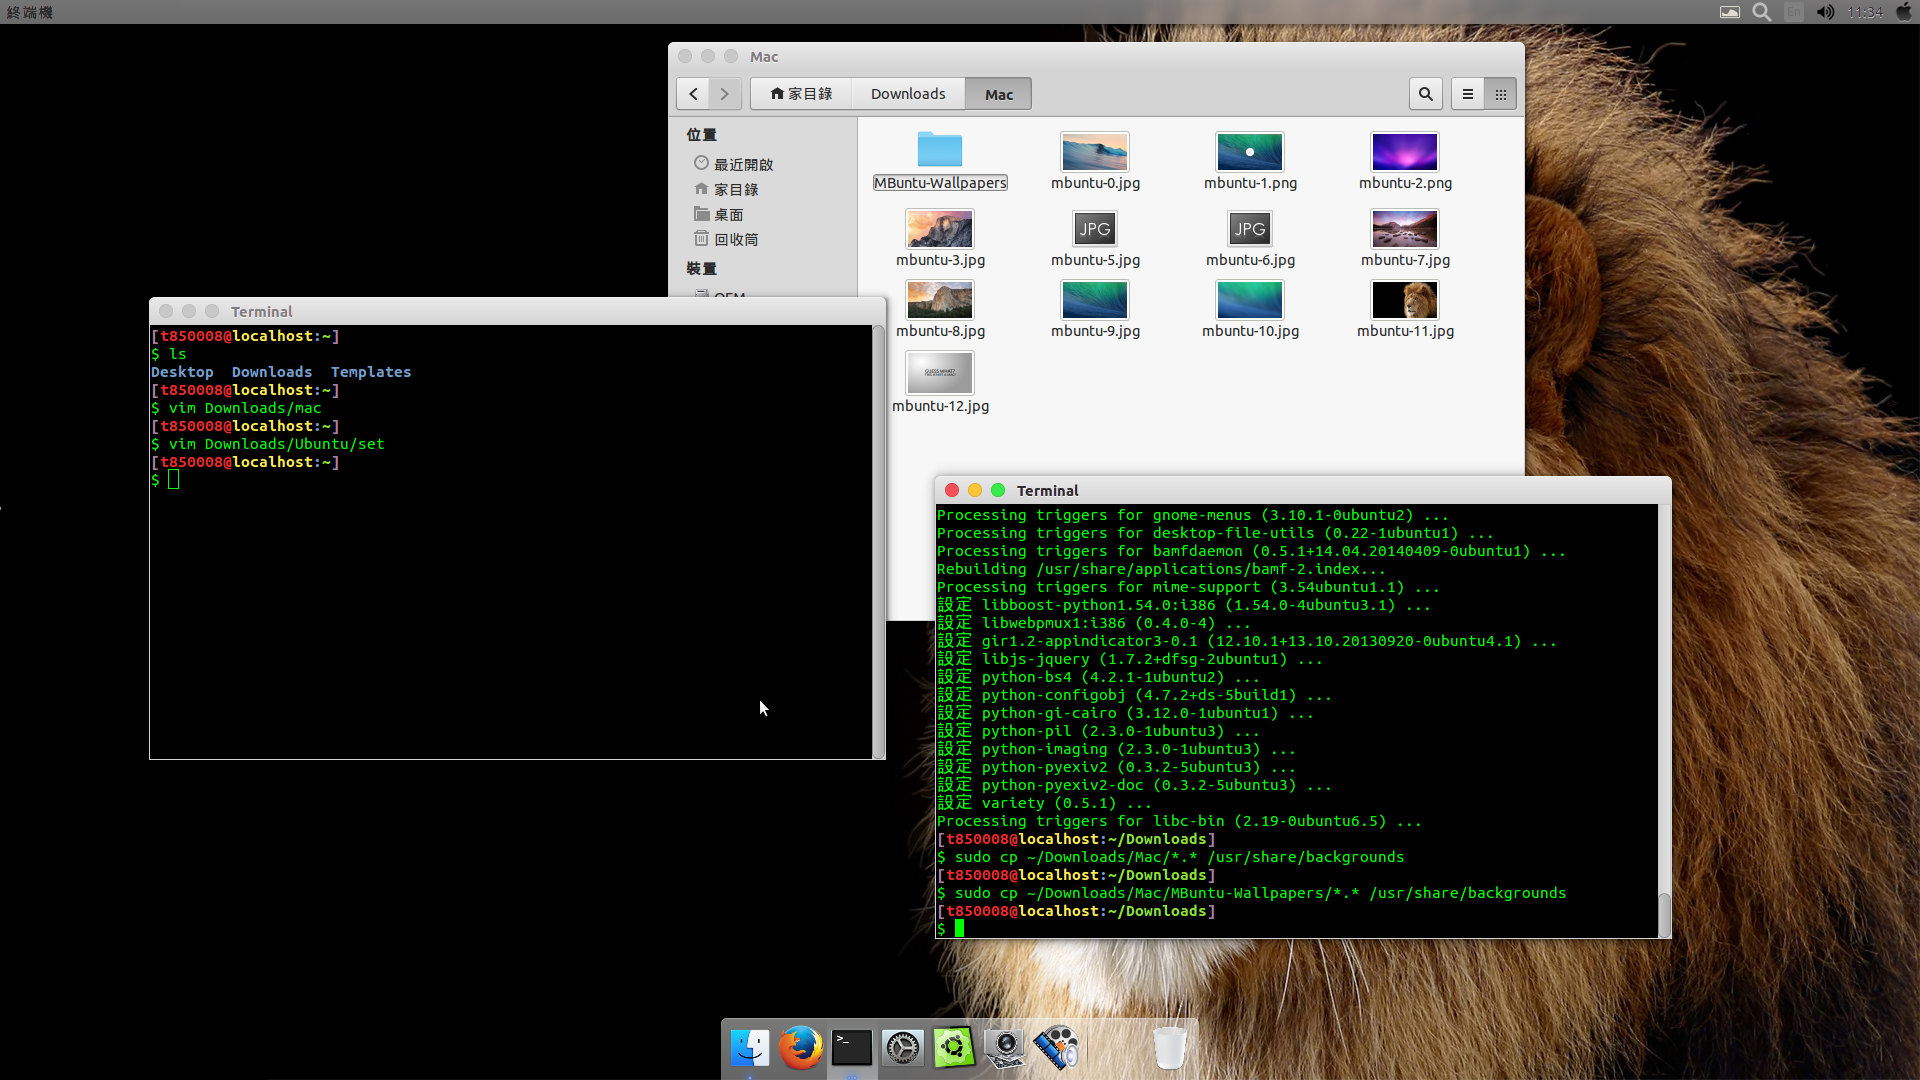
[@more@]
下載桌布
$ wget http://drive.noobslab.com/data/Mac-14.10/MBuntu-Wallpapers.zip -P ~/Download
解壓縮
$ sudo unzip ~/Download/MBuntu-Wallpapers.zip /usr/share/backgrounds
安裝佈景主題、圖示、游標
新增套件庫
$ sudo add-apt-repository ppa:noobslab/themes
更新套件庫
$ sudo apt-get update
安裝佈景主題、圖示、游標
$ sudo apt-get install mbuntu-y-ithemes-v4
$ sudo apt-get install mbuntu-y-icons-v4
若要移除佈景主題、圖示、游標
$ cd /usr/share/icons/mac-cursors && sudo ./uninstall-mac-cursors.sh
$ sudo apt-get remove –purge mbuntu-y-icons-v4 mbuntu-y-ithemes-v4
安裝 Slingscold Launcher
新增套件庫
$ sudo add-apt-repository ppa:noobslab/apps
更新套件
$ sudo apt-get update
安裝 Slingscold 套件
$ sudo apt-get install slingscold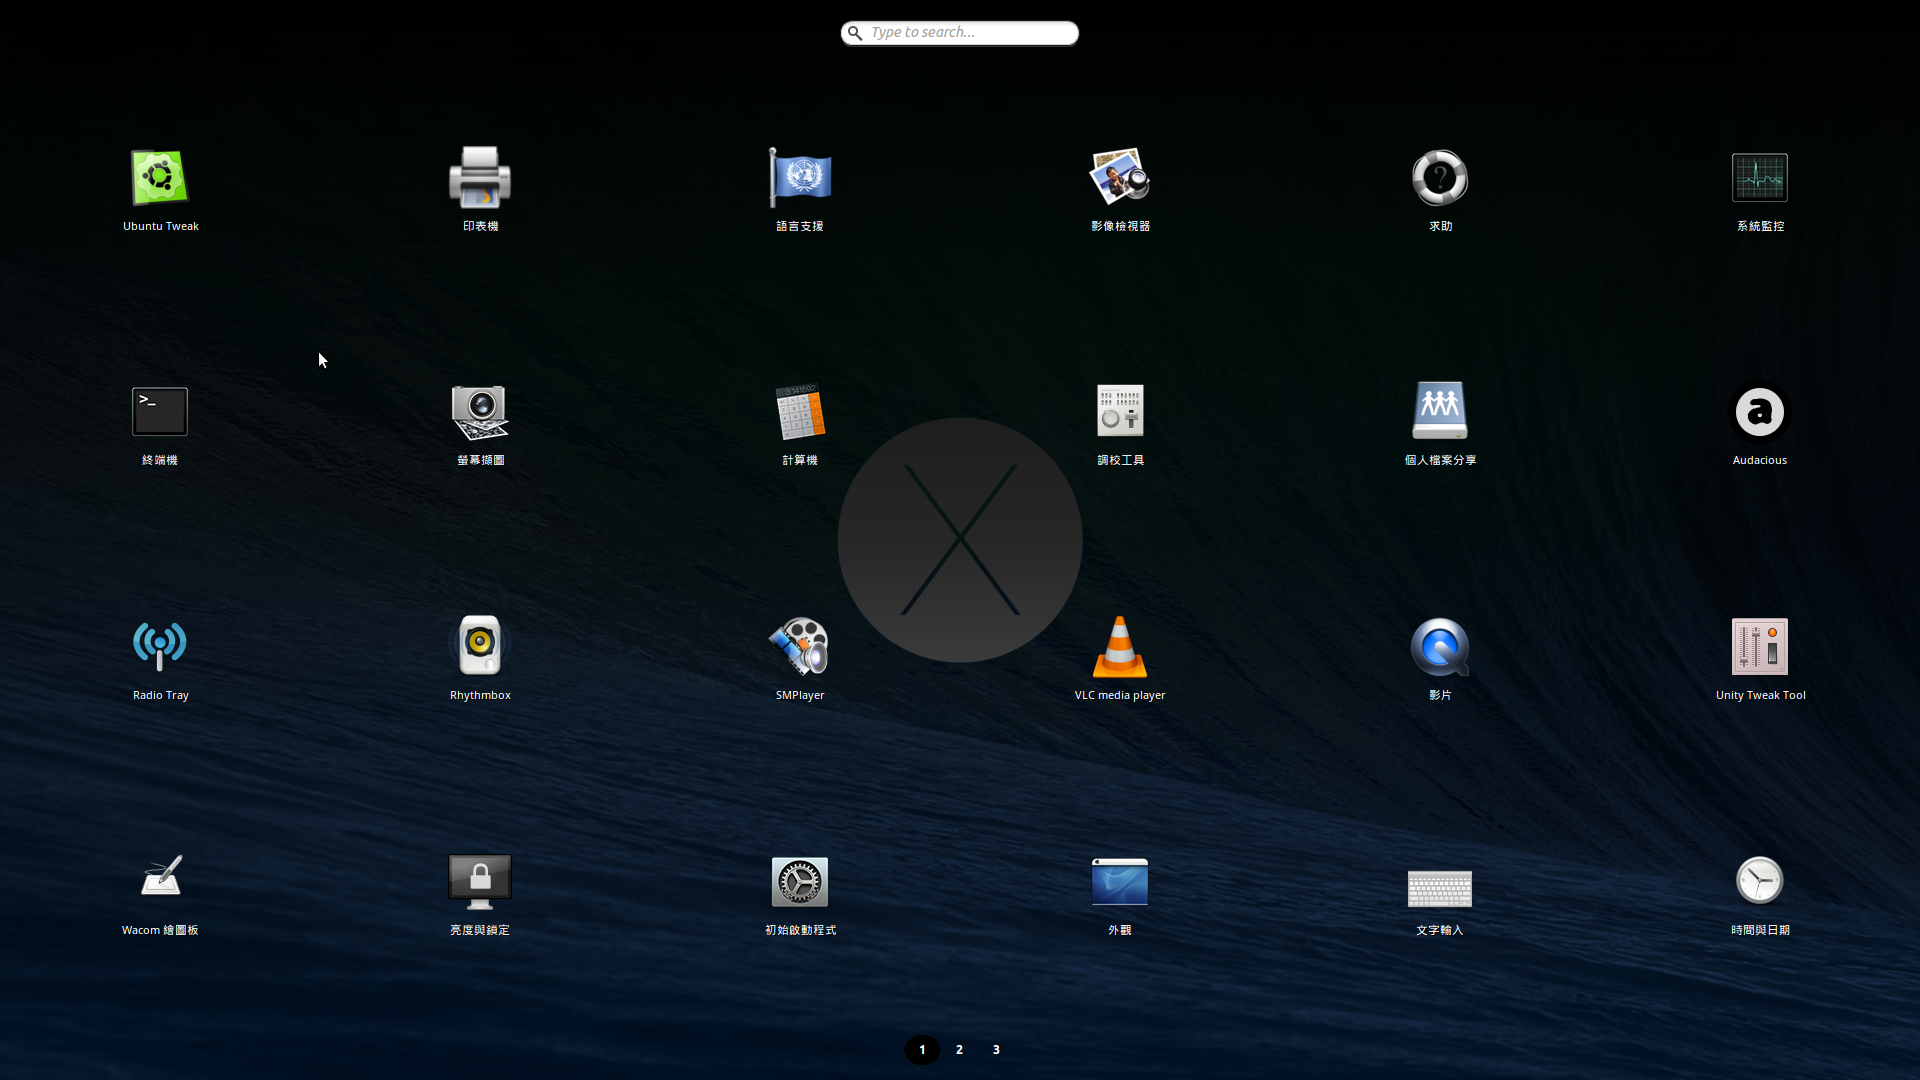
安裝 Indicator-Synapse
新增套件庫
$ sudo add-apt-repository ppa:noobslab/apps
更新套件庫
$ sudo apt-get update
安裝 Indicator-Synapse 套件
$ sudo apt-get install indicator-synapse
安裝 Docky
新增套件庫
$ sudo add-apt-repository ppa:docky-core/ppa
更新套件庫
$ sudo apt-get update
安裝 Docky
$ sudo apt-get install docky
安裝 Docky Themes
新增套件庫
$ sudo add-apt-repository ppa:noobslab/themes
更新套件庫
$ sudo apt-get update
安裝 Docky Themes
$ sudo apt-get install mbuntu-y-docky-skins-v4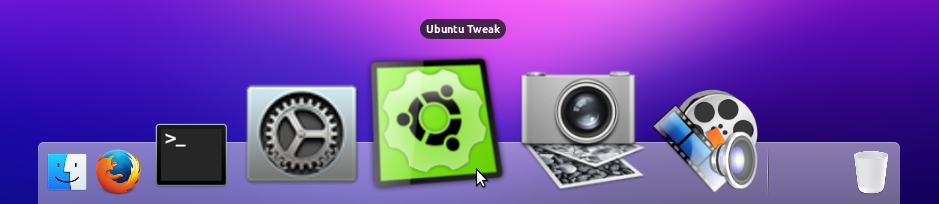
若要移除 Docky 和 Docky Themes
$ sudo apt-get autoremove docky mbuntu-y-docky-skins-v4
設定佈景主題和圖示
$ cd ~/Downloads && wget -O config.sh http://drive.noobslab.com/data/Mac-14.10/config.sh
$ chmod +x config.sh;./config.sh
回復原設定值
$ cd ~/Downloads && wget -O unconfig.sh http://drive.noobslab.com/data/Mac-14.10/unconfig.sh
$ chmod +x unconfig.sh;./unconfig.sh
在 Launcher 加入 Apple Logo
$ sudo mv /usr/share/unity/icons/launcher_bfb.png /usr/share/unity/icons/launcher_bfb.png.backup
$ cd ~/Downloads;wget -O apple_launcher_bfb.png http://drive.noobslab.com/data/Mac-14.10/launcher-logo/apple/launcher_bfb.png;cd
$ sudo cp ~/Downloads/apple_launcher_bfb.png /usr/share/unity/icons/launcher_bfb.png
回復原先的設定值
$ sudo mv /usr/share/unity/icons/launcher_bfb.png.backup /usr/share/unity/icons/launcher_bfb.png
安裝 Unity Tweak Tool 來設定佈景主題和圖示
$ sudo apt-get install unity-tweak-tool