2. 如果有使用過之前的版本,可以選擇匯入之前的記錄[@more@]
3. Xshell 執行畫面3.
比較特別的是,Xshell 是以類似標籤的方式,來區隔每一個連線,連線數量大時,會比較不佔工作列空間,切換也比較方便!
更多的 Xshell 特色,請參考:http://www.netsarang.com/products/xsh_screenshot.html
下圖取自官網
全新的繁體中文 WordPress 網站《宜蘭部落格教育平台 網站》
2. 如果有使用過之前的版本,可以選擇匯入之前的記錄[@more@]
3. Xshell 執行畫面3.
比較特別的是,Xshell 是以類似標籤的方式,來區隔每一個連線,連線數量大時,會比較不佔工作列空間,切換也比較方便!
更多的 Xshell 特色,請參考:http://www.netsarang.com/products/xsh_screenshot.html
下圖取自官網
Xshell 是由 NetSarang 公司所開發的軟體,可以支援 SSH, SFTP, TELNET, RLOGIN and SERIAL 等連線,功能非常強大,個人在家裡及學校可以免費使用。
NetSarang Xshell 官方網站:
http://www.netsarang.com/products/xsh_overview.html
NetSarang Xshell 下載網頁:
http://www.netsarang.com/download/down_xsh.html
要下載之前,請先到下載網頁填入一些個人資料,網站會寄一封軟體下載點的 mail,提供下載。[@more@]1. 按 mail 中的下載連結來下載 Xshell
列出可以更新的套件
# pacman -Quq
dbus
libdbus
linux-firmware
linux-sun7i
openresolv
uboot-cubieboard2[@more@]改採信件通知管理者
# vim /usr/local/bin/check-update
#!/bin/bash
/usr/bin/pacman -Quq > /tmp/$(date +%F)
if [ -s /tmp/$(date +%F) ] ;then
/usr/bin/mail -s “Arch Linux Updates Available” xxxx@gmail.com < /tmp/$(date +%F)
rm -rf /tmp/$(date +%F)
else
rm -rf /tmp/$(date +%F)
fi
更改檔案執行權限
# chmod 700 /usr/local/bin/check-update
加入到 crontab
# crontab -l
0 0,12 * * * /usr/bin/pacman -Syy > /dev/null 2>&1
0 1,13 * * * /usr/local/bin/check-update
# mailq
-Queue ID- –Size– —-Arrival Time—- -Sender/Recipient——-
B1C9B217921A* 458 Sun Jan 25 01:17:14 root@PC111.test.ilc.edu.tw
tester@gmail.com
C1BC72179219* 98915 Sun Jan 25 01:06:44 root@PC111.test.ilc.edu.tw
tester@gmail.com
— 97 Kbytes in 2 Requests.
有二封寄不出的信
查看一下紀錄
# grep C1BC72179219 /var/log/maillog
Jan 25 01:06:44 PC111 postfix/cleanup[31640]: C1BC72179219: message-id=<20150124170644.ABA122018DD0@PC111.test.ilc.edu.tw>
Jan 25 01:06:44 PC111 postfix/qmgr[30282]: C1BC72179219: from=<root@PC111.test.ilc.edu.tw>, size=98915, nrcpt=1 (queue active)
清除佇列 queue
# postsuper -d ALL
postsuper: Deleted: 2 messages
1. 先停止 postfix 服務
# systemctl stop postfix
# systemctl disable postfix
rm ‘/etc/systemd/system/multi-user.target.wants/postfix.service'[@more@]2. 安裝 ssmtp 套件
# yum install ssmtp –enablerepo=epel
3. 備份原設定檔 /etc/ssmtp/ssmtp.conf
# cp /etc/ssmtp/ssmtp.conf /etc/ssmtp/ssmtp.conf.$(date +%F)
4. 修改設定檔
1. 可以使用 yum info updates 指令來查詢可以可升級的套件
# yum info updates | grep Name | awk ‘{print $3}’
jasper-libs
或是
[@more@]2. 使用 yum-cron
# yum install yum-cron
3. 修改設定檔
# vim /etc/yum/yum-cron.conf
# Whether a message should be emitted when updates are available,
# were downloaded, or applied.
update_messages = yes
# Whether updates should be downloaded when they are available.
download_updates = no
# Whether updates should be applied when they are available. Note
# that download_updates must also be yes for the update to be applied.
apply_updates = no
4. 啟動 yum-cron 服務
# systemctl start yum-cron
5. 設定開機時啟動 yum-cron 服務
# systemctl enable yum-cron
Scratch 2.0 Offline Editor v432 新版本
[@more@]Scratch Offline Editor 下載網頁:
http://scratch.mit.edu/scratch2download/
但安裝完成看起來好像是 v431b 版
fail2ban 在 CentOS 7.x 上的執行方式和之前的 CentOS 5.x/6.x 有一些不同
安裝方式:
1. 使用 epel 套件庫
# rpm -Uvh http://dl.fedoraproject.org/pub/epel/7/x86_64/e/epel-release-7-5.noarch.rpm
# yum install fail2ban –enablerepo=epel[@more@]2. 這裡以建立 ssh 服務保護為例
# vim /etc/fail2ban/jail.d/sshd.local
[ssh-iptables]
enabled = true
filter = sshd
action = iptables[name=SSH, port=ssh, protocol=tcp]
logpath = /var/log/secure
maxretry = 3
bantime = 86400
3. 啟動 fail2ban
# systemctl start fail2ban
4. 設定開機時啟動
# systemctl enable fail2ban
5. 進行測試
login as: root
root@192.168.1.111’s password: ***
Access denied
root@192.168.1.111’s password: **
Access denied
root@192.168.1.111’s password: ***
Access denied
root@192.168.1.111’s password: ***
# iptables -L -n | tail -4
Chain f2b-SSH (1 references)
target prot opt source destination
REJECT all — 192.168.1.3 0.0.0.0/0 reject-with icmp-port-unreachable
RETURN all — 0.0.0.0/0 0.0.0.0/0
參考網頁:
Debian / Ubuntu Linux 空間釋放 – 清除沒用的檔案 – Tsung’s Blog
清理 Debian/Ubuntu 儲存空間 – OpenFoundry
這些工具都可以協助管理人員清除一些可能沒有用的檔案,但一般來說,不建議使用,因為一旦誤刪了之後,可能會造成嚴重的後果。
$ sudo apt-get install debfoster deborphan bleachbit
deborphan
因為 Linux 都是支援多國語言,所以可以同時支援多國語言的輸入及顯示,但有時使用者並不須要支援這多種語言時,就可以把用不到的語系給清除掉。
$ head /usr/share/applications/chromium-browser.desktop
[Desktop Entry]
Version=1.0
Name=Chromium Web Browser
Name[ast]=Restolador web Chromium
Name[bg]=Уеб четец Chromium
Name[bn]=ক্রোমিয়াম ওয়েব ব্রাউজার
Name[bs]=Chromium web preglednik
Name[ca]=Navegador web Chromium
Name[ca@valencia]=Navegador web Chromium
Name[da]=Chromium netbrowser
安裝 localepurge 工具
$ sudo apt-get install localepurge
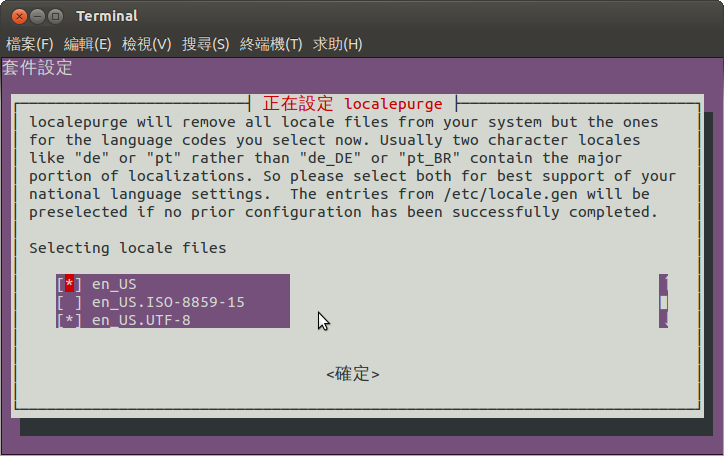
第一次安裝 localepurge 時,系統會問你要保留哪些語系,回答過一次後,未來每次透過 apt/aptitude 安裝套件時,它都會自動清理一次。
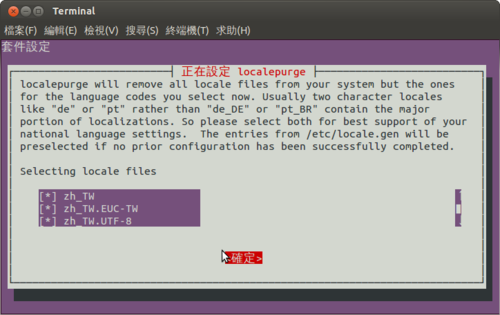
設定檔 /etc/locale.nopurge
$ sudo tail -5 /etc/locale.nopurge
en_US
en_US.UTF-8
zh_TW
zh_TW.EUC-TW
zh_TW.UTF-8
之後在進行套件安裝時,就會進行這項動作
正在進行 menu 的觸發程式 …
localepurge: Disk space freed in /usr/share/locale: 58596 KiB
localepurge: Disk space freed in /usr/share/man: 4920 KiB
localepurge: Disk space freed in /usr/share/gnome/help: 16152 KiB
localepurge: Disk space freed in /usr/share/omf: 1276 KiB
Total disk space freed by localepurge: 80944 KiB