ArchLinux – 安裝 Moodle 2.6

Moodle 官方網站:http://www.moodle.org
因為 Moodle 2.7.x 安裝起來畫面有些奇怪,所以改安裝 2.6.x 版
1.下載 Moodle 2.6.5+
# wget https://download.moodle.org/download.php/direct/stable26/moodle-latest-26.tgz
下載正體中文語系 for 2.6.5+
# wget https://download.moodle.org/download.php/direct/langpack/2.6/zh_tw.zip

2. 解壓縮
# tar xvzf moodle-latest-26.tgz -C /srv/http

3. 建立存放 Moodle 課程資料的目錄
# mkdir /home/moodledata
4. 解壓縮正體中文語系
# unzip zh_tw.zip -d /home/moodledata
5. 改變目錄權限
# chown -R http:http /home/moodledata[@more@]

6. 進行安裝,開啟瀏覽器在網址列輸入
http://Server’s IP/moodle

如果出現下面的錯誤訊息

修改 /etc/php/php.ini
# sed -i ‘s/;extension=iconv.so/extension=iconv.so/’ /etc/php/php.ini

重新啟動 Server
# systemctl restart php-fpm

預設的語系是 英文

改成 正體中文

如果出現 Zip PHP 擴展的錯誤,請做下面的修改

修改 /etc/php/php.ini
# sed -i ‘s/;extension=zip.so/extension=zip.so/’ /etc/php/php.ini
重新啟動 Server
# systemctl restart php-fpm

課程資料存放路徑

設定使用的 資料庫 MariaDB

資料庫設定

/srv/http/moodle/config.php 的設定

版權聲明

伺服器環境檢查,後面出現檢查,代表是要做修改的部分

修改 /etc/php/php.ini
# sed -i ‘s/;extension=gd.so/extension=gd.so/’ /etc/php/php.ini
# sed -i ‘s/;extension=openssl.so/extension=openssl.so/’ /etc/php/php.ini
# sed -i ‘s/;extension=xmlrpc.so/extension=xmlrpc.so/’ /etc/php/php.ini
# sed -i ‘s/;extension=soap.so/extension=soap.so/’ /etc/php/php.ini
# sed -i ‘s/;extension=intl.so/extension=intl.so/’ /etc/php/php.ini
# sed -i ‘s/;zend_extension=opcache.so/zend_extension=opcache.so/’ /etc/php/php.ini

修改完畢

重新啟動 Server
# systemctl restart php-fpm

完成安裝

最後加入工作排程
# crontab -u http -e

加入下面一行
*/15 * * * * /usr/bin/php /srv/http/moodle/admin/cli/cron.php > /dev/null 2>&1

ArchLinux 安裝 XOOPS 2.5.7

使用的是 XOOPS 輕鬆架網站上的版本
XOOPS輕鬆架下載:http://campus-xoops.tn.edu.tw/modules/tad_uploader/index.php?of_cat_sn=11
[@more@]1.下載 XOOPS
# wget http://campus-xoops.tn.edu.tw/uploads/tad_uploader/tmp/61/my_xoops_base_20140701.tgz

2.解壓縮
# tar xvzf my_xoops_base_20140701.tgz -C /srv/http

3.更改目錄名稱及搬移目錄
# mv /srv/http/public_html /srv/http/xoops
# mv /srv/http/xoops_data /srv
# mv /srv/http/xoops_lib /srv

4. 更改目錄權限
# chown -R root:root /srv/http/xoops
# chown -R http:http /srv/http/xoops/uploads
# chmod 777 /srv/http/xoops/mainfile.php
# chmod 777 /srv/http/xoops/include/license.php
# chmod 777 /srv/http/xoops_data/caches
# chmod 777 /srv/http/xoops_data/caches/xoops_cache
# chmod 777 /srv/http/xoops_data/caches/smarty_cache
# chmod 777 /srv/http/xoops_data/caches/smarty_compile
# chmod 777 /srv/http/xoops_data/configs

5. 開啟瀏覽器進行安裝

6. 安裝完畢後的設定

# chmod 444 /srv/http/xoops/mainfile.php
# mkdir /home/xoops
# mv /srv/http/xoops_data /home/xoops
# mv /srv/http/xoops_lib /home/xoops
修改 /srv/http/xoops/mainfile.php
# vim /srv/http/xoops/mainfile.php
    // For forward compatibility
    // Physical path to the XOOPS library directory WITHOUT trailing slash
    define(‘XOOPS_PATH’, “/home/xoops/xoops_lib“);
    // Physical path to the XOOPS datafiles (writable) directory WITHOUT trailing slash
    define(‘XOOPS_VAR_PATH’, “/home/xoops/xoops_data“);
    // Alias of XOOPS_PATH, for compatibility, temporary solution
    define(“XOOPS_TRUST_PATH”, XOOPS_PATH);

ArchLinux 的工作排程

本來一直以為工作排程在 Linux 中是預設的服務,但在 ArchLinux 中才發現好像不是這樣。
# crontab -u http -e
-bash: crontab: command not found

參考網頁:cron – ArchWiki
目前在 ArchLinux 中常用工作排程有
core/cronie
community/fcron
community/incron
AUR/vixie-cron
https://aur.archlinux.org/packages/vixie-cron/
AUR/dcron
https://aur.archlinux.org/packages/dcron/
AUR/bcron
https://aur.archlinux.org/packages/bcron/[@more@]安裝 cronie
# pacman -S cronie

啟動 cronie
# systemctl start cronie
設定開機時啟動
# systemctl enable cronie

設定工作排程
# crontab -u http -e

加入下面一行
*/15 * * * * /usr/bin/php /srv/http/moodle/admin/cli/cron.php

ArchLinux – 網路設定

原本的 ArchLinux 是使用 DHCP 自動取得 IP 連線,但要當成可以正式連線的 Server,就要改成使用固定 IP。
原本的設定(dhcp)
# vim /etc/netctl/eth0
Description=’A basic dhcp ethernet connection’
Interface=eth0
Connection=ethernet
IP=dhcp
ExecUpPost=’/usr/bin/ntpd -gq || true’

## for DHCPv6
#IP6=dhcp
## for IPv6 autoconfiguration
#IP6=stateless[@more@]改成固定 IP
# vim /etc/netctl/eth0
Description=’A basic static ethernet connection’
Interface=eth0
Connection=ethernet
AutoWired=yes
IP=static
Address=(‘192.168.1.23/24’)
Gateway=’192.168.1.254′
DNS=(‘168.95.1.1’ ‘140.111.66.1’ ‘8.8.8.8’)

## For IPv6 autoconfiguration
#IP6=stateles
## For IPv6 static address configuration
#IP6=static
#Address6=(‘1234:5678:9abc:def::1/64’ ‘1234:3456::123/96’)
#Routes6=(‘abcd::1234’)
#Gateway6=’1234:0:123::abcd’

讓設定生效
# systemctl reboot

用指令設定
DHCP
# ip link set eth0 up
# dhcpcd eth0

Static
# link link set eth0 up
# ip addr add 192.168.1.105/24 dev eth0
# ip route add default via 192.168.1.254

# systemctl enable dhcpcd@interface_name.service
# systemctl enable dhcpcd@eth0.service

# cd /etc/netctl
# netctl enable eth0

另外一種方式
設定 Static IP
# systemctl disable dhcpcd
# vim /etc/systemd/network/eth0.network
[Match]
Name=eth0

[Network]
DNS=168.95.1.1 140.111.66.1
Address=192.168.1.94/24
Gateway=192.168.1.254

設定 DHCP
# systemctl enable dhcpcd
# vim /etc/systemd/network/eth0.network
[Match]
Name=eth0

[Network]
DHCP=yes

在 CentOS 6.x 上安裝 Moodle 2.6.5+

因為 CentOS 6.x 的 PHP 是 5.3.3 版,所以不能安裝 Moodle 2.7.2。
切換目錄
# cd /var/www/html
下載 Moodle 2.6.5+
# wget https://download.moodle.org/download.php/direct/stable26/moodle-latest-26.tgz
下載正體中文語系 for 2.6.5+
# wget https://download.moodle.org/download.php/direct/langpack/2.6/zh_tw.zip[@more@]
解壓縮
# tar xvzf moodle-latest-26.tgz
建立儲放課程的目錄
# mkdir /var/www/moodledata
解壓縮正體中文語系到 /var/www/moodledata
# unzip zh_tw.zip -d /var/www/moodledata
改變目錄擁有者
# chown -R apache:apache /var/www/moodledata

進行安裝

目錄設定

資料庫設定

資料庫伺服器設定

/var/www/html/moodle 目錄之下,建立 config.php 設定檔

授權協定

# yum install php-soap php-intl
至於 php_setting opcache.enable 設定的部分,因為要升級到 php 5.5 or 5.6,所以可以暫不處理
伺服器檢查

只剩下 php_setting opcache.enable 的部分

最後加入工作排程
# crontab -u apache -e

加入下面一行
*/15 * * * * /usr/bin/php /var/www/html/moodle/admin/cli/cron.php > /dev/null 2>&1


ArchLinux – 架設 DNS Server

參考網站:
Linux Pi的奇幻旅程(28)-DNS – iT邦幫忙::IT知識分享社群
BIND – ArchWiki
How to setup a DNS server master / slave with BIND
How to install and set-up Slave Named (BIND) DNS server in ArchLinux | Stavrovski.Net

安裝 bind 及 dnsutils 套件
# pacman -S bind dnsutils

備份設定檔
# cp /etc/named.conf /etc/named.conf.$(date +%F)[@more@]
修改設定檔 /etc/named.conf
# vim /etc/named.conf
//
// /etc/named.conf
//

options {
        directory “/var/named”;
        pid-file “/run/named/named.pid”;
        auth-nxdomain yes;
        datasize default;
// Uncomment these to enable IPv6 connections support
// IPv4 will still work:
//      listen-on-v6 { any; };
// Add this for no IPv4:
//      listen-on { none; };

        // Default security settings.
        allow-recursion { 127.0.0.1; };
        allow-transfer { none; };
        allow-update { none; };
    version none;
    hostname none;
    server-id none;
};

zone “localhost” IN {
        type master;
        file “localhost.zone”;
        allow-transfer { any; };
};

zone “0.0.127.in-addr.arpa” IN {
        type master;
        file “127.0.0.zone”;
        allow-transfer { any; };
};

zone “.” IN {
        type hint;
        file “root.hint”;
};

zone “test.ilc.edu.tw” IN {
          type master;
          file “test.ilc.edu.tw.zone”;
          allow-update { none; };
};

zone “1.168.192.in-addr.arpa” IN {
          type master;
          file “1.168.192.zone”;
          allow-update { none; };
};

//zone “example.org” IN {
//      type slave;
//      file “example.zone”;
//      masters {
//              192.168.1.100;
//      };
//      allow-query { any; };
//      allow-transfer { any; };
//};

logging {
        channel xfer-log {
                file “/var/log/named.log”;
                print-category yes;
                print-severity yes;
                print-time yes;
                severity info;
        };
        category xfer-in { xfer-log; };
        category xfer-out { xfer-log; };
        category notify { xfer-log; };
};

# 設定權限
# chown -R root:named /var/named

建立 log 檔
# touch /var/log/named.log

更改檔案擁有者及群組
# chown named:named /var/log/named.log

啟動 DNS Server
# systemctl start named

設定開機時啟動 DNS Server
# systemctl enable named
Created symlink from /etc/systemd/system/multi-user.target.wants/named.service to /usr/lib/systemd/system/named.service.

DNS Server 192.168.1.106
# cat /etc/resolv.conf
nameserver 192.168.1.106

測試
# host free.test.ilc.edu.tw
free.test.ilc.edu.tw has address 192.168.1.6

# host 192.168.1.6
6.1.168.192.in-addr.arpa domain name pointer free.test.ilc.edu.tw.

防火牆上的設定
# iptables -A INPUT -p udp -m state –state NEW -m udp –dport 53 -j ACCEPT

ArchLinux 執行 iptables Firewall

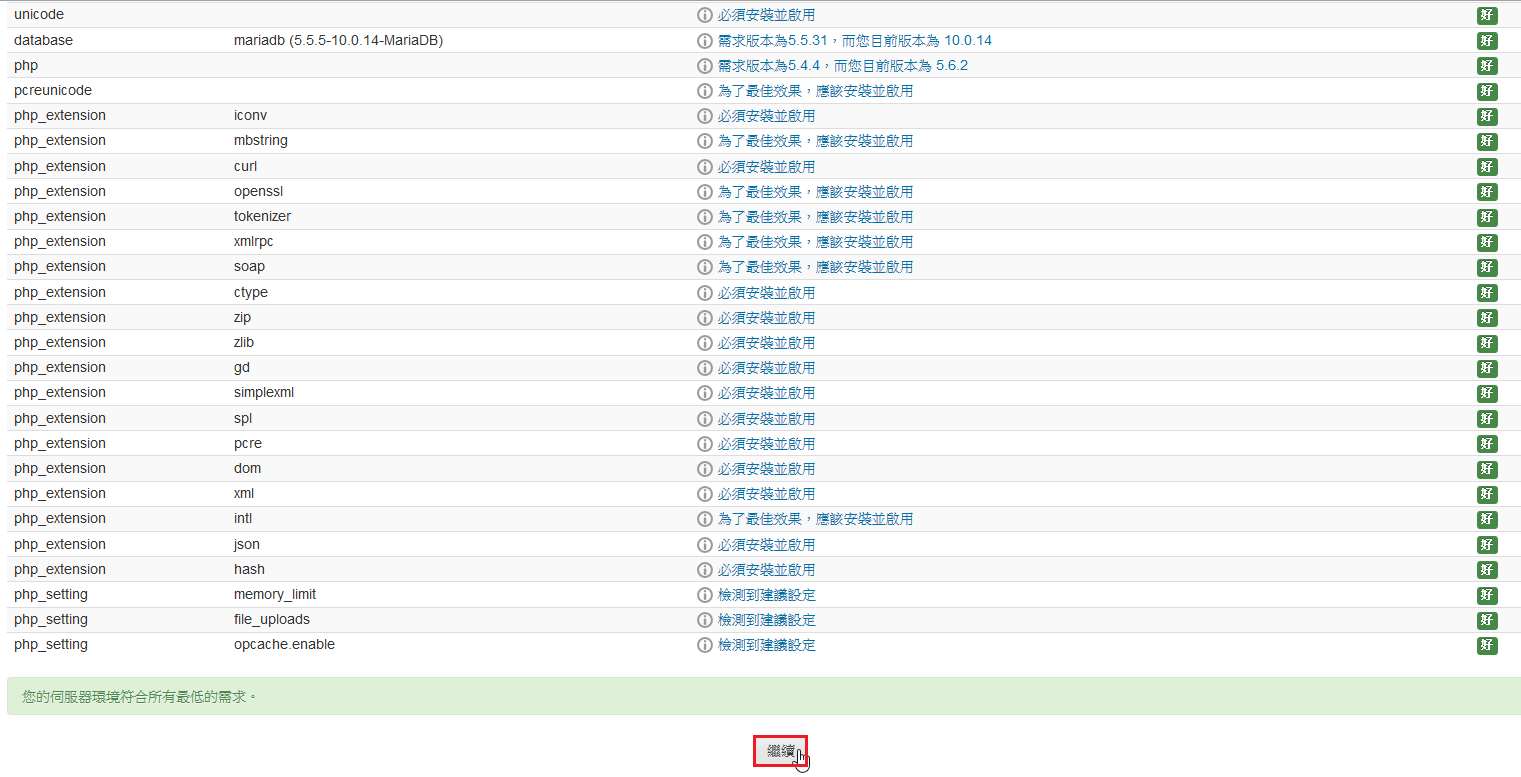
參考網站:iptables – ArchWiki
啟動 iptables & ip6tables
# systemctl start iptables
# systemctl start ip6tables

建立 iptables 規則
# cp /etc/iptables/empty.rules /etc/iptables/iptables.rules
# touch /etc/iptables/ip6tables.rules

開機時啟動 iptables & ip6tables
# systemctl enable iptables
ln -s ‘/usr/lib/systemd/system/iptables.service’ ‘/etc/systemd/system/multi-user.target.wants/iptables.service’
# systemctl enable ip6tables
[@more@]底下以 IPv4 為例
設定防火牆規則
# iptables -nvL –line-numbers
Chain INPUT (policy DROP 18 packets, 1042 bytes)
num   pkts bytes target     prot opt in     out     source               destination
1        0     0 ACCEPT     all  —  lo     *       0.0.0.0/0            0.0.0.0/0
2        0     0 DROP       all  —  *      *       0.0.0.0/0            0.0.0.0/0            state INVALID
3        0     0 DROP       tcp  —  *      *       0.0.0.0/0            0.0.0.0/0            tcp flags:!0x17/0x02 state NEW
4        0     0 DROP       tcp  —  *      *       0.0.0.0/0            0.0.0.0/0            tcp flags:0x3F/0x00
5        0     0 DROP       tcp  —  *      *       0.0.0.0/0            0.0.0.0/0            tcp flags:0x03/0x03
6        0     0 DROP       tcp  —  *      *       0.0.0.0/0            0.0.0.0/0            tcp flags:0x06/0x06
7        0     0 DROP       tcp  —  *      *       0.0.0.0/0            0.0.0.0/0            tcp flags:0x05/0x05
8        0     0 DROP       tcp  —  *      *       0.0.0.0/0            0.0.0.0/0            tcp flags:0x11/0x01
9        0     0 DROP       tcp  —  *      *       0.0.0.0/0            0.0.0.0/0            tcp flags:0x30/0x20
10       0     0 DROP       tcp  —  *      *       0.0.0.0/0            0.0.0.0/0            tcp flags:0x18/0x08
11       0     0 DROP       tcp  —  *      *       0.0.0.0/0            0.0.0.0/0            tcp flags:0x3F/0x29
12       0     0 DROP       tcp  —  *      *       0.0.0.0/0            0.0.0.0/0            tcp flags:0x3F/0x37
13       0     0 DROP       tcp  —  *      *       0.0.0.0/0            0.0.0.0/0            tcp flags:0x3F/0x3F
14       0     0 DROP       tcp  —  *      *       0.0.0.0/0            0.0.0.0/0            tcp flags:0x3F/0x01
15     107  7340 ACCEPT     all  —  *      *       0.0.0.0/0            0.0.0.0/0            state RELATED,ESTABLISHED
16       0     0 ACCEPT     tcp  —  *      *       192.168.1.0/24       0.0.0.0/0            tcp dpt:22
17       0     0 ACCEPT     tcp  —  *      *       0.0.0.0/0            0.0.0.0/0            tcp dpt:80
18       0     0 ACCEPT     tcp  —  *      *       0.0.0.0/0            0.0.0.0/0            tcp dpt:443
19       0     0 ACCEPT     icmp —  *      *       0.0.0.0/0            0.0.0.0/0            icmptype 8
20       0     0 ACCEPT     icmp —  *      *       0.0.0.0/0            0.0.0.0/0            icmptype 0

Chain FORWARD (policy DROP 0 packets, 0 bytes)
num   pkts bytes target     prot opt in     out     source               destination

Chain OUTPUT (policy ACCEPT 1 packets, 64 bytes)
num   pkts bytes target     prot opt in     out     source               destination
1        0     0 ACCEPT     all  —  *      lo      0.0.0.0/0            0.0.0.0/0
2      100 16760 ACCEPT     all  —  *      *       0.0.0.0/0            0.0.0.0/0            state RELATED,ESTABLISHED

將目前的規則寫入到 /etc/iptables/iptables.rules
# iptables-save > /etc/iptables/iptables.rules

重新載入防火牆規則
# systemctl reload iptables
# iptables-restore < /etc/iptables/iptables.rules

# cat /etc/iptables/iptables.rules
# Generated by iptables-save v1.4.21 on Mon Sep 29 23:06:35 2014
*mangle
:PREROUTING ACCEPT [49:3160]
:INPUT ACCEPT [49:3160]
:FORWARD ACCEPT [0:0]
:OUTPUT ACCEPT [51:7732]
:POSTROUTING ACCEPT [51:7732]
COMMIT
# Completed on Mon Sep 29 23:06:35 2014
# Generated by iptables-save v1.4.21 on Mon Sep 29 23:06:35 2014
*filter
:INPUT DROP [4:124]
:FORWARD DROP [0:0]
:OUTPUT ACCEPT [0:0]
-A INPUT -i lo -j ACCEPT
-A INPUT -m state –state INVALID -j DROP
-A INPUT -p tcp -m tcp ! –tcp-flags FIN,SYN,RST,ACK SYN -m state –state NEW -j DROP
-A INPUT -p tcp -m tcp –tcp-flags FIN,SYN,RST,PSH,ACK,URG NONE -j DROP
-A INPUT -p tcp -m tcp –tcp-flags FIN,SYN FIN,SYN -j DROP
-A INPUT -p tcp -m tcp –tcp-flags SYN,RST SYN,RST -j DROP
-A INPUT -p tcp -m tcp –tcp-flags FIN,RST FIN,RST -j DROP
-A INPUT -p tcp -m tcp –tcp-flags FIN,ACK FIN -j DROP
-A INPUT -p tcp -m tcp –tcp-flags ACK,URG URG -j DROP
-A INPUT -p tcp -m tcp –tcp-flags PSH,ACK PSH -j DROP
-A INPUT -p tcp -m tcp –tcp-flags FIN,SYN,RST,PSH,ACK,URG FIN,PSH,URG -j DROP
-A INPUT -p tcp -m tcp –tcp-flags FIN,SYN,RST,PSH,ACK,URG FIN,SYN,RST,ACK,URG -j DROP
-A INPUT -p tcp -m tcp –tcp-flags FIN,SYN,RST,PSH,ACK,URG FIN,SYN,RST,PSH,ACK,URG -j DROP
-A INPUT -p tcp -m tcp –tcp-flags FIN,SYN,RST,PSH,ACK,URG FIN -j DROP
-A INPUT -m state –state RELATED,ESTABLISHED -j ACCEPT
-A INPUT -s 192.168.1.0/24 -p tcp -m tcp –dport 22 -j ACCEPT
-A INPUT -p tcp -m tcp –dport 80 -j ACCEPT
-A INPUT -p tcp -m tcp –dport 443 -j ACCEPT
-A INPUT -p icmp -m icmp –icmp-type 8 -j ACCEPT
-A INPUT -p icmp -m icmp –icmp-type 0 -j ACCEPT
-A OUTPUT -o lo -j ACCEPT
-A OUTPUT -m state –state RELATED,ESTABLISHED -j ACCEPT
COMMIT
# Completed on Mon Sep 29 23:06:35 2014
# Generated by iptables-save v1.4.21 on Mon Sep 29 23:06:35 2014
*nat
:PREROUTING ACCEPT [4:124]
:INPUT ACCEPT [0:0]
:OUTPUT ACCEPT [0:0]
:POSTROUTING ACCEPT [0:0]
COMMIT
# Completed on Mon Sep 29 23:06:35 2014

使用 LEMP for Raspberry Pi 版會出現下面的錯誤訊息
iptables v1.4.21: can’t initialize iptables table `filter’: Table does not exist (do you need to insmod?)

Raspberry Pi 測試 – 成為 WiFi AP

參考網站:
Download Arch Linux Raspberry Pi WiFi Access Point Image – Hayden James

下載網站:
https://sourceforge.net/projects/archwipi/files/latest/download

預設登入帳號及密碼:root / archwipi

請更改密碼
# passwd
Enter new UNIX password:
Retype new UNIX password:
passwd: password updated successfully
[@more@]
更換成台灣的 Server
# sed -i ‘s/^Server/#Server/’ /etc/pacman.d/mirrorlist
# sed -i ’53s/# Server/Server/g’ /etc/pacman.d/mirrorlist

更新套件庫
#
pacman -Syy
:: Synchronizing package databases…
 core                                        159.0 KiB  3.11M/s 00:00 [######################################] 100%
 extra                                         2.2 MiB  4.62M/s 00:00 [######################################] 100%
 community                                     2.4 MiB  5.11M/s 00:00 [######################################] 100%
 alarm                                        29.0 KiB  14.1M/s 00:00 [######################################] 100%
 aur                                          61.7 KiB  15.1M/s 00:00 [######################################] 100%

安裝所需套件
# pacman -S pssh vim mlocate dnsutils

設定時區
# date
Sun Sep 28 09:13:30 MDT 2014
# ls -l /etc/localtime
lrwxrwxrwx 1 root root 34 Aug 13  2013 /etc/localtime -> /usr/share/zoneinfo/America/Denver

刪除舊有設定
# rm -rf /etc/localtime

連結到 Asis/Taipei
# ln -s /usr/share/zoneinfo/Asia/Taipei /etc/localtime

# timedatectl set-timezone Asia/Taipei
# date
Sun Sep 28 23:16:19 CST 2014

設定中文化環境,加入 en_US.UTF-8 和 zh-TW.UTF-8
# sed -i ‘s/#en_US.UTF-8/en_US.UTF-8/’ /etc/locale.gen
# sed -i ‘s/#zh_TW.UTF-8/zh_TW.UTF-8/’ /etc/locale.gen

產生 locale.gen 內指定的語系
locale-gen
Generating locales…
  en_US.UTF-8
  zh_TW.UTF-8
Generation complete.

設定預設語系
# echo ‘LANG=”en_US.UTF-8″‘ > /etc/locale.conf

檢視設定
# grep -v ^# /etc/locale.gen
en_US.UTF-8 UTF-8
zh_TW.UTF-8 UTF-8

更新已安裝程式
# pacman -Syu

超頻
# vim /boot/config.txt
#Custom overclocking: http://haydenjames.io/raspberry-pi-safe-overclocking-settings/

##Overclock – Option 1: Low freq minimum & no over voltage (keeps Pi cool 24/7!)
arm_freq=800
arm_freq_min=600
core_freq=300
sdram_freq=500
boot_delay=0
disable_splash=1

##Overclock Option – 2: High freq maximums & over voltage (usually runs under 60C)
#arm_freq=1000
#core_freq=500
#sdram_freq=500
#over_voltage=6
#boot_delay=0
#disable_splash=1

##The lowest gpu_mem setting of 16MB (NoGUI)
gpu_mem=16

改成
#Custom overclocking: http://haydenjames.io/raspberry-pi-safe-overclocking-settings/

##Overclock – Option 1: Low freq minimum & no over voltage (keeps Pi cool 24/7!)
#arm_freq=800
#arm_freq_min=600
#core_freq=300
#sdram_freq=500
#boot_delay=0
#disable_splash=1

##Overclock Option – 2: High freq maximums & over voltage (usually runs under 60C)
arm_freq=1000
core_freq=500
sdram_freq=500
over_voltage=6
boot_delay=0
disable_splash=1

##The lowest gpu_mem setting of 16MB (NoGUI)
gpu_mem=16

重新啟動電腦
# systemctl reboot

無線網路 SSID及密碼:ArchWiPi / 1010101010

更改無線網路密碼
# vim /usr/lib/systemd/system/create_ap.service
[Unit]
Description=Create AP Service

[Service]
Type=simple
ExecStart=/usr/bin/bash create_ap wlan0 eth0 ArchWiPi 1010101010
KillSignal=SIGINT
Restart=on-failure
RestartSec=5

[Install]
WantedBy=multi-user.target

檢查 CPU 速度和溫度,可以執行
# cd /root;./bcmstat.sh

使用瀏覽器來觀看:http://192.168.12.1:8080/archwipi

 (powered by Monitorix)

系統開啟的服務
# netstat -antulp
Active Internet connections (servers and established)
Proto Recv-Q Send-Q Local Address           Foreign Address         State       PID/Program name
tcp        0      0 0.0.0.0:8080            0.0.0.0:*               LISTEN      344/monitorix-httpd
tcp        0      0 127.0.0.1:53            0.0.0.0:*               LISTEN      342/dnsmasq
tcp        0      0 192.168.12.1:53         0.0.0.0:*               LISTEN      342/dnsmasq
tcp        0      0 0.0.0.0:22              0.0.0.0:*               LISTEN      119/dropbear
udp        0      0 0.0.0.0:5353            0.0.0.0:*                           136/avahi-daemon: r
udp        0      0 127.0.0.1:53            0.0.0.0:*                           342/dnsmasq
udp        0      0 192.168.12.1:53         0.0.0.0:*                           342/dnsmasq
udp        0      0 0.0.0.0:67              0.0.0.0:*                           342/dnsmasq
udp        0      0 0.0.0.0:68              0.0.0.0:*                           384/dhcpcd
udp        0      0 0.0.0.0:40054           0.0.0.0:*                           136/avahi-daemon: r

ArchLinux 更新時出現 ignoring package upgrade 訊息

使用 pacman -Syu 更新時,出現下面的警告訊息
# pacman -Syu
:: Synchronizing package databases…
 core is up to date
 extra is up to date
 community is up to date
 alarm is up to date
 aur is up to date
:: Starting full system upgrade…
warning: linux-firmware: ignoring package upgrade (20140603.a4f3bc0-1 => 20141009.0e5f637-1)
warning: linux-sun7i: ignoring package upgrade (3.4.90-4 => 3.4.90-5)
warning: uboot-cubieboard2: ignoring package upgrade (2014.04-8 => 2014.04-10)
 there is nothing to do[@more@]看起來似乎是 linux-firmware / linux-sun7i / uboot-cubieboard2 這三個套件被設定成不能夠更新

# grep IgnorePkg /etc/pacman.conf
# Pacman won’t upgrade packages listed in IgnorePkg and members of IgnoreGroup
IgnorePkg   = linux-sun7i linux-firmware uboot-cubieboard2

原來是這一個 ArchLinux 的版本有設定這三個套件不做更新。

因為我目前用的這一個版本是特別製作給 BerryBoot 使用的版本,所以不是很了解,為什麼要特別限定這三個套件不做更新!