Raspberry Pi 測試 – ArchLinux 篇 IPv6

雖然 IPv6 目前在家裡使用的機率不是很高,但在學校裡使用是必要的。
預設使用的 Raspberry Pi  ArchLinux 預設把 IPv6 的設定關掉。
# cat /boot/cmdline.txt
ipv6.disable=1 avoid_safe_mode=1 selinux=0 plymouth.enable=0 smsc95xx.turbo_mode=N dwc_otg.lpm_enable=0 console=ttyAMA0,115200 kgdboc=ttyAMA0,115200 console=tty1 root=/dev/mmcblk0p5 rootfstype=ext4 elevator=noop rootwait libahci.ignore_sss=1

開啟 IPv6 功能
修改前先備份原檔
# cp /boot/cmdline.txt /boot/cmdline.txt.$(date +%F)[@more@]
修改設定檔
# vim /boot/cmdline.txt
avoid_safe_mode=1 selinux=0 plymouth.enable=0 smsc95xx.turbo_mode=N dwc_otg.lpm_enable=0 console=ttyAMA0,115200 kgdboc=ttyAMA0,115200 console=tty1 root=/dev/mmcblk0p5 rootfstype=ext4 elevator=noop rootwait libahci.ignore_sss=1

重新啟動電腦
# systemctl reboot

檢查是否有取得 IPv6
# ifconfig eth0 | grep -m 1 inet6
        inet6 2001:288:a229:2:ba27:ebff:fe31:70a5  prefixlen 64  scopeid 0x0<global>

檢查是否能以 IPv6 ping 到外部
# ping6 -c 4 2001:288:a229:1::250
PING 2001:288:a229:1::250(2001:288:a229:1::250) 56 data bytes
64 bytes from 2001:288:a229:1::250: icmp_seq=1 ttl=64 time=1.80 ms
64 bytes from 2001:288:a229:1::250: icmp_seq=2 ttl=64 time=0.502 ms
64 bytes from 2001:288:a229:1::250: icmp_seq=3 ttl=64 time=0.470 ms
64 bytes from 2001:288:a229:1::250: icmp_seq=4 ttl=64 time=0.502 ms

— 2001:288:a229:1::250 ping statistics —
4 packets transmitted, 4 received, 0% packet loss, time 3004ms
rtt min/avg/max/mdev = 0.470/0.818/1.800/0.567 ms

Wordress 更換 IP 之後

因為 WordPress 在安裝時會把網路的設定寫入到資料庫,所以當更換 IP 時,就會有無法連線的問題。

[@more@]解決方法:
參考網頁:
wordpress 修改IP地址后进不去后台的解决方法_wordpress_新浪轻博客
1. 使用 SQL 指令 紅色的 IP 就是新的 IP
# /usr/bin/mysql -u root -p wordpress
Enter password:
Reading table information for completion of table and column names
You can turn off this feature to get a quicker startup with -A

Welcome to the MariaDB monitor.  Commands end with ; or g.
Your MariaDB connection id is 16
Server version: 10.0.14-MariaDB MariaDB Server

Copyright (c) 2000, 2014, Oracle, SkySQL Ab and others.

Type ‘help;’ or ‘h’ for help. Type ‘c’ to clear the current input statement.

MariaDB [wordpress]> update wp_options set option_value = ‘http://192.168.1.109/wordpress’ where option_name = ‘siteurl’ or option_name = ‘home’;
Query OK, 2 rows affected (0.01 sec)
Rows matched: 2  Changed: 2  Warnings: 0

MariaDB [wordpress]> quit
Bye2. 使用 Script   紅字部分代表是 root SQL 的密碼
# vim /usr/local/bin/setwordpressip
#! /bin/bash
# set wordpress admin ip

param=$#

if [ $param -eq 1 ]; then
     echo “update wp_options set option_value = ‘http://”$1″/wordpress’ where option_name = ‘siteurl’ or option_name = ‘home’;” > setwordpress.tmp
     mysql -uroot -p123456 wordpress < setwordpress.tmp
     rm setwordpress.tmp
     echo “OK…”
     exit 0
fi

echo “use: $0 IP Address (127.0.0.1)”

更改權限
# chmod 700 /usr/local/bin/setwordpressip

使用方式
# /usr/local/bin/setwordpressip 192.168.1.109

CentOS 6.x/7.x 上安裝 ownCloud 7.x

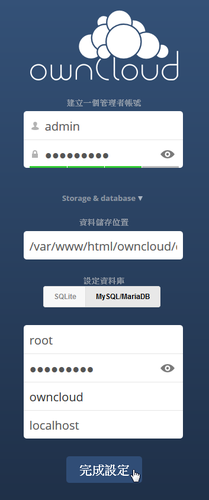
最近在 CentOS 6.x / 7.x 安裝 ownCloud 時,都會出現下面的畫面
[@more@]經過反覆的測試,發現應該是 SElinux 造成的問題
只要暫且把 SELinux 關閉
# setenforce 0

系統就可以正常安裝

可以在 owncloud 目錄下的 README.SELinux 中提到
NOTE: IF YOU INSTALLED FROM THE OFFICIAL OWNCLOUD RPM, YOU DO NOT NEED TO
      FOLLOW THE INSTRUCTIONS BELOW! THEY HAVE ALREADY BEEN DONE FOR YOU!

If you are running Fedora 16 with SELinux enabled, you need to relabel the
ownCloud installation directory to allow the webserver to store files there.

To do that, execute the following commands as user root AFTER you installed
ownCloud:

# semanage fcontext -a -t httpd_sys_rw_content_t ‘/var/www/html/owncloud/data’
# restorecon ‘/var/www/html/owncloud/data’
# semanage fcontext -a -t httpd_sys_rw_content_t ‘/var/www/html/owncloud/config’
# restorecon ‘/var/www/html/owncloud/config’

To remove the ownCloud directory label execute the following commands as
user root AFTER you uninstalled ownCloud:

# semanage fcontext -d -t httpd_sys_rw_content_t ‘/var/www/html/owncloud/data’
# restorecon ‘/var/www/html/owncloud/data’
# semanage fcontext -d -t httpd_sys_rw_content_t ‘/var/www/html/owncloud/config’
# restorecon ‘/var/www/html/owncloud/config’

Note: all of the above applies only to the default policies. If you modified
      them, please give the webserver write-access to the directories
      /var/www/html/owncloud/data and /var/www/html/owncloud/config

Note: for non-Fedora / Redhat systems running SELinux the policy might be
      called differently.

Enjoy you own Cloud!

只要是用 rpm 來安裝的,就可以不用做設定,但即使做了設定也沒有用

解決方式:
1. 關閉 SELinux,這是我最不建議的
# sed -i ‘s/SELINUX=enforcing/SELINUX=disabled/’ /etc/selinux/config

重新開機
# reboot

2. 設定目錄擁有者及 SELinux
# chown -R apache:apache /var/www/html/owncloud/data
# chown -R apache:apache /var/www/html/owncloud/config
# chcon -R -t httpd_sys_rw_content_t /var/www/html/owncloud/config
# chcon -R -t httpd_sys_rw_content_t /var/www/html/owncloud/data
# chcon -R -t httpd_sys_rw_content_t /var/www/html/owncloud/apps

Raspberry Pi 測試 – ArchLinux 篇 安裝 fail2ban

在 ArchLinux 安裝 fail2ban
# pacman -S fail2ban

但安裝好了之後,在 /var/log 目錄下卻一直找不到相關的 log 檔,後來才又安裝了 syslog-ng 解決了這個問題!
ArchLinux 的系統 ssh log 檔

修改設定檔,加入對 ssh 的攻擊防護,因為根據自己架設的 Server,大部分都是嘗試對 ssh 的錯誤連線,而 ftp 的部分幾乎都沒有。
Chain fail2ban-ssh (1 references)
target     prot opt source               destination
DROP       all  —  61.174.51.232        0.0.0.0/0
DROP       all  —  61.174.51.235        0.0.0.0/0
DROP       all  —  122.225.109.217      0.0.0.0/0
DROP       all  —  218.2.0.123          0.0.0.0/0
RETURN     all  —  0.0.0.0/0            0.0.0.0/0

Chain fail2ban-vsftpd (1 references)
target     prot opt source               destination
RETURN     all  —  0.0.0.0/0            0.0.0.0/0[@more@]# vim /etc/fail2ban/jail.conf
修改並加入下面的設定
[sshd]
enabled = true
port    = ssh
logpath = /var/log/ssh.log
#logpath = %(sshd_log)s
maxretry = 3
bantime  = 86400

重新啟動 fail2ban
# systemctl start fail2ban

設定開機時啟動
# systemctl enable fail2ban

檢查 fail2ban 的狀態
# fail2ban-client status
Status
|- Number of jail:      1
`- Jail list:   sshd

以 Client  IP 192.168.1.10 嘗試對 Server IP 192.168.1.106 嘗試連線錯誤幾次之後
列出 fail2ban 偵測到的 SSH 攻擊
# fail2ban-client status sshd
Status for the jail: sshd
|- Filter
|  |- Currently failed: 0
|  |- Total failed:     3
|  `- File list:        /var/log/ssh.log
`- Actions
   |- Currently banned: 1
   |- Total banned:     1
   `- Banned IP list:   192.168.1.10

列出 f2b-sshd 的規則
# iptables -t filter -L f2b-sshd -n
Chain f2b-sshd (1 references)
target     prot opt source               destination
REJECT     all  —  192.168.1.10         0.0.0.0/0            reject-with icmp-port-unreachable
RETURN     all  —  0.0.0.0/0            0.0.0.0/0

刪除防火牆規則
# iptables -D f2b-sshd  -s 192.168.1.10 -j REJECT

DNSSEC (DNS Security Extensions)

DNS 是網路設定的基礎,幾乎每天都要使用,設定錯誤可能就會無法正常連線,但它的安全性也一直受到關切,除了一般做限制遞迴查詢(recursion),限制 zone transfer,也可以考慮使用 DNSSEC。
以下資料引自:首頁 – DNSSEC技術中心
DNSSEC 是一個 DNS 的安全強化技術,它在原本的 DNS 標準上做了許多安全上的延伸,它以電子簽章技術為基礎,能有效避免 DNS 資料竄改等問題,同時仍相容於 DNS。

DNSSEC 相關安全技術,請參閱底下網站
DNSSEC安全技術簡介

這個部份會納入未來研究的課題。

DNS 的安全性設定

參考網站:
bind – DNS 設定
中小企業 DNS Server 實戰應用(上)
中小企業 DNS Server 實戰應用(中)
中小企業 DNS Server 實戰應用(下)
中小企業 DNS Server 實戰應用(特集)

1. 避免成為 Open DNS servers
Open DNS servers 簡單來說,就是只要大家指向你為查詢伺服器,那麼你就會為大家努力的查詢,而且來者不拒。
# vim /etc/named.conf
#在檔案最上面加入 trusted 的 acl。
acl “trusted” {127.0.0.1; 192.168.1.0/24;};

options {
~其它 option 設定~
allow-recursion { trusted; };
};
[@more@]
2.限制 zone transfer 來源主機,就是不能隨便一台主機都可以將所有紀錄探查出來。
在 master 主機限制 zone transfer 來源只能是 slave,或是上一層的 DNS Server
master DNS – 192.168.1.3
options {
~其它 option 設定~
allow-transfer { 140.111.66.1; 140.111.66.10; 192.168.1.12; };
};

3.在 slave 主機限制不開放 zone transfer
slave DNS – 192.168.1.12
options {
~其它 option 設定~
allow-transfer { none; };
};

ArchLinux 的系統 ssh log 檔

使用 ArchLinux 時,覺得有些奇怪,因為在使用 Linux 時,經常要查詢一些系統的 log 檔,都會到 /var/log 目錄之下搜尋,不過 ArchLinux 的 /var/log 實在是有些簡潔。
# ls -l /var/log
total 104
-rw——-  1 root  utmp             1920 Sep 30 22:26 btmp
-rw——-  1 root  root             1068 Sep 30 22:30 fail2ban.log
-rw——-  1 root  root              984 Sep 30 22:30 faillog
drwxr-sr-x+ 4 root  systemd-journal  4096 Sep 29 23:22 journal
-rw-r–r–  1 root  root            11972 Sep 30 22:30 lastlog
-rw-r–r–  1 named named               0 Sep 29 23:41 named.log
drwxr-xr-x  2 root  root             4096 Jun  4  2013 old
-rw-r–r–  1 root  root            10229 Sep 30 22:38 pacman.log
-rw-rw-r–  1 root  utmp            53760 Sep 30 22:30 wtmp[@more@]比如,想要查詢一下,經由 ssh 嘗試錯誤登錄的記錄,竟然都找不到,一般來說,大概是
/var/log/secure
或是
/var/log/auth.log

後來使用 Google 查詢了一下
arch linux – Where are my sshd logs? – Unix & Linux Stack Exchange

原來是可以用下面的指令來擷取關於 ssh 的 log
# journalctl -u sshd |tail -10
Sep 30 22:26:40 alarmpi sshd[308]: Failed password for root from 192.168.1.6 port 3192 ssh2
Sep 30 22:27:55 alarmpi sshd[308]: Connection closed by 192.168.1.6 [preauth]
Sep 30 22:27:55 alarmpi sshd[308]: PAM 3 more authentication failures; logname= uid=0 euid=0 tty=ssh ruser= rhost=192.168.1.6  user=root
Sep 30 22:27:55 alarmpi sshd[308]: PAM service(sshd) ignoring max retries; 4 > 3
Sep 30 22:28:25 alarmpi systemd[1]: Stopping OpenSSH Daemon…
Sep 30 22:28:26 alarmpi systemd[1]: Stopped OpenSSH Daemon.
— Reboot —
Jan 01 08:00:16 alarmpi sshd[115]: Server listening on 0.0.0.0 port 22.
Sep 30 22:30:12 alarmpi sshd[265]: Accepted password for root from 192.168.1.6 port 3269 ssh2
Sep 30 22:30:12 alarmpi sshd[265]: pam_unix(sshd:session): session opened for user root by (uid=0)

在同一篇文章中也提到,可以在 /etc/syslog.conf 或 /etc/rsyslog.conf 中設定,把記錄檔單獨擷取出來
安裝 rsyslog 套件
# pacman -S syslog-ng
# sed -i ‘s/#ForwardToSyslog=no/ForwardToSyslog=yes/’ /etc/systemd/journald.conf

設定開機時啟動 syslog-ng 服務
# systemctl enable syslog-ng
Created symlink from /etc/systemd/system/syslog.service to /usr/lib/systemd/system/syslog-ng.service.
Created symlink from /etc/systemd/system/multi-user.target.wants/syslog-ng.service to /usr/lib/systemd/system/syslog-ng.service.

啟動 syslog-ng 服務
# systemctl start syslog-ng

檢查 /var/log 目錄下的 log 檔
# ls -l /var/log
total 824
-rw-r—–  1 root  log               1245 Oct  1 20:17 auth.log
-rw——-  1 root  utmp              2688 Oct  1 20:17 btmp
-rw——-  1 root  utmp              6912 Sep 30 23:29 btmp.1
-rw-r—–  1 root  log              10952 Oct  1 20:16 daemon.log
-rw-r—–  1 root  root              8000 Jan  1  1970 debug
-rw-r—–  1 root  log              11910 Oct  1 20:16 everything.log
-rw——-  1 root  root              4342 Oct  1 20:16 fail2ban.log
-rw——-  1 root  root               984 Oct  1 20:17 faillog
drwxr-sr-x+ 4 root  systemd-journal   4096 Sep 29 23:22 journal
-rw-r—–  1 root  root            206836 Jan  1  1970 kern.log
-rw-r–r–  1 root  root             11972 Oct  1 20:15 lastlog
-rw-r—–  1 root  root            202786 Oct  1 19:49 messages
-rw-r—–  1 root  log              10952 Oct  1 20:16 messages.log
-rw-r–r–  1 named named                0 Sep 29 23:41 named.log
drwxr-xr-x  2 root  root              4096 Jun  4  2013 old
-rw-r–r–  1 root  root             12889 Oct  1 19:51 pacman.log
-rw-r—–  1 root  log               1005 Oct  1 20:17 ssh.log
-rw-r—–  1 root  root            215446 Oct  1 19:49 syslog
-rw-r—–  1 root  log                958 Jan  1  1970 syslog.log
-rw-rw-r–  1 root  utmp             83712 Oct  1 20:15 wtmp

ssh log 檔儲存在 /var/log/auth.log
# cat /var/log/auth.log
Jan  1 08:00:15 alarmpi systemd-logind[126]: New seat seat0.
Oct  1 20:15:55 alarmpi sshd[258]: Accepted password for root from 192.168.1.6 port 2278 ssh2
Oct  1 20:15:55 alarmpi sshd[258]: pam_unix(sshd:session): session opened for user root by (uid=0)
Oct  1 20:15:55 alarmpi systemd-logind[126]: New session c1 of user root.
Oct  1 20:15:55 alarmpi systemd: pam_unix(systemd-user:session): session opened for user root by (uid=0)
Oct  1 20:16:55 alarmpi sshd[275]: Address 192.168.1.10 maps to tces-doc-airport-express.home, but this does not map back to the address – POSSIBLE BREAK-IN ATTEMPT!
Oct  1 20:16:57 alarmpi sshd[275]: pam_unix(sshd:auth): authentication failure; logname= uid=0 euid=0 tty=ssh ruser= rhost=192.168.1.10  user=root
Oct  1 20:16:58 alarmpi sshd[275]: Failed password for root from 192.168.1.10 port 59403 ssh2
Oct  1 20:17:01 alarmpi sshd[275]: Failed password for root from 192.168.1.10 port 59403 ssh2
Oct  1 20:17:04 alarmpi sshd[275]: Failed password for root from 192.168.1.10 port 59403 ssh2
Oct  1 20:17:04 alarmpi sshd[275]: Connection closed by 192.168.1.10 [preauth]
Oct  1 20:17:04 alarmpi sshd[275]: PAM 2 more authentication failures; logname= uid=0 euid=0 tty=ssh ruser= rhost=192.168.1.10  user=root

也可以單獨把 ssh 的 log 檔抽離出來
修改 /etc/syslog-ng/syslog-ng.conf
# vim /etc/syslog-ng/syslog-ng.conf
#sshd configuration
加入下面三行設定
destination ssh { file(“/var/log/ssh.log”); };
filter f_ssh { program(“sshd”); };
log { source(src); filter(f_ssh); destination(ssh); };

重新啟動 syslog-ng 服務
# systemctl restart syslog-ng

只剩下和 ssh 相關的 log
# cat /var/log/ssh.log
Oct  1 20:15:55 alarmpi sshd[258]: Accepted password for root from 192.168.1.6 port 2278 ssh2
Oct  1 20:15:55 alarmpi sshd[258]: pam_unix(sshd:session): session opened for user root by (uid=0)
Oct  1 20:16:55 alarmpi sshd[275]: Address 192.168.1.10 maps to tces-doc-airport-express.home, but this does not map back to the address – POSSIBLE BREAK-IN ATTEMPT!
Oct  1 20:16:57 alarmpi sshd[275]: pam_unix(sshd:auth): authentication failure; logname= uid=0 euid=0 tty=ssh ruser= rhost=192.168.1.10  user=root
Oct  1 20:16:58 alarmpi sshd[275]: Failed password for root from 192.168.1.10 port 59403 ssh2
Oct  1 20:17:01 alarmpi sshd[275]: Failed password for root from 192.168.1.10 port 59403 ssh2
Oct  1 20:17:04 alarmpi sshd[275]: Failed password for root from 192.168.1.10 port 59403 ssh2
Oct  1 20:17:04 alarmpi sshd[275]: Connection closed by 192.168.1.10 [preauth]
Oct  1 20:17:04 alarmpi sshd[275]: PAM 2 more authentication failures; logname= uid=0 euid=0 tty=ssh ruser= rhost=192.168.1.10  user=root

ArchLinux – 安裝 WordPress

WordPress › Taiwan 正體中文網站:https://tw.wordpress.org/

下載 WordPress
# wget https://tw.wordpress.org/wordpress-4.0-zh_TW.tar.gz

解壓縮
# tar xvzf wordpress-4.0-zh_TW.tar.gz -C /srv/http

也可以直接使用 ArchLinux 內建的套件來安裝
# pacman -Ss wordpress
community/wordpress 4.0-1
    Blog tool and publishing platform
# pacman -S wordpress

建立資料庫 wordpress
# /usr/bin/mysqladmin -u root -p create wordpress
Enter password:[@more@]

開啟瀏覽器在網址列輸入 http://Server’IP/wordpress,然後選擇 衝吧!

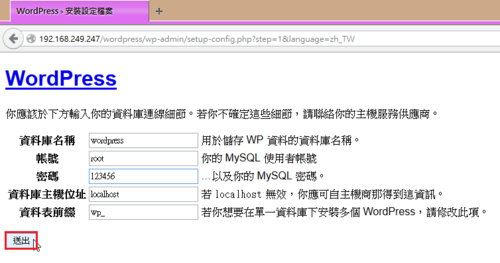
資料庫設定

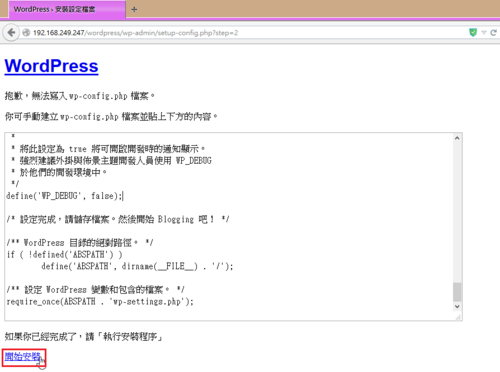
 在 /srv/http/wordpress 目錄下建立 wp-config.php 設定檔
# vim /srv/http/wordpress/wp-config.php

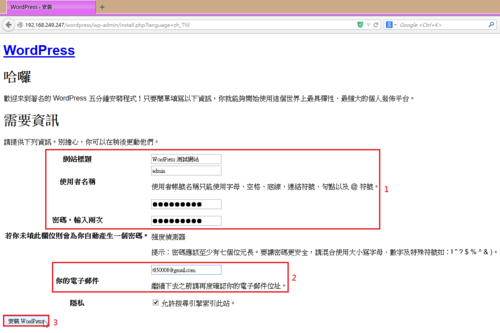
設定管理者資訊

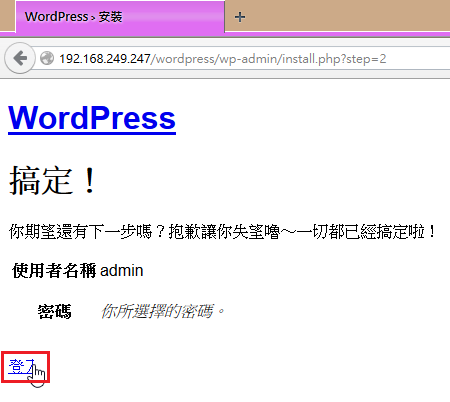
安裝完成

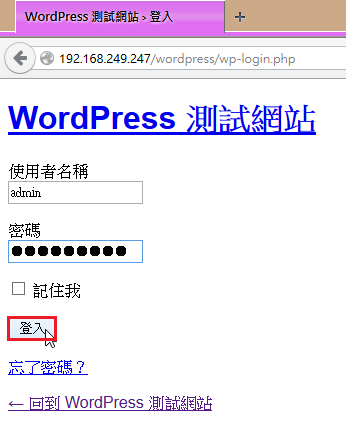
登入網站

登入成功

ArchLinux – 建立 DNS Server Chroot 環境

ArchLinux 好像並沒有像 CentOS Linux,在 Bind DNS Server 有直接提供 DNS Server Chroot(bind-chroot) 的套件,可以方便做設定,所以要用手動的方式來設定。
在 CentOS
# yum list | grep bind-chroot | awk ‘{print $1}’
bind-chroot.x86_64

底下文章參考:
How to install and set-up Slave Named (BIND) DNS server in ArchLinux | Stavrovski.Net

[@more@]設定 DNS Chroot 的目錄
# CHROOT=/var/named/chroot
# 建立 chroot 目錄
# mkdir -p “${CHROOT}”/{dev,etc} “${CHROOT}”/var/{run,log,named,tmp}
# mkdir -p “${CHROOT}”/usr/lib/bind “${CHROOT}”/usr/lib/engines

建立  block devices
# mknod “${CHROOT}”/dev/null c 1 3
# mknod “${CHROOT}”/dev/random c 1 8

複製  /usr/lib/libgost.so/var/named/chroot/usr/lib/engines/
# cp /usr/lib/engines/libgost.so “${CHROOT}”/usr/lib/engines/

更改目錄權限
# chown root:named “${CHROOT}”
# chmod 750 “${CHROOT}”
# chown -R named: “${CHROOT}”/var/named/
# chown named: “${CHROOT}”/var/{run,log}
# chmod 666 “${CHROOT}”/dev/{null,random}

搬移原有的設定檔到 chroot 目錄
# mv /etc/named.conf “${CHROOT}”/etc/
# mv /etc/rndc.key “${CHROOT}”/etc/
# mv /var/named/{root.hint,127.0.0.zone,localhost.zone,db.1.168.192,db.tces.ilc.edu.tw} “${CHROOT}”/var/named/

建立 /var/named/chroot/etc/named.conf 的連結到 /etc 目錄之下
# ln -s “${CHROOT}”/etc/named.conf /etc/

設定目錄的權限
# chown -R named: “${CHROOT}”/var/named/

在 /etc/systemd/system 目錄下建立 named.service 啟動檔
# vim /etc/systemd/system/named.service

[Unit]
Description=Internet domain name server
After=network.target

[Service]
ExecStart=/usr/bin/named -f -u named -t /var/named/chroot
ExecReload=/usr/bin/rndc reload
ExecStop=/usr/bin/rndc stop

[Install]
WantedBy=multi-user.target

關閉原有的 DNS Server,並啟動 chroot DNS Server
# systemctl stop named
# systemctl disable named
Removed symlink /etc/systemd/system/multi-user.target.wants/named.service.
# systemctl start named.service
# systemctl enable named.service
Created symlink from /etc/systemd/system/multi-user.target.wants/named.service to /etc/systemd/system/named.service.

檢查 DNS Server 是否有正常啟動
# netstat -ant | grep :.*53
tcp        0      0 192.168.1.106:53        0.0.0.0:*               LISTEN
tcp        0      0 127.0.0.1:53            0.0.0.0:*               LISTEN
tcp        0      0 127.0.0.1:953           0.0.0.0:*               LISTEN

測試
# host free.test.ilc.edu.tw
free.test.ilc.edu.tw has address 192.168.1.6

# host 192.168.1.6
6.1.168.192.in-addr.arpa domain name pointer free.test.ilc.edu.tw.