FTP Server 的被動模式 – vsftpd FTP Server & Pure-FTPd FTP Server

vsftpd FTP Server 的被動模式
# vim /etc/vsftpd/vsftpd.conf
加入下面三行
pasv_enable=YES
pasv_min_port=60000
pasv_max_port=61000

重新啟動 vsftpd FTP Server
# service vsftpd restart
正在關閉 vsftpd:                                          [  確定  ]
正在啟動 vsftpd 中的 vsftpd:                              [  確定  ]
[@more@]

修改 Pure-FTPd FTP Server 設定檔
# vim /etc/pure-ftpd/pure-ftpd.conf
找到
# PassivePortRange          30000 50000
把前面的 # 刪除即可
PassivePortRange          60000 61000

重新啟動 Pure-FTPd FTP Server
# service pure-ftpd restart
正在停止 pure-ftpd:                                       [  確定  ]
正在啟動 pure-ftpd:                                       [  確定  ]

FTP Server 的被動模式 – ProFTP FTP Server

在測試 FTP Server 是否可以正常連線時,通常都是用指令模式來測試,後來在 Windows 平台上用 FileZilla / Xftp 時,才發現無法連線,測試一下,原來是 FTP Server 沒有設定成被動模式,而防火牆中也沒有開啟 FTP Server 被動模式所要用的 Port。
底下是以 FileZilla 做測試
在 FTP Server 和 iptables 防火牆沒做任何設定時

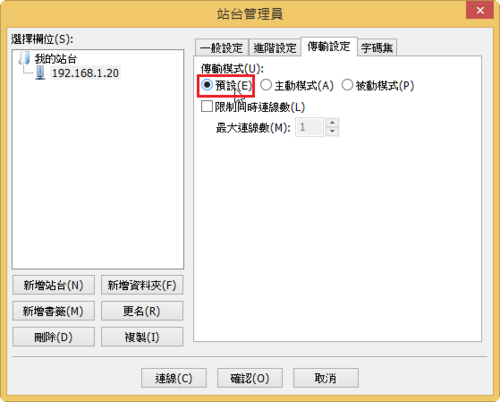
1. 使用預設模式
[@more@]
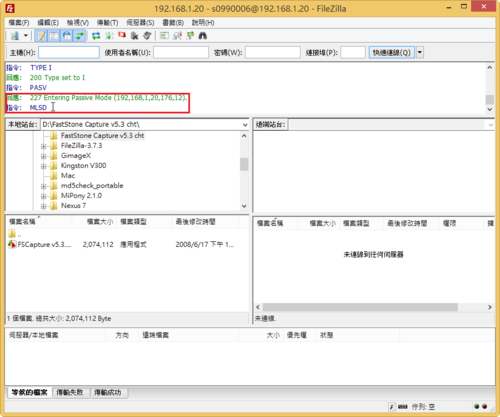
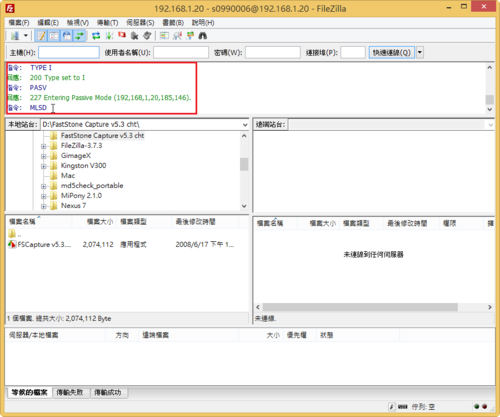
卡在 MLSD 很久

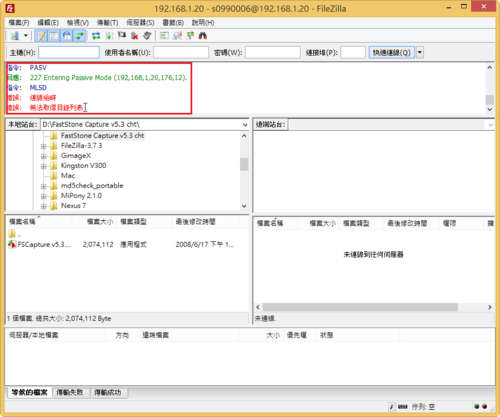
出現連線逾時,無法取得目錄列表的訊息

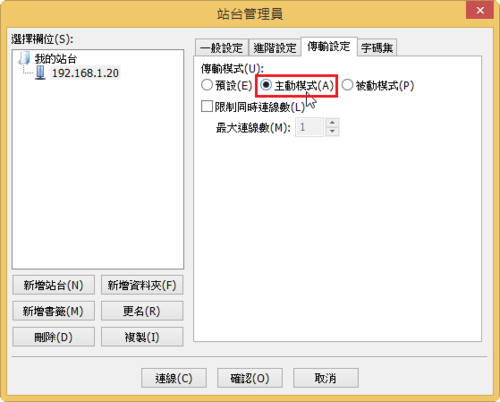
2. 改成主動模式

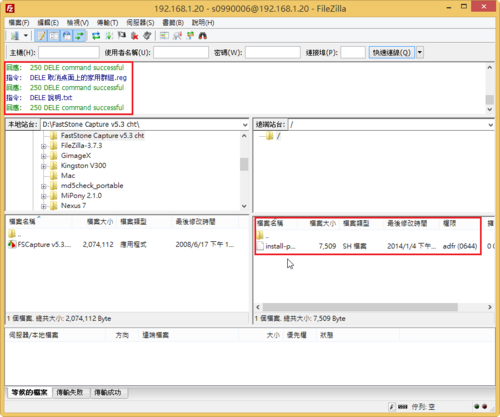
可以正常連線

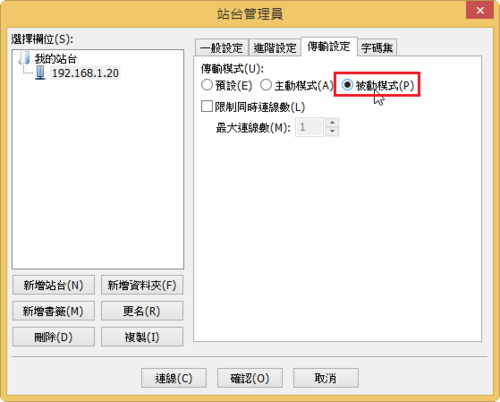
3. 改成被動模式

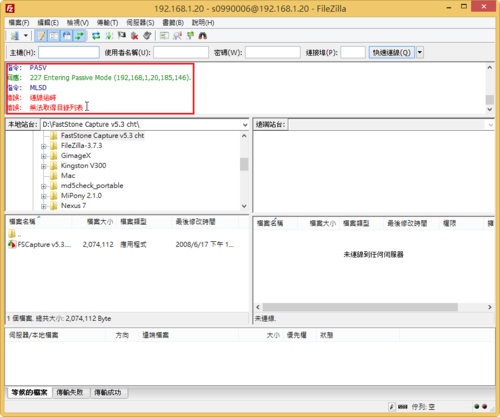
卡在 MLSD

出現連線逾時,無法取得目錄列表的訊息

解決方式:
1. ProFTPd FTP Server 連線埠可以自訂
# vim /etc/proftpd.conf
PassivePorts                    60000   61000

重新啟動 FTP Server
# service proftpd restart
正在關閉 proftpd:                                         [  確定  ]
正在啟動 proftpd:                                         [  確定  ]

修改防火牆設定
# vim /etc/sysconfig/iptables
-A INPUT -m state –state NEW -m tcp -p tcp –dport 60000:61000 -j ACCEPT

重新啟動 iptables 防火牆
# service iptables stop
iptables:正在設定 chains 為 ACCEPT 政策:filter           [  確定  ]
iptables:正在清除防火牆規則:                             [  確定  ]
iptables:正在卸載模組:                                   [  確定  ]
# service iptables start
iptables:正在套用防火牆規則:                             [  確定  ]

檢查規則是否有產生
# iptables -L -n
Chain INPUT (policy ACCEPT)
target     prot opt source               destination
ACCEPT     all  —  0.0.0.0/0            0.0.0.0/0           state RELATED,ESTABLISHED
ACCEPT     icmp —  0.0.0.0/0            0.0.0.0/0
ACCEPT     all  —  0.0.0.0/0            0.0.0.0/0
ACCEPT     tcp  —  0.0.0.0/0            0.0.0.0/0           state NEW tcp dpt:22
ACCEPT     tcp  —  0.0.0.0/0            0.0.0.0/0           state NEW tcp dpt:21
ACCEPT     tcp  —  0.0.0.0/0            0.0.0.0/0           state NEW tcp dpts:60000:61000
REJECT     all  —  0.0.0.0/0            0.0.0.0/0           reject-with icmp-host-prohibited

Chain FORWARD (policy ACCEPT)
target     prot opt source               destination
REJECT     all  —  0.0.0.0/0            0.0.0.0/0           reject-with icmp-host-prohibited

Chain OUTPUT (policy ACCEPT)
target     prot opt source               destination

這時候,應該都可以正常連線了!

ProFTPd FTP Server 使用 LDAP Server 認證

測試環境
LDAP Server IP:192.168.1.20
FTP Server:192.168.1.9

1. 安裝 proftpd proftpd-ldap 套件
# yum install proftpd proftpd-ldap –enablerepo=epel
[@more@]
2. 修改 ProFTPd FTP 設定檔
# vim /etc/proftpd.conf
SystemLog                       /var/log/proftpd/proftpd.log
PassivePorts                    60000   61000

# Use pam to authenticate (default) and be authoritative
#AuthPAMConfig                  proftpd
AuthOrder                       mod_ldap.c
#AuthOrder                      mod_auth_pam.c* mod_auth_unix.c
LoadModule mod_ldap.c
<IfModule mod_ldap.c>
LDAPServer 192.168.1.20
LDAPDNInfo “cn=Manager,dc=ldap,dc=tces.ilc.edu.tw” “123456”
##LDAPDoUIDLookups on “ou=Student,dc=ldap,dc=tces.ilc.edu.tw”
##LDAPDoGIDLookups on “ou=groups,dc=ldap,dc=tces.ilc.edu.tw”
LDAPDoAuth on “ou=Student,dc=ldap,dc=tces.ilc.edu.tw” “(&(uid=%v)(objectclass=posixAccount))”
LDAPSearchScope subtree

## Assign default IDs
LDAPDefaultUID 500
LDAPDefaultGID 500

## Create the home directory
LDAPGenerateHomedir on
LDAPGenerateHomedirPrefix /home/s0990
LDAPForceGeneratedHomedir on
CreateHome on

## Use different attribute names where necessary
#LDAPAttr uid sAMAccountName
#LDAPAttr gidNumber primaryGroupID
</IfModule>

3. 重新啟動 ProFTPd FTP Server
# service proftpd restart
Shutting down proftpd:                                     [  OK  ]
Starting proftpd:                                          [  OK  ]

在 LDAP Server 中的測試帳號 s0990999
# /usr/bin/ldapsearch -x -b “ou=s0990,ou=Student,dc=ldap,dc=tces.ilc.edu.tw” uid=s0990999
# extended LDIF
#
# LDAPv3
# base <ou=s0990,ou=Student,dc=ldap,dc=tces.ilc.edu.tw> with scope subtree
# filter: uid=s0990135
# requesting: ALL
#

# s0990999, s0990, Student, ldap.tces.ilc.edu.tw
dn: uid=s0990999,ou=s0990,ou=Student,dc=ldap,dc=tces.ilc.edu.tw
uid: s0990999
cn:: 5Zub+gMjHlpbPpfoirPnkak=
sn:: 5Zub+gMjHlpbPpfoirPnkak=
mail: s0990999@tces.ilc.du.tw
objectClass: person
objectClass: organizationalPerson
objectClass: inetOrgPerson
objectClass: posixAccount
objectClass: top
userPassword:: e2
loginShell: /sbin/nologin
uidNumber: 1322
gidNumber: 1073
homeDirectory: /home/s0990/s0990999
gecos:: 5Zub+gMjHlpbPpfoirPnkak=

# search result
search: 2
result: 0 Success

# numResponses: 2
# numEntries: 1

4. 測試連線
# lftp -u s0990999 192.168.1.9
密碼:
lftp s0990999@192.168.1.9:~> ls
-rw-r–r–   1 s0990999 1073        73416 Jan  7 13:06 Pietty.reg
lftp s0990999@192.168.1.9:/>

5. 檢查使者的家目錄是否會自動建立
# ls -l /home/s0990
total 4
drwx——. 2 1322 1073 4096 Jan  7 20:53 s0990999

在 FTP Server 上也可以發現使用者的家目錄會自動建立

ProFTPd FTP Server 使用 MySQL 虛擬帳號

ProFTPd FTP Server 除了一般系統帳號之外,也支援 MySQL / LDAP 的虛擬帳號,底下是安裝及設定

安裝 MySQL
# yum install mysql mysql-server
安裝 ProFTPd FTP Server
# yum install proftpd proftpd-mysql –enablerepo=rpmforge

建立資料庫 proftpdb
# /usr/bin/mysqladmin -u root -p create proftpdb
建立虛擬群組 virtualgrp GID 501
# groupadd -g 501 virtualgrp
建立虛擬帳號 virtualuser UID 501
# useradd -g 501 -u 501 virtualuser
[@more@]
proftpd 資料庫的 ftpuser 資料表
# cat /root/users.sql
CREATE TABLE IF NOT EXISTS `ftpuser` (
  `id` int(10) unsigned NOT NULL AUTO_INCREMENT,
  `userid` varchar(32) COLLATE utf8_general_ci NOT NULL DEFAULT ”,
  `passwd` varchar(32) COLLATE utf8_general_ci NOT NULL DEFAULT ”,
  `uid` smallint(6) NOT NULL DEFAULT ‘501’,
  `gid` smallint(6) NOT NULL DEFAULT ‘501’,
  `homedir` varchar(255) COLLATE utf8_general_ci NOT NULL DEFAULT ”,
  `shell` varchar(16) COLLATE utf8_general_ci NOT NULL DEFAULT ‘/sbin/nologin’,
  PRIMARY KEY (`id`),
  UNIQUE KEY `userid` (`userid`)
) ENGINE=MyISAM  DEFAULT CHARSET=utf8 COLLATE=utf8_general_ci COMMENT=’ProFTP user table’;
insert into ftpuser values (‘1′,’s0990001’,encrypt(‘123456′),’501′,’501′,’/home/virtualuser/s0990001′,’/sbin/nologin’);
insert into ftpuser values (‘2′,’s0990002’,encrypt(‘123456′),’501′,’501′,’/home/virtualuser/s0990002′,’/sbin/nologin’);

proftpd 資料庫的 ftpgroup 資料表
# cat /root/groups.sql
CREATE TABLE IF NOT EXISTS `ftpgroup` (
  `groupname` varchar(16) COLLATE utf8_general_ci NOT NULL,
  `gid` smallint(6) NOT NULL DEFAULT ‘5500’,
  `members` varchar(16) COLLATE utf8_general_ci NOT NULL,
  KEY `groupname` (`groupname`)
) ENGINE=MyISAM DEFAULT CHARSET=utf8 COLLATE=utf8_general_ci COMMENT=’ProFTP group table’;
insert into ftpgroup values (‘virtualgrp’,’501′,’s0990001′);
insert into ftpgroup values (‘virtualgrp’,’501′,’s0990002′);

匯入資料表 ftpuser
# /usr/bin/mysql -u root -p proftpdb < /root/users.sql
匯入資料表 ftpgroup
# /usr/bin/mysql -u root -p proftpdb < /root/groups.sql
指定 proftpdb 的管理 proftpd 密碼是 proftpdpass
# /usr/bin/mysql -u root -p -e “GRANT ALL PRIVILEGES ON proftpdb.* TO ‘proftpd’@’localhost’ IDENTIFIED BY ‘proftpdpass’;”

修改 ProFTPd FTP Server 設定檔 /etc/proftpd.conf
# vim /etc/proftpd.conf

AuthOrder                       mod_sql.c

<IfModule mod_dso.c>
   LoadModule mod_sql.c
   LoadModule mod_sql_mysql.c
#   LoadModule mod_sql_postgres.c
</IfModule>

  <IfModule mod_sql.c>

    # We need our “default” connection to the userdb database
    SQLConnectInfo proftpdb@localhost proftpd proftpdpass
    SQLBackend mysql
    SQLAuthTypes Backend Plaintext Crypt

    SQLAuthenticate on
    SQLMinUserUID 500
    SQLMinUserGID 500
    RequireValidShell off
    CreateHome on

    # Point mod_sql at our users/groups tables
    SQLUserInfo ftpuser userid passwd uid gid homedir shell
    SQLGroupInfo ftpgroup groupname gid members

  </IfModule>

測試設定檔語法是否正確
# proftpd -t
Checking syntax of configuration file
Syntax check complete.

重新啟動 ProFTPd FTP Server
# service proftpd restart
正在關閉 proftpd:                                         [  確定  ]
正在啟動 proftpd:                                         [  確定  ]

進行測試
# lftp -u s0990001 192.168.1.20
密碼:
lftp s0990001@192.168.1.20:~> ls
lftp s0990001@192.168.1.20:/>

在 Log 檔也可以看到相關記錄
# tail -f /var/log/proftpd/proftpd.log
Jan 04 13:35:15 . proftpd[3875] 192.168.1.20 (192.168.1.20[192.168.1.20]): FTP session opened.
Jan 04 05:35:15 . proftpd[3875] 192.168.1.20 (192.168.1.20[192.168.1.20]): Preparing to chroot to directory ‘/home/virtualuser/s0990001’
Jan 04 05:35:15 . proftpd[3875] 192.168.1.20 (192.168.1.20[192.168.1.20]): USER s0990001: Login successful.
Jan 04 05:35:25 . proftpd[3875] 192.168.1.20 (192.168.1.20[192.168.1.20]): FTP session closed.

虛擬使用者的目錄也會自行建立
# ls -ld /home/virtualuser/*
drwx—— 2 virtualuser virtualgrp 4096 2014-01-04 13:33 /home/virtualuser/s0990001
drwx—— 2 virtualuser virtualgrp 4096 2014-01-04 13:35 /home/virtualuser/s0990002

在 CentOS 6.x 安裝 ProFTPd FTP Server

在 CentOS 6.x 上安裝 ProFTPd FTP Server
# yum install proftpd proftpd-ldap proftpd-mysql –enablerepo=epel

啟動 ProFTPd FTP Server
# service proftpd start

設定開機時啟動 ProFTPd FTP Server
# chkconfig –level 3 proftpd on

連線測試
# lftp -u test 192.168.1.20
密碼:
lftp test@192.168.1.20:~> ls
ls: 登入錯誤: 530 Login incorrect.

在 /var/log/proftpd/proftpd.log 中找到登入錯誤的記錄
# grep test /var/log/proftpd/proftpd.log
Jan 03 16:17:39 . proftpd[2441] 192.168.1.9 (192.168.1.20[192.168.1.20]): USER test (Login failed): Incorrect password.

但明明密碼是對的,而且改用 vsFTPd FTP Server 就可以正常登入
# service proftpd stop
正在關閉 proftpd:                                         [  確定  ]
# service vsftpd start
正在啟動 vsftpd 中的 vsftpd:                              [  確定  ]
# lftp -u test 192.168.1.20
密碼:
lftp test@192.168.1.20:~> ls -l
-rw-r–r–    1 0        0             358 Jan 03 08:10 groups.sql
-rw-r–r–    1 0        0             563 Jan 03 08:10 users.sql
[@more@]後來在 CentOS 6.x 如何安裝 Proftpd | Vixual 找到了解決的方式
檢查 /var/log/secure 發現有錯誤的訊息
# grep proftpd /var/log/secure | tail -2
Jan  3 16:10:42  proftpd: PAM unable to dlopen(/lib64/security/pam_stack.so): /lib64/security/pam_stack.so: cannot open shared object file: No such file or directory
Jan  3 16:10:42  proftpd: PAM adding faulty module: /lib64/security/pam_stack.so

解決方式:
先備份原檔
# cp /etc/pam.d/proftpd /etc/pam.d/proftpd_$(date +%F)

修改 /etc/pam.d/proftpd
# vim /etc/pam.d/proftpd

#%PAM-1.0
auth       required     pam_listfile.so item=user sense=deny file=/etc/ftpusers onerr=succeed
auth       required     pam_stack.so service=system-auth
auth       required     pam_shells.so
account    required     pam_stack.so service=system-auth
session    required     pam_stack.so service=system-auth
改成
#%PAM-1.0
auth       required     pam_listfile.so item=user sense=deny file=/etc/ftpusers onerr=succeed
auth       required     pam_shells.so
account    include      password-auth
session    required     pam_loginuid.so

重新啟動 ProFTPd FTP Server
# service proftpd restart

使用者可以正常登入了!
# lftp -u test 192.168.1.20
密碼:
lftp t0880001@192.168.1.20:~> ls -l
drwx——   2 test teacher      4096 Jan  3 08:10 .
drwx——   2 test teacher      4096 Jan  3 08:10 ..
-rw-r–r–   1 test teacher        18 Jul 18 13:19 .bash_logout
-rw-r–r–   1 test teacher       176 Jul 18 13:19 .bash_profile
-rw-r–r–   1 test teacher       124 Jul 18 13:19 .bashrc
-rw-r–r–   1 root     root          358 Jan  3 08:10 groups.sql
-rw-r–r–   1 root     root          563 Jan  3 08:10 users.sql

Moodle 使用 LDAP Server 做帳號認證

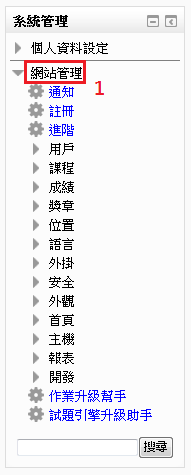
1. 選擇 系統管理的 網站管理
[@more@]

2. 選擇 進階外掛身份認證

3. 選擇 管理身份認證

4. 找到 LDAP 的選項,然後按 啟用圖示

5. 選擇 設定

6. 輸入 主機網址
             可區辨的名稱
             密碼

7. 輸入 用戶類型
            情境

8.選擇 密碼格式

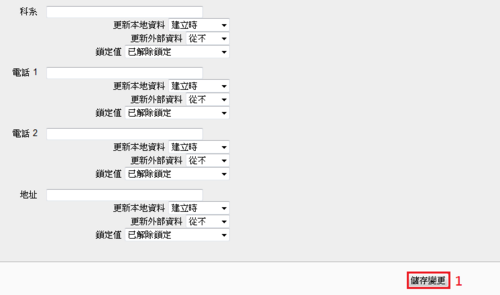
9. 最後 儲存變更

10. 在另外一台電腦,或用不同的瀏覽器,連線到 Moodle,選擇 登入

11. 輸入帳號及密碼後,按 登入

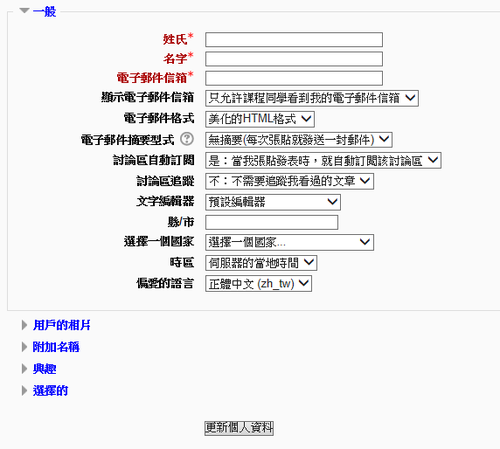
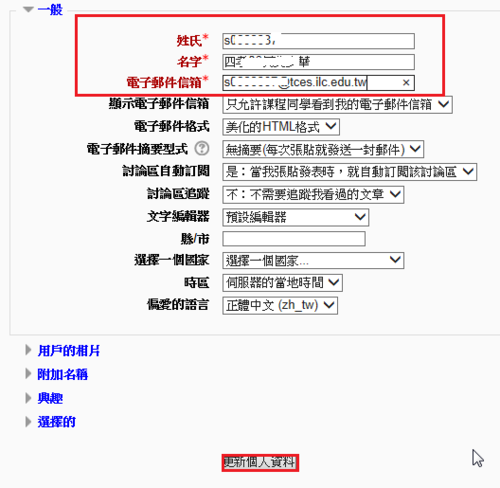
12. 已登入成功,但有些資料須做設定

也可以在 對應資料中直接做對應,這樣使用者第一次登入時,就會自動把資料對應出來

Windows 命令提示字元 find 指令的用法

Windows 命令提示字元中 find 的指令的功能和 Linux 中的 grep 類似,但 find 的功能比起 grep 相差太多,遠遠不及。
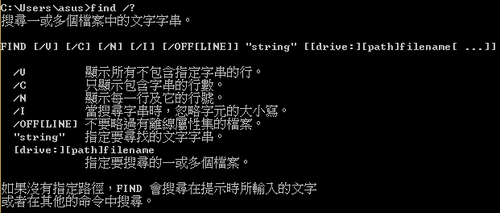
find 指令的用法
find /?
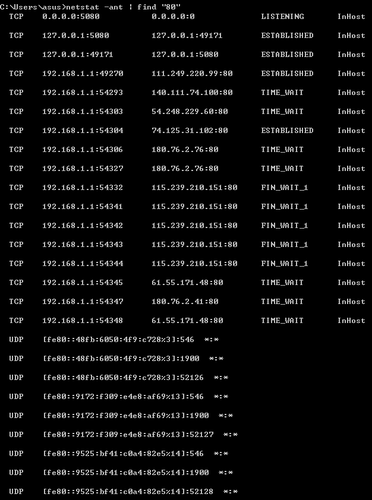
[@more@]列出對 80 埠的連線
netstat -ant | find “:80”

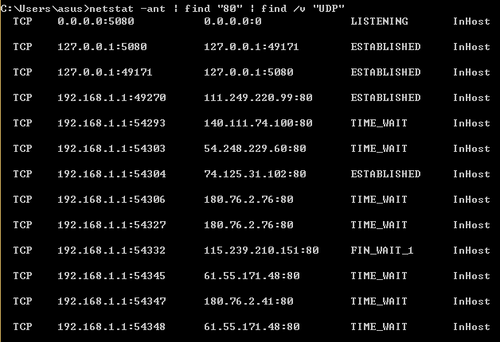
過濾掉 UDP
netstat -ant | find “:80” | find /v “UDP”

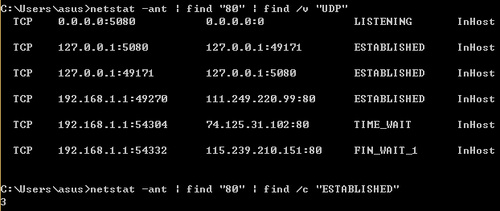
計算出 80 埠連線數並且連線狀態是 ESTABLISHED 的數量
netstat -ant | find “:80” | find /c “ESTABLISHED”

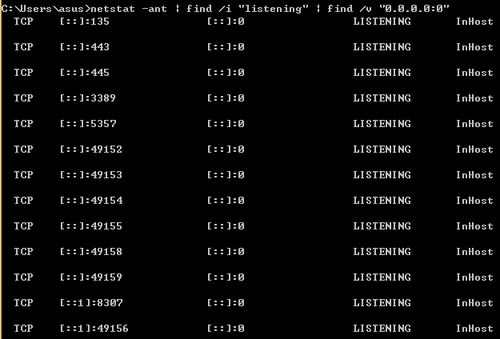
列出主機中有提供服務連線的 Port,不區分大小寫
netstat -ant | find / i “listening” | find /v “0.0.0.0:0”

Pure-FTPd WebUI


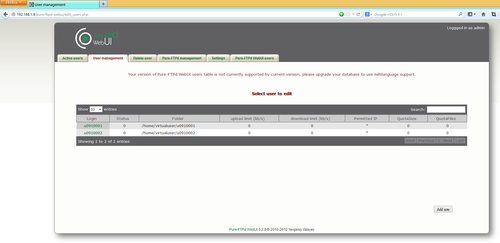
Pure-FTPd WebUI 是一套能利用網頁來管理 PureFTPd FTP Server 和 MySQL Server 虛擬帳號的工具。
Pure-FTPd WebUI 官方網站:http://pure-ftpd-webui.org/
切換目錄
# cd /var/www/html
安裝 git 套件
# yum install git
下載 Pure-FTPd WebUI
# git clone git://github.com/mazay/pure-ftpd-webui.git
Initialized empty Git repository in /var/www/html/pure-ftpd-webui/.git/
remote: Reusing existing pack: 554, done.
Receiving objects: 100% (554/554), 846.22 KiB | 325 KiB/s, done.
remote: Total 554 (delta 0), reused 0 (delta 0)
Resolving deltas: 100% (314/314), done.
[@more@]改變目錄的使用者和群組
# chown -R apache:apache /var/www/html/pure-ftpd-webui

建立資料庫 pureftpdb
# /usr/bin/mysqladmin -u root -p create pureftpdb
設定 pureftpd 擁有 pureftpdb 完整權限及設定密碼
# /usr/bin/mysql -u root -p -e “GRANT ALL PRIVILEGES ON pureftpdb.* TO ‘pureftpd’@’localhost’ IDENTIFIED BY ‘pureftpdpass’;”
檢查是否有設定完成
# /usr/bin/mysql -u root -p -e “SHOW GRANTS FOR pureftpd@localhost;”
Enter password:
+—————————————————————————————————————–+
| Grants for pureftpd@localhost                                                                                   |
+—————————————————————————————————————–+
| GRANT USAGE ON *.* TO ‘pureftpd’@’localhost’ IDENTIFIED BY PASSWORD ‘*F78AF3FDFBCD19918F457A682B481EF35DBF6806’ |
| GRANT ALL PRIVILEGES ON `pureftpdb`.* TO ‘pureftpd’@’localhost’                                                 |
+—————————————————————————————————————–+

匯入 sql 資料表
# /usr/bin/mysql -u root -p pureftpdb < pure-ftpd-webui/INSTALL/pure-ftpd-webui_users-table_0.0.9.sql
# /usr/bin/mysql -u root -p pureftpdb < pure-ftpd-webui/INSTALL/pure-ftpd_users-table_0.0.9.sql

設定管理者 admin / adminpass
# /usr/bin/mysql -u root -p pureftpdb -e “INSERT INTO userlist (user,pass) VALUES (‘admin’,md5(‘adminpass’));”

設定網頁目錄
# vim /etc/httpd/conf.d/pure-ftpd-webui.conf

Alias /pure-ftpd-webui /var/www/html/pure-ftpd-webui <Directory /var/www/html/pure-ftpd-webui> Options +FollowSymLinks AllowOverride None order allow,deny allow from all AddType application/x-httpd-php .php <IfModule mod_php5.c> php_flag magic_quotes_gpc On php_flag short_open_tag On php_flag register_globals On php_flag register_argc_argv On php_flag track_vars On # this setting is necessary for some locales php_value mbstring.func_overload 0 php_value include_path . </IfModule> DirectoryIndex index.php </Directory>

重新啟動瀏覽器
# service httpd restart

打開網頁瀏覽器
http://Server'IP/
pure-ftpd-webui


Pure-FTPd FTP Server 使用 LDAP Server 認證

開啟 PureFTPd FTP Server 的 LDAP  設定
# vim /etc/pure-ftpd/pure-ftpd.conf
# LDAP configuration file (see README.LDAP)
LDAPConfigFile                /etc/pure-ftpd/pureftpd-ldap.conf

修改 /etc/pure-ftpd/pureftpd-ldap.conf 設定
# vim /etc/pure-ftpd/pureftpd-ldap.conf
# Optional : name of the LDAP server. Default : localhost
# LDAP Server IP
LDAPServer 192.168.154.167

# Optional : server port. Default : 389
# LDAP Server 連線 Port
LDAPPort   389

# Mandatory : the base DN to search accounts from. No default.
LDAPBaseDN ou=Student,dc=ldap,dc=tces.ilc.edu.tw

# Optional : who we should bind the server as.
#            Default : binds anonymously or binds as FTP users
LDAPBindDN cn=Manager,dc=ldap,dc=tces.ilc.edu.tw

# Password if we don’t bind anonymously
# This configuration file should be only readable by root
# LDAP 管理者密碼
LDAPBindPW 123456

重新啟動 PureFTPd FTP Server
# service pure-ftpd restart
正在停止 pure-ftpd:                                       [  確定  ]
正在啟動 pure-ftpd:                                       [  確定  ]
[@more@]
要測試的帳號 s0990499 和 s0990999
# cat s0990t.ldif
dn: uid=s0990499,ou=s0990,ou=Student,dc=ldap,dc=tces.ilc.edu.tw
uid: s0990499
cn: 四忠01蔡中火
sn: 四忠01蔡中火
mail: s0990499@tces.ilc.edu.tw
objectClass: person
objectClass: organizationalPerson
objectClass: inetOrgPerson
objectClass: posixAccount
objectClass: top
userPassword: {SSHA}xecUVfAyOlao7udDzLccUvf4fHOonjzN
loginShell: /sbin/nologin
uidNumber: 500
gidNumber: 500
homeDirectory: /home/s0990/s0990499
gecos: 四忠01蔡中火

dn: uid=s0990999,ou=s0990,ou=Student,dc=ldap,dc=tces.ilc.edu.tw
uid: s0990999
cn: 四忠02陳大水
sn: 四忠02陳大水
mail: s0990999@tces.ilc.edu.tw
objectClass: person
objectClass: organizationalPerson
objectClass: inetOrgPerson
objectClass: posixAccount
objectClass: top
userPassword: {SSHA}WqVy40LfOfoRV1KBwlJFPpfGNgnkIbtr
loginShell: /sbin/nologin
uidNumber: 500
gidNumber: 500
homeDirectory: /home/s0990/s0990999
gecos: 四忠02陳大水

匯入 LDAP 資料
# service slapd stop
# /usr/sbin/slapadd -l s0990t.ldif
# chown -R ldap:ldap /var/lib/ldap
# service slapd start

搜尋 LDAP 資料庫是否有加入的資料
# ldapsearch -x -b “ou=Student,dc=ldap,dc=tces.ilc.edu.tw” uid=s0990999 | php /root/utf8ldif.php

# extended LDIF
#
# LDAPv3
# base <ou=Student,dc=ldap,dc=tces.ilc.edu.tw> with scope subtree
# filter: uid=s0990999
# requesting: ALL
#

# s0990999, s0990, Student, ldap.tces.ilc.edu.tw
dn: uid=s0990999,ou=s0990,ou=Student,dc=ldap,dc=tces.ilc.edu.tw
uid: s0990999
cn: 四忠02陳大水
sn: 四忠02陳大水
mail: s0990999@tces.ilc.edu.tw
objectClass: person
objectClass: organizationalPerson
objectClass: inetOrgPerson
objectClass: posixAccount
objectClass: top
userPassword: {SSHA}WqVy40LfOfoRV1KBwlJFPpfGNgnkIbtr
loginShell: /sbin/nologin
uidNumber: 500
gidNumber: 500
homeDirectory: /home/s0990/s0990999
gecos: 四忠02陳大水

# search result
search: 2
result: 0 Success

# numResponses: 2
# numEntries: 1

建立使用者虛擬目錄
# vim mkuserdir.awk
# 建立使用者目錄
{print “mkdir -p /home/”$6″/”$4 }
# 更改檔案目錄的所屬擁有者及群組
{print “chown -R  500:500  /home/”$6″/”$4″ ” }

測試
# awk -f mkuserdir.awk 102_class41.lst
mkdir -p /home/s0990/s0990499
chown -R  500:500  /home/s0990/s0990499
mkdir -p /home/s0990/s0990999
chown -R  500:500  /home/s0990/s0990999

使用方式
# awk -f mkuserdir.awk 102_class41.lst  | sh

測試
# lftp -u s0990999 localhost
密碼:
lftp s0990999@localhost:~> ls -l
drwxr-xr-x    2 500        virtualgrp       4096 Jan  2 10:58 .
drwxr-xr-x    2 500        virtualgrp       4096 Jan  2 10:58 ..
lftp s0990999@localhost:/>

如果系統有使用 SELinux,要記得把家目錄的功能打開
# setsebool -P ftp_home_dir 1
# setsebool -P allow_ftpd_full_access=1