使用 TLS/SSL 的方式查詢做 LDAP 資料的查詢

在本機上查詢
-ZZ TLS 方式查詢
-x 使用 SASL 認證
ldapsearch -x -ZZ -h localhost -b “ou=Teacher,dc=ldap,dc=tces.ilc.edu.tw” uid=t850008
# extended LDIF
#
# LDAPv3
# base <ou=Teacher,dc=ldap,dc=tces.ilc.edu.tw> with scope subtree
# filter: uid=t850008
# requesting: ALL
#

# t850008, Teacher, ldap.tces.ilc.edu.tw
dn: uid=t850008,ou=Teacher,dc=ldap,dc=tces.ilc.edu.tw
uid: t850008
cn:: 5p6X5pit5ZCN
objectClass: account
objectClass: posixAccount
objectClass: top
userPassword:: e2Nye
loginShell: /bin/bash
uidNumber: 953
gidNumber: 500
homeDirectory: /home/t850008

# search result
search: 3
result: 0 Success

# numResponses: 2
# numEntries: 1
[@more@]以 SSL 方式查詢
# ldapsearch -x -H ldaps://localhost -b “ou=Teacher,dc=ldap,dc=tces.ilc.edu.tw” uid=t850008
# extended LDIF
#
# LDAPv3
# base <ou=Teacher,dc=ldap,dc=tces.ilc.edu.tw> with scope subtree
# filter: uid=t850008
# requesting: ALL
#

# t850008, Teacher, ldap.tces.ilc.edu.tw
dn: uid=t850008,ou=Teacher,dc=ldap,dc=tces.ilc.edu.tw
uid: t850008
cn:: 5p6X5pit5ZCN
objectClass: account
objectClass: posixAccount
objectClass: top
userPassword:: e2Nye
loginShell: /bin/bash
uidNumber: 953
gidNumber: 500
homeDirectory: /home/t850008

# search result
search: 2
result: 0 Success

# numResponses: 2
# numEntries: 1

啟用 Open LDAP Server 加密傳輸

為了安全的因素,所以啟用 Open LDAP Server 加密傳輸,讓資料在傳輸時能更加的安全。
文章內容參考 八克里: CENTOS 6 LDAP server設定 – 轉移使用者帳號資訊到 LDAP
切換目錄
# cd /etc/pki/tls/certs
刪除原有的憑證
# rm -rf slapd.pem
產生新的憑證
# make slapd.pem
更改檔案權限
# chmod 640 slapd.pem
更改檔案擁有的使用者及群組
# chown ldap:ldap slapd.pem
將 slapd.pem 連結到 /etc/openldap/cacerts 目錄下提供憑證認證使用
# ln -s /etc/pki/tls/certs/slapd.pem /etc/openldap/certs/slapd.pem
[@more@]修改系統的啟動設定檔,開啟 LDAPS 的功能
# vim /etc/sysconfig/ldap

SLAPD_LDAPS=yes

修改 /etc/openldap/slapd.conf 設定檔,加入憑證路徑
# vim /etc/openldap/slapd.conf

取消註解以下內容:
TLSCACertificateFile /etc/pki/tls/certs/ca-bundle.crt
TLSCertificateFile /etc/pki/tls/certs/slapd.pem
TLSCertificateKeyFile /etc/pki/tls/certs/slapd.pem

修改 /etc/openldap.ldap.conf 設定檔
# vim /etc/openldap/ldap.conf

#加入以下內容:
TLS_CACERTDIR /etc/openldap/cacerts
TLS_REQCERT never

重新初始化 Open LDAP Server
# rm -rf /etc/openldap/slapd.d/*
# slaptest -f /etc/openldap/slapd.conf -F /etc/openldap/slapd.d
# chown -R ldap:ldap /etc/openldap/slapd.d
# service slapd restart

檢查是否有啟動 636 Port
# netstat -ntulp | egrep ‘389|636’
tcp 0 0 0.0.0.0:636 0.0.0.0:* LISTEN 38883/slapd
tcp 0 0 0.0.0.0:389 0.0.0.0:* LISTEN 38883/slapd
tcp 0 0 :::636 :::* LISTEN 38883/slapd
tcp 0 0 :::389 :::* LISTEN 38883/slapd

設定防火牆
# iptables -A INPUT -p tcp -s 192.168.1.0/24 -m state –state NEW –dport 389 -j ACCEPT
# iptables -A INPUT -p tcp -s 192.168.1.0/24 -m state –state NEW –dport 636 -j ACCEPT

# iptables -A INPUT -p tcp -s 192.168.1.0/24 -m state –state NEW -m multiport –dports 389,636 -j ACCEPT

將 LDAP Server 的 log 記錄到 Log Server

底下文章參考 【Linux】在 CentOS 上安裝 LDAP Server 2.4 @ 有為青年生活札記 :: 痞客邦 PIXNET ::

1. 修改設定檔
# vim /etc/openldap/slapd.conf
loglevel        256
logfile         /var/log/slapd/ldap.log

2. 設定將 LDAP 的 log 寫入 /var/log/slapd
# vim /etc/rsyslog.conf
加入下面的設定
# Save LDAP Server log to ldap.log
local4.*                                                /var/log/slapd/ldap.log

3. 重新啟動 Log Server 和 LDAP Server
# service rsyslog restart
正在關閉系統記錄器:                                       [  確定  ]
正在啟動系統記錄器:                                       [  確定  ]
# service slapd restart
正在停止 slapd:                                           [  確定  ]
正在啟動 slapd:                                           [  確定  ]

LDAP Server 的基本操作

搜尋
-x:採用簡易認證
-b:指定搜尋起點
uid=:指定查詢條件

列出 ou=Teacher 的所有使用者[@more@]
# /usr/bin/ldapsearch -x -b “ou=Teacher,dc=ldap,dc=tces.ilc.edu.tw” uid=*
# extended LDIF
#
# LDAPv3
# base <ou=Teacher,dc=ldap,dc=tces.ilc.edu.tw> with scope subtree
# filter: uid=*
# requesting: ALL
#

# t850008, Teacher, ldap.tces.ilc.edu.tw
dn: uid=t850008,ou=Teacher,dc=ldap,dc=tces.ilc.edu.tw
uid: t850008
cn:: 5p6X5pit5ZCN
objectClass: account
objectClass: posixAccount
objectClass: top
userPassword:: e2
loginShell: /bin/bash
uidNumber: 953
gidNumber: 500
homeDirectory: /home/t850008

# search result
search: 2
result: 0 Success

# numResponses: 2
# numEntries: 1
列出單一使用者
# /usr/bin/ldapsearch -x -b “ou=Student,dc=ldap,dc=tces.ilc.edu.tw” uid=s0990001
# extended LDIF
#
# LDAPv3
# base <ou=Student,dc=ldap,dc=tces.ilc.edu.tw> with scope subtree
# filter: uid=s0990001
# requesting: ALL
#

# s0990001, Student, ldap.tces.ilc.edu.tw
dn: uid=s0990001,ou=Student,dc=ldap,dc=tces.ilc.edu.tw
uid: s0990001
cn:: 5Zub5oSbMTLnlLfmnpfls7vnkYs=
objectClass: account
objectClass: posixAccount
objectClass: top
userPassword:: e2
loginShell: /sbin/nologin
uidNumber: 1390
gidNumber: 505
homeDirectory: /home/s0990/s0990001

# search result
search: 2
result: 0 Success

# numResponses: 2
# numEntries: 1
刪除使用者
刪除 s0990001 使用者
# /usr/bin/ldapdelete -D “cn=Manager,dc=ldap,dc=tces.ilc.edu.tw” -W “uid=s0990001,ou=Student,dc=ldap,dc=tces.ilc.edu.tw”

更改密碼
改變使用者密碼,將 s0980005 的使用者密碼改成 123456
# /usr/bin/ldappasswd -s 123456 -D “cn=Manager,dc=ldap,dc=tces.ilc.edu.tw” -W -x “uid=s0980005,ou=Student,dc=ldap,dc=tces.ilc.edu.tw”

原本的使用者密碼
# /usr/bin/ldapsearch -x -b “ou=Student,dc=ldap,dc=tces.ilc.edu.tw” uid=s0980005 | grep userPassword
userPassword:: e2NyeXB0fSQ2JGJWVnYyOUZnaHUvJFNzaTBnMmg5VEhXakd3TWI0YWZIelVpc3B

改變後的使用者密碼
# /usr/bin/ldapsearch -x -b “ou=Student,dc=ldap,dc=tces.ilc.edu.tw” uid=s0980005 | grep userPassword
userPassword:: e1NTSEF9Y0U4Q3o1b0JYV1hTbFBpQnpJWEhiaTBzSUY5L1U0UFo=

匯入 LDIF 格式檔的方式

匯入 LDIF 格式的方式,可以使用 ldapadd 和 slapadd 這二種方式。
1. 採用 slapadd 的方式
# /usr/sbin/slapadd -l /root/ldif/s0980.ldif

-l 後面接的是 ldif 檔的位置[@more@]2. 採用 ldapadd 的方式
# /usr/bin/ldapadd -x -D “cn=Manager,dc=ldap,dc=tces.ilc.edu.tw” -W -f /root/ldif/s0980.passwd.ldif

-x:使用簡易認證來存取資料庫,不採用 SASL 認證
-f:指定要加入物件的資料庫設定檔
-D:指定在 /etc/openldap/slapd.conf 設定檔中,rootdn 項目所設定的 LDAP 伺服器管理者的 DN
-W:指定採詢問方式要求輸入 /etc/openldap/slapd.conf 設定檔中,rootpw 項目所設定的 rootdn 密碼,也可以直接指定 -w password

另外一個差別,slapadd 的方式,執行時要先把 LDAP Server 關閉,匯入完畢後,要更改權限,再啟動 LDAP Server
# service slapd stop
# /usr/sbin/slapadd -l /root/ldif/s0980.ldif
# chown -R ldap:ldap /var/lib/ldap
# service slapd start

而 ldapadd 則不用做上面的處理

匯入 LDIF 格式檔時出現 ldap_bind: Invalid credentials (49) 的錯誤訊息

之前在匯入 LDIF 格式檔時,都是使用 slapadd 的方式,後來改用 ldapadd 的方式,但却一直出現 ldap_bind: Invalid credentials (49) 的錯誤訊息。
# ldapadd -x -D “cn=Manager,dc=ldap,dc=tces.ilc.edu.tw” -W -f /root/ldif/s0980.passwd.ldif
Enter LDAP Password:
ldap_bind: Invalid credentials (49)

在網路上搜尋了一下,有人說是密碼打錯了,可是我確認沒有打錯,重新設定密碼,卻還是一樣。[@more@]後來在這裡找到答案
原來是我在 /etc/openldap/slapd.conf 中關於 rootpw 的設定有錯誤
# vim /etc/openldap/slapd.conf
# rootpw                {crypt}ijFYNcSNctBYg
 rootpw  {SSHA}x

rootpw 前面多了一個空格,清除之後,就正常了!

解決 LDIF 格式檔中有中文無法匯入的問題

經過 utf8 轉換過的 LDIF 格式檔,在匯入時會出現下面的錯誤的訊息
# slapadd -l /root/ldif/t850008.ldif
The first database does not allow slapadd; using the first available one (2)
str2entry: invalid value for attributeType gecos #0 (syntax 1.3.6.1.4.1.1466.115.121.1.26)
slapadd: could not parse entry (line=1)
_#################### 100.00% eta   none elapsed            none fast!
Closing DB…

看起來似乎是 gecos 的問題[@more@]在網路上搜尋了一下,似乎預設的 LDAP schema 在 gecos 的部分不支援中文
解決方法:
1. 先備份原檔 /etc/openldap/schema/nis.schema
# cp /etc/openldap/schema/nis.schema /etc/openldap/schema/nis.schema.bak

2. 修改設定檔 /etc/openldap/schema/nis.schema
# vim /etc/openldap/schema/nis.schema

attributetype ( 1.3.6.1.1.1.1.2 NAME ‘gecos’
        DESC ‘The GECOS field; the common name’
        EQUALITY caseIgnoreIA5Match
        SUBSTR caseIgnoreIA5SubstringsMatch
        SYNTAX 1.3.6.1.4.1.1466.115.121.1.26 SINGLE-VALUE )
修改成
attributetype ( 1.3.6.1.1.1.1.2 NAME ‘gecos’
        DESC ‘The GECOS field; the common name’
        EQUALITY caseIgnoreMatch
        SUBSTR caseIgnoreSubstringsMatch
        SYNTAX 1.3.6.1.4.1.1466.115.121.1.15 SINGLE-VALUE )

3. 重新匯入
# slapadd -l /root/ldif/t850008.ldif
The first database does not allow slapadd; using the first available one (2)
_#################### 100.00% eta   none elapsed            none fast!
Closing DB…

4. 如果還是不行的話,就只要把 LDIF 中的 gecos 那一行刪除即可!

LDIF 格式檔中文亂碼的問題

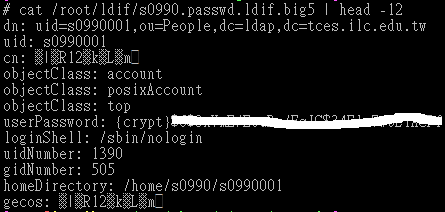
使用 migrationtools 工具來產生 LDIF 格式檔時,如果原來的帳號檔含有中文資料時,匯出時會變成亂碼
# cat /root/ldif/s0990.passwd
s0990001:x:1390:505:四愛12林○瑋:/home/s0990/s0990001:/sbin/nologin
s0990002:x:1391:505:四愛13林○豪:/home/s0990/s0990002:/sbin/nologin

# cat /root/ldif/s0990.passwd.ldif.big5 | head -12
[@more@]目前想到的解決方式
1. 先轉換成 big5 格式
# piconv -f utf8 -t big5 /root/ldif/s0990.passwd > /root/ldif/s0990.passwd.big5

2.  利用 migrationtools 進行轉換
# ./migrate_passwd.pl /root/ldif/s0090.passwd > /root/ldif/s0990.ldif.big5

3. 再轉換成 uft8 格式
# piconv -f big5 -t utf8 /root/ldif/s0990.ldif.big5 > /root/ldif/s0990.ldif

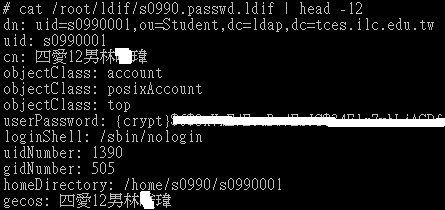
4. 檢視成果
# cat /root/ldif/s0990.passwd.ldif | head -12

使用 migrationtools 工具來產生 LDIF 格式檔

因為 LDIF 格式有一定的格式,如果完全使用手動來建立,是一件很累的工作,尤其是要處理的帳號很多時,這時可以利用 migrationtools 工具來協助產生 LDIF 格式檔,再視情況做修改。
1. 安裝 migrationtools 工具
# yum install migrationtools
安裝完成之後,可以在 /usr/share/migrationtools 目錄下找到很多以 .sh .pl 的程序檔
[root@localhost:/usr/share/migrationtools]
# ls
migrate_aliases.pl* migrate_all_nis_online.sh* migrate_all_online.sh* migrate_fstab.pl* migrate_netgroup_byuser.pl* migrate_profile.pl* migrate_slapd_conf.pl*
migrate_all_netinfo_offline.sh* migrate_all_nisplus_offline.sh* migrate_automount.pl* migrate_group.pl* migrate_netgroup.pl* migrate_protocols.pl*
migrate_all_netinfo_online.sh* migrate_all_nisplus_online.sh* migrate_base.pl* migrate_hosts.pl* migrate_networks.pl* migrate_rpc.pl*
migrate_all_nis_offline.sh* migrate_all_offline.sh* migrate_common.ph migrate_netgroup_byhost.pl* migrate_passwd.pl* migrate_services.pl* [@more@]2. 修改 /usr/share/migrationtools/migrate_common.ph
# vim /usr/share/migrationtools/migrate_common.ph
修改下面的值
# Default DNS domain
$DEFAULT_MAIL_DOMAIN = ” ilc.edu.tw “;

# Default base
$DEFAULT_BASE = ” dc=ldap,dc=tces.ilc.edu.tw “;

$EXTENDED_SCHEMA = 1;

3. 建立存放 ldif 檔案的目錄
# mkdir /root/ldif

4. 從系統帳號中取出要的資料
# grep t850008 /etc/passwd > /root/ldif/t850008.passwd
# grep ^s0990 /etc/passwd | sort > /root/s0990.passwd
# cat /root/ldif/s0990.passwd | head -2
s0990001:x:1390:505:四愛12林○瑋:/home/s0990/s0990001:/sbin/nologin
s0990002:x:1391:505:四愛13林○豪:/home/s0990/s0990002:/sbin/nologin

5. 從系統群組中取出要的資料
# egrep ‘teacher|s0990’ /etc/group > /root/ldif/group
# cat /root/ldif/group
teacher:x:500:
s0990:x:505:

6. 使用 migrationtools 工具
# cd /usr/share/migrationtools
# ./migrate_base.pl > /root/ldif/base.ldif
# ./migrate_passwd.pl /root/ldif/t850008.passwd > /root/ldif/t850008.ldif
# ./migrate_passwd.pl /root/ldif/s0090.passwd > /root/ldif/s0990.ldif
# ./migrate_group.pl /root/ldif/group > /root/ldif/group.ldif

7. 開始匯入
# service slapd stop
# slapadd -l /root/ldif/base.ldif
The first database does not allow slapadd; using the first available one (2)
_#################### 100.00% eta   none elapsed            none fast!
Closing DB…
# slapadd -l /root/ldif/t850008.ldif
# slapadd -l /root/ldif/s0990.ldif
# slapadd -l /root/ldif/group.ldif

8. 啟動 LDAP Server
# chown -R ldap:ldap /var/lib/ldap
# service slapd start

LDIF – LDAP Server 格式檔

LDIF 是 LDAP Data Interchange Format 的縮寫,是 LDAP Server 明文的格式檔。
底下是一個例子
#存放帳號資料之 Teacher 物件的 DN
dn: ou=Teacher,dc=ldap,dc=tces.ilc.edu.tw
#物件類別為 organizationalUnit 及 top
objectClass: top
objectClass: organizationalUnit
#指定必要屬性 ou 為 Teacher
ou: Teacher

# 後面接的是註解
: 左邊為屬性,右邊為屬性值,: 的右邊要空一格
如果有跨列時,不使用一般使用的倒斜線  來接續上一行,只要在下一行開加一個空格即可!

也因為 LDIF 是採用明文的格式檔,所以可以直接使用 vim 等編輯器來處理,也可以使用 awk / grep / sed 來做大批匯入 /  匯出等處理。